www.acti.com
Installation Guide
3
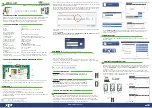
Port Pins
Port
Pin#
Definition & Color
P1
(Power)
1
12V POWER SUPPLY
2
12V POWER GND
P2
(Digital I/O)
1
Brown
12V DC OUT
2
Black
12V DC OUT
3
Pink
DOOR SENSOR INPUT
4
Purple
EXIT SWITCH INPUT
5
White
RELAY 1 COM
6
Gray
RELAY 2 COM
7
Green
RELAY 1 NC
8
Yellow
RELAY 2 NC
9
Blue
RELAY 1 NO
10
Orange
RELAY 2 NO
P3 (Communication)
1
Red
12V Power OUT
2
Black
12V Power OUT GND
3
Blue
Wiegand IN Data 0
4
Gray
Wiegand IN Data 1
5
Green
Wiegand OUT Data 0
6
White
Wiegand OUT Data 1
7
Orange
RS232 Tx
8
Yellow
RS232 Rx
P4
(Network)
Standard Gigabit Ethernet
DC 12V Power,
2Amp
Right: 12V DC
Left: Ground