background image

www.acti.com


CONFIGURATION GUIDE


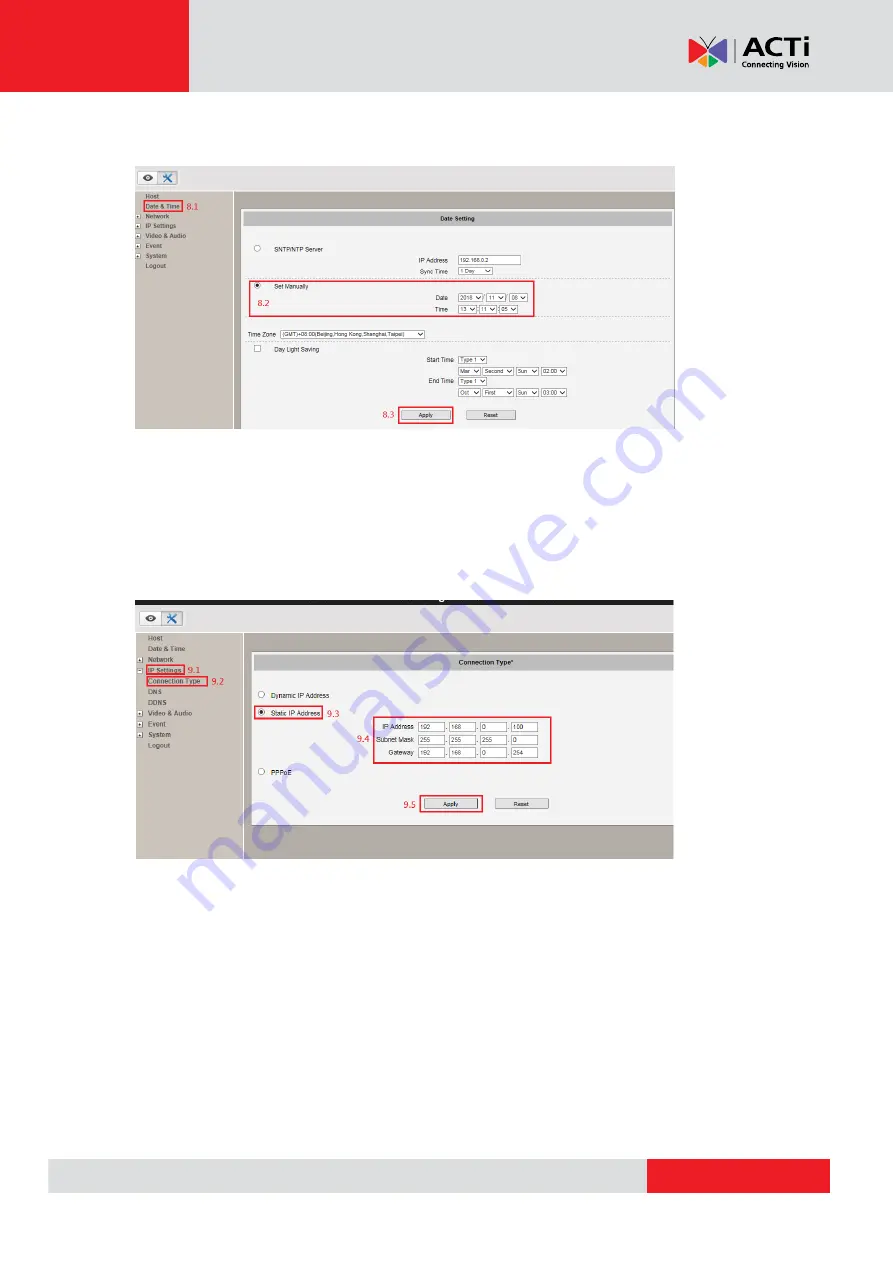
8. Adjust the camera to the correct time according to the figure below. 


8.1 

Click “Date & Time” 

8.2. Click “Set Manually” and then adjust the time 

8.3 Click “Apply” to save. 

9. Please set the network parameters according to the following figure. 


9.1. 

Click “IP Setting” 

9.2. Click “Connection Type” 

9.3. Click “Static IP Address” 

9.4. Configure the related IP parameters 

9.5. Click “Apply” to save the settings. 


Summary of Contents for Q51

Page 1: ...Q51 Configuration Guide with RAS 2019 05 28...

Page 2: ...IP Utility on the desktop 2 Find the Q51 camera you would like to install 3 Open IE browser Please be sure to use IE browser 4 Enter the IP address of Q51 to connect by using IE browser 5 Enter the ac...

Page 3: ...he camera icon to take a snapshot of the camera view name the picture file as eMap and save it on the desktop Note This step will be used in Part two Step 5 Heat Map Increase eMap settings 7 Click on...

Page 4: ...Click Date Time 8 2 Click Set Manually and then adjust the time 8 3 Click Apply to save 9 Please set the network parameters according to the following figure 9 1 Click IP Setting 9 2 Click Connection...

Page 5: ...o 10 3 Click Reporting Server 10 4 Configure the related server parameters Please follow the example shown below Server 1 Please tick Network Address Please enter the IP address set by the installed S...

Page 6: ...the store name Ex ACTi Note This will be used in Part two Settings of adding device Write down the name you have set on a piece of paper 11 3 Store Please fill in the installation position of the Came...

Page 7: ...e 12 1 Click Intelligent video 12 2 Click Heatmap on the setting page 12 3 After entering the setting page click Setup to start 12 4 Draw the analysis range as shown in the following figure you can dr...

Page 8: ...click Get to confirm the screenshot of the live environment 12 6 Refer to the illustration and the following text to set 1 Check Enabled 2 Active on Tick all 3 Start Time 00 00 4 End Time 24 00 5 Rep...

Page 9: ...IGURATION GUIDE 9 13 Please set the HeatMap parameters according to the following figure 13 1 Click Intelligent video 13 2 Click Dwell time on the setting page 13 3 After entering the setting page cli...

Page 10: ...oes not need to be detected please try to avoid the light or screen 13 5 Click Setup then click Get to confirm the screenshot of the live environment 13 6 Refer to the illustration and the following t...

Page 11: ...page Using Google chrome browser http localhost MAS_RetailPackage Setting mgbmanagement aspx 2 Sign in RAS admin 123456 3 Settings of adding device 3 1Click Overview Setting MGB Server 3 2Click the sa...

Page 12: ...www acti com CONFIGURATION GUIDE 12 3 4Choose Q51 for the Device Type Please refer to the picture below...

Page 13: ...ep it blank Account admin Password 123456 3 6 Click Save 3 7 Be sure all the devices have been set properly then click Lock Click Lock Save If there are still other devices that need to be added excep...

Page 14: ...d set the location click sign 5 Bussiness Hour Confirm with the customer and set the store opening hours 6 Enter Customer Number 7 Select HeatMapDwell Device same as the device we mentioned above 8 Pr...

Page 15: ...re is a need to adjust please contact ACTi customer service to unlock 4 Permission 1 Click Setting 2 Click UserManagement 3 Click Add a User 4 Account Name Fill in the login account 5 Email Fill in th...

Page 16: ...Increase eMap settings 1 Click Setting Heat Map 2 Click Add eMap 3 Click Upload eMap 4 Click the camera icon to open the picture you saved in Part one 5 Click Open file 6 Click Save 7 Drag Q51 to the...

Page 17: ...Copyright 2019 ACTi Corporation All Rights Reserved 7F No 1 Alley 20 Lane 407 Sec 2 Ti Ding Blvd Neihu District Taipei Taiwan 114 R O C TEL 886 2 2656 2588 FAX 886 2 2656 2599 Email sales acti com...

Reviews: