


E53 Hardware User’s Manual
Product Specification
E53
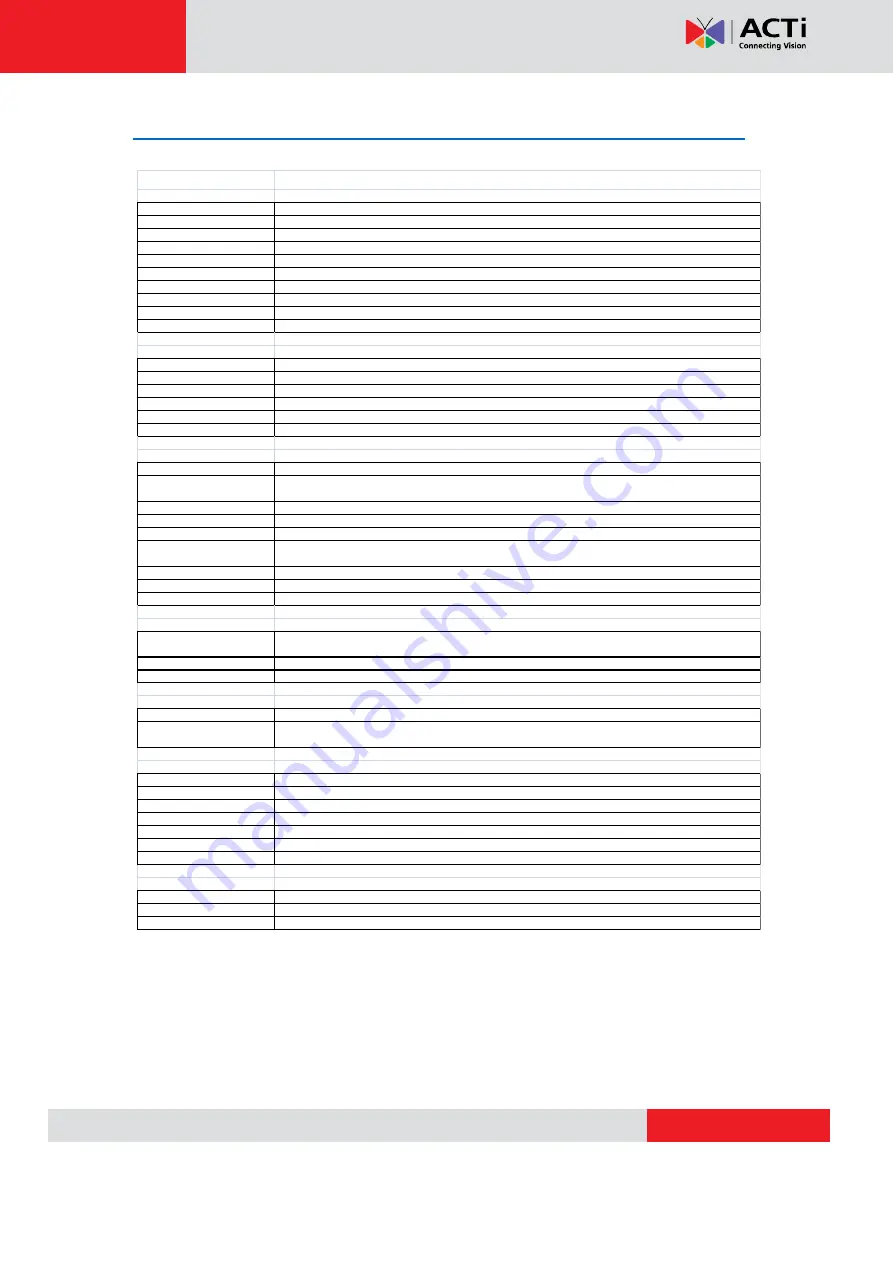
• Device
Device Type
Fixed Indoor Dome Camera
Image Sensor
Progressive Scan CMOS
Day / Night
Yes
Minimum Illumination
Color: 0.1 lux at F1.8 (30 IRE, 2400°K); B/W: 0 lux (IR LED on)
Color to B/W switch
ISP based switch, configurable
Mechanical IR Cut Filter
Yes
IR Sensitivity Range
700~1100nm
IR LED
IR LED x 16 (850nm)
IR Working Distance
15 m (0 lux, 30 IRE, Max exposure gain)
Electronic Shutter
1/5 - 1/2,000 sec (Manual / Auto mode)
• Lens
Focal Length / Aperture
Fixed focal, f3.6 mm / F1.8
Iris
Fixed iris
Focus
Fixed focus
Mount Type
Board Mount
Horizontal Viewing Angle
72°
Viewing Angle Adjustment
Pan: 0° - 330°; Tilt: 20° - 90°
• Video
Compression
H.264 HP, MJPEG
Maximum Frame Rate
vs. Resolution
15 fps at 2048x1536; 30 fps at 1920 x 1080 (Full HD 1080p);
30 fps at 1280 x 720 (HD 720p); 30 fps at 640 x 480 (VGA)
Multi-Streaming
Simultaneous dual streams based on two configurations
Bit Rate
28 Kbps - 6 Mbps (per stream)
Bit Rate Mode
Constant, Variable
Image Enhancement
Basic WDR; White balance: automatic, hold, and manual;
Brightness; Contrast;Auto gain control; Digital noise reduction; Flickerless
Privacy Mask
4 configurable regions
Text Overlay
User defined text on video
Image Orientation
Image flip and mirror
• Network
Protocol & Service
TCP, UDP, HTTP, HTTPS, DHCP, PPPoE, RTP, RTSP, IPv6, DNS, DDNS, NTP, ICMP, ARP, IGMP, SMTP, FTP,
UPnP, SNMP, Bonjour
Ethernet Port
1, Ethernet (10/100 Base-T), RJ-45 connector
Security
IP address filtering; HTTPS encryption; Password protected user levels; IEEE 802.1X network access control
• Alarm
Alarm Trigger
Video motion detection (3 regions)
Alarm Response
Notify control center; Change camera settings; Command other devices;
E-mail notification with snapshots; Upload video, snapshot to FTP server
• General
Power Source / Consumption
PoE Class 2 (IEEE802.3af) / 6.02 W (IR on)
Weight
292 g (0.64 lb)
Dimensions (Φ x H)
128 mm x 99 mm (5.12" x 3.90")
Mount Type
Surface, Pendant, Wall, Corner, Pole, Flush
Operating Temperature
-10 °C ~ 50 °C (14 °F ~ 122 °F)
Operating Humidity
10% ~ 85% RH
Approvals
CE, FCC
• Integration
Unified Solution
Fully compatible with ACTi software
ISV Integration
Software Development Kit (SDK) available; ONVIF compliant
Firmware Access Browser
Microsoft Internet Explorer 6.0 or newer


