background image

www.acti.com


Hardware Manual 


13 

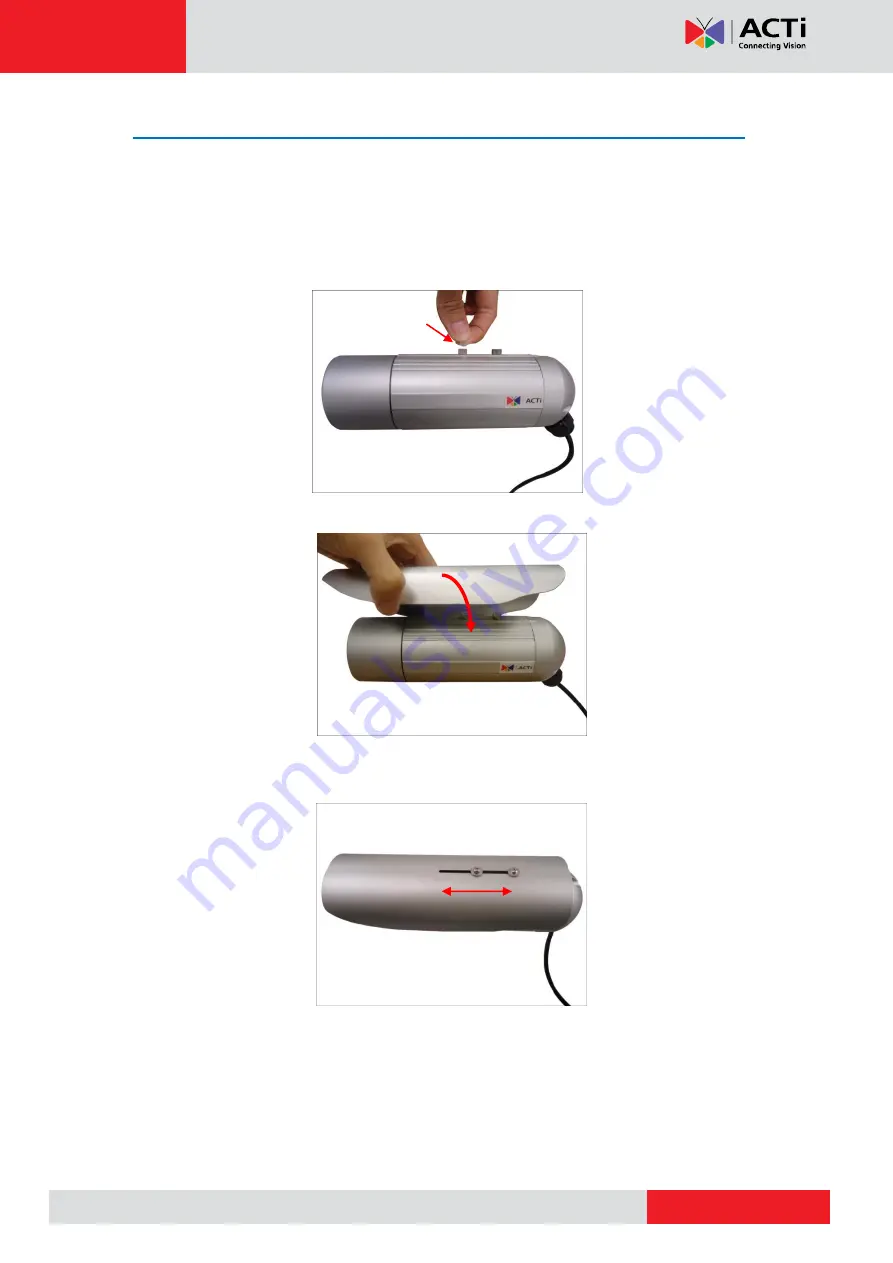
Step 2: Attach the Sunshield 

The use of sunshield is optional if the camera will be installed indoors. However, if the camera 

will be installed outdoors, attach the sunshield to protect the lens from all types of weather and 

lighting conditions. 


1.  Attach the supplied washers to the screws. 


2.  Attach the sunshield then loosely secure it with the supplied screws. 


3. 

Slide to adjust the sunshield to cover the lens as far as possible but out of the camera’s 

live view. 


4.  Tighten the screws to fix the position of the sunshield. 


Summary of Contents for D41A

Page 1: ...Bullet Camera Series Hardware Manual D41A D42A E41B E42B E43B E47 Ver 2017 06 20...

Page 2: ...stall the Camera 14 Step 4 Waterproof and Connect the Cable 15 How to Use the Cable Gland 16 How to Use the Conduit Gland 20 Step 5 Connect the Cable 24 Step 6 Access the Camera Live View 24 Other Con...

Page 3: ...www acti com Hardware Manual 3 Accessing the Camera 34 Configure the IP Addresses 34 Using DHCP Server to Assign IP Addresses 34 Using the Default Camera IP Address 36 Access the Camera 38...

Page 4: ...attempt to service this video device yourself as opening or removing covers may expose you to dangerous voltage or other hazards Refer all servicing to qualified service personnel Trademarks All names...

Page 5: ...urning the equipment off and on the user is encouraged to try to correct the interference by one or more of the following measures Reorient or relocate the receiving antenna Increase the separation be...

Page 6: ...this video product from the power supply immediately and refer servicing to qualified service personnel under the following conditions 1 When the power supply cord or plug is damaged 2 If liquid has b...

Page 7: ...aptive IR Vari focal lens D42A 3MP Bullet with D N Adaptive IR Vari focal lens E41B 1MP Bullet with D N Adaptive IR Basic WDR Vari focal lens E42B 3MP Bullet with D N Adaptive IR Basic WDR Vari focal...

Page 8: ...ww acti com Hardware Manual 8 Package Contents Camera Conduit Gland Cable Gland Washer x 2 Mounting Screw Kit Sunshield Screw Kit Bracket Bracket Plate Sunshield Warranty Card Quick Installation Guide...

Page 9: ...ee How to Reset the Camera on page 33 3 Power LED The Power LED lights up when the camera is connected to the power source and goes off once the camera boot up process is complete NOTE For typical use...

Page 10: ...put devices such as an alarm trigger panic button etc Digital Input DI and Digital Output DO devices are used in applications like motion detection event triggering alarm notifications etc See How to...

Page 11: ...e with the camera Mount Types Accessories Corner Mount Suitable when mounting the camera on a corner wall PMAX 1107 PMAX 0402 Pole Mount Suitable when mounting the camera on a pole PMAX 1107 PMAX 0503...

Page 12: ...the location of the three 3 screw holes using the bracket plate included in the package NOTE Depending on the surface where you will install the camera it may be necessary to drill the holes and use t...

Page 13: ...utdoors attach the sunshield to protect the lens from all types of weather and lighting conditions 1 Attach the supplied washers to the screws 2 Attach the sunshield then loosely secure it with the su...

Page 14: ...y card to the camera See How to Insert the Memory Card on page 30 for more information 2 Depending on how you want to install the camera attach the camera to the bracket through one of the two 2 holes...

Page 15: ...ion there are two waterproofing methods Bundled Accessory Description Cable Gland Use this solution when connecting an Exterior grade Ethernet cable between the camera and a Power over Ethernet PoE sw...

Page 16: ...e connections see related installation procedures for details Before connection prepare the following materials Cable Gland included in the camera package Exterior Grade Ethernet Cable not included in...

Page 17: ...Insert the clamping nut into the Ethernet cable 3 Insert the sealing insert with claw 4 Attach one 1 supplied rubber ring on the gland body smooth end NOTE Make sure the rubber ring is completely ali...

Page 18: ...rnet port of the camera IMPORTANT Make sure the rubber ring is completely aligned and flat on the gland body to avoid possible water leakage 6 Connect the Ethernet cable connector to the pigtail conne...

Page 19: ...www acti com Hardware Manual 19 8 Attach the clamping nut to the gland body Make sure the clamping nut is tightly secured and the sealing rubber is squeezed in to avoid water leakage...

Page 20: ...is not available Before connection prepare the following materials Conduit Gland included in the camera package Flexible Conduit 1 2 Trade size not included in the package NOTE Not included in the pa...

Page 21: ...of the cable outside the flex conduit 3 Insert the clamping nut through the flex conduit 4 Insert the sealing nut and fix it at the end of the flex conduit 5 Attach one 1 supplied rubber ring on the g...

Page 22: ...ernet port of the camera IMPORTANT Make sure the rubber ring is completely aligned and flat on the gland body to avoid possible water leakage 7 Connect the Ethernet connector to the Ethernet port of t...

Page 23: ...www acti com Hardware Manual 23 9 Attach the clamping nut to the conduit gland body Make sure the clamping nut is tightly secured to avoid water leakage...

Page 24: ...injector to a network PC and a power source See Power over Ethernet PoE connection example below Network AC Power Source PoE Injector Power Cable Ethernet Cable Ethernet Cable Data Power Ethernet Cabl...

Page 25: ...the camera site DI can be triggers of events For example you can connect a panic button to the camera as such when the panic button is pressed the alarm signal will be sent through the camera Other co...

Page 26: ...I GND Connect the wires of the input device to GND and DI DI The table below shows the DI DO connection specifications Device DI Connection design TTL compatible logic levels Voltage To trigger low Lo...

Page 27: ...30V or the DO device has a voltage of 24V 50mA then the camera can supply internal power to these devices and there is no need to connect the DI DO device to an external power source In this case use...

Page 28: ...pecifications and make sure they match the above design The triggering circuit voltage has to be around 12V DC and the switch controlled circuit voltage has to match the external power supply e g 110V...

Page 29: ...he Audio Output jack GREEN jack of the camera If the camera is installed outdoors be sure to wrap the audio connectors with Waterproof tape can be purchased in hardware stores DISCLAIMER ACTi will not...

Page 30: ...ports local video recording or saving of snapshots to a memory card NOTE Supports microSDHC and microSDXC cards How to Insert the Memory Card 1 Loosen the three 3 screws to detach the back cover NOTE...

Page 31: ...he rubber seal is properly attached and the back cover is closed to ensure water or dust cannot enter the camera How to Remove the Memory Card In case there is a need to remove the card make sure to a...

Page 32: ...s below to adjust them 1 Open the front cover 2 Loosen the lever screws Based on the live view move the levers to adjust the focus and viewing angle of the target area 3 When done tighten back the lev...

Page 33: ...the camera do not abruptly pull the back cover 2 Using a pointed object such as the tip of a pen press and hold the Reset button for at least 5 seconds or until the Power LED lights up to reset the ca...

Page 34: ...request a unique IP address from DHCP server automatically In such case the camera will immediately be ready for the access from the PC The user however might not know the IP address of the camera yet...

Page 35: ...ddresses serial numbers firmware versions etc and allows quick configuration of multiple devices at the same time The IP Utility can be downloaded for free from http www acti com IP_Utility With just...

Page 36: ...work and it does not detect any DHCP services it will automatically assign itself a default IP 192 168 0 100 Whereas the default port number would be 80 In order to access that camera the IP address o...

Page 37: ...IP Utility With the procedure shown above all the cameras will have unique IP addresses starting from 192 168 0 101 In case there are 20 cameras selected the last one of the cameras would have the IP...

Page 38: ...Explorer browsers free third party software plug ins must be installed to the PC first to be able to get the live video feed from the camera Browser Required Plug In Safari QuickTime http www apple co...

Page 39: ...r s address bar http 192 168 0 100 Upon successful connection to the camera the user interface called Web Configurator would appear together with the login page The HTTP port number was not added behi...

Page 40: ...Copyright 2017 ACTi Corporation All Rights Reserved 7F No 1 Alley 20 Lane 407 Sec 2 Ti Ding Blvd Neihu District Taipei Taiwan 114 R O C TEL 886 2 2656 2588 FAX 886 2 2656 2599 Email sales acti com...

Reviews: