background image

www.acti.com


Hardware Manual 


10 

Basic Connections 

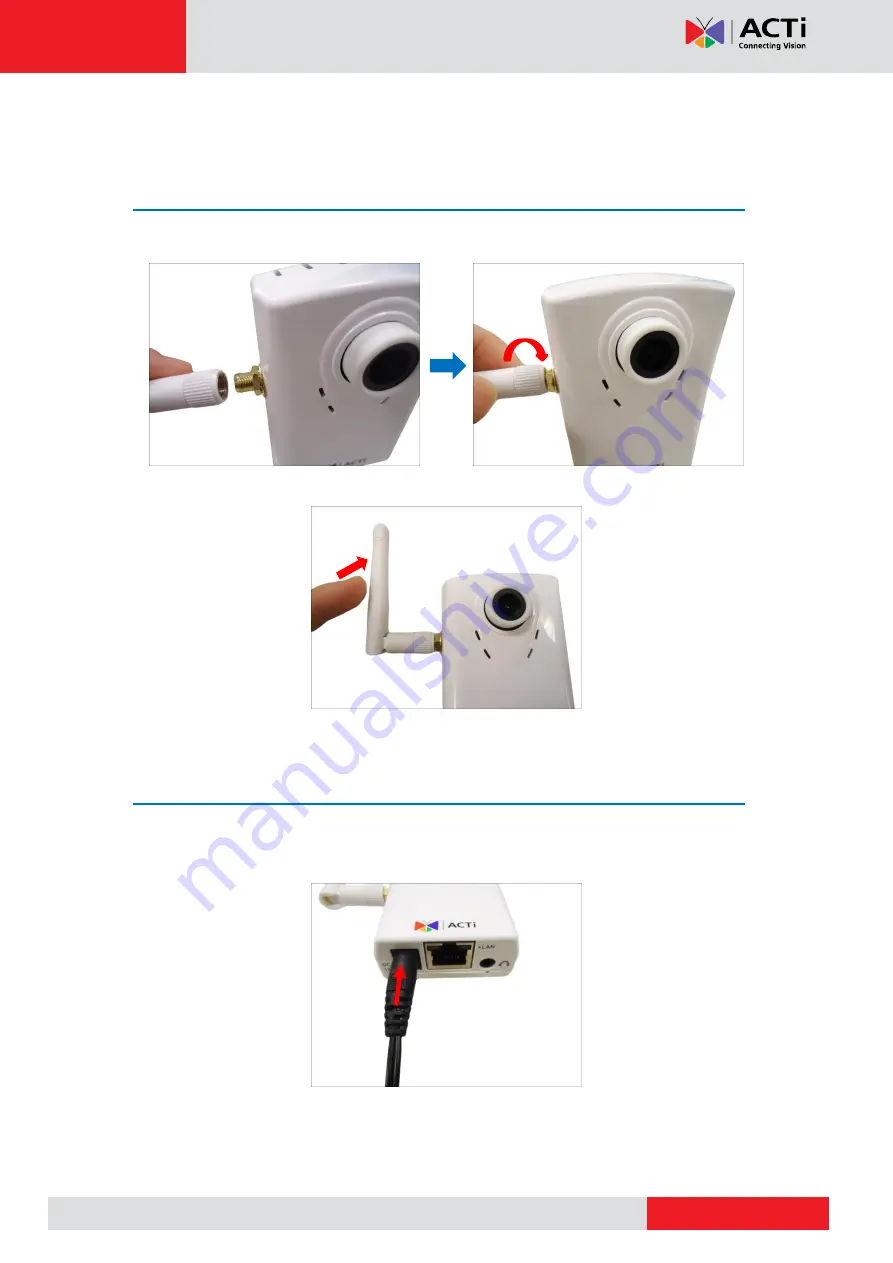
Connecting the Antenna 

1.


Screw the antenna to the antenna jack. 


2.


Turn the antenna to its vertical position. 


Connecting to Power 

Connect one end of the bundled power adapter to the camera DC 12V jack and the other end 

to a power outlet. 


Summary of Contents for C11W

Page 1: ...Wireless Cube Camera Hardware Manual C11W Ver 2016 01 08...

Page 2: ...8 Basic Connections 10 Connecting the Antenna 10 Connecting to Power 10 Connecting to a Wired Network 11 Connecting Audio Output Device optional 11 Installing the Memory Card optional 11 Installing th...

Page 3: ...empt to service this video device yourself as opening or removing covers may expose you to dangerous voltage or other hazards Refer all servicing to qualified service personnel Trademarks All company...

Page 4: ...urning the equipment off and on the user is encouraged to try to correct the interference by one or more of the following measures Reorient or relocate the receiving antenna Increase the separation be...

Page 5: ...to qualified service personnel Damage Requiring service Disconnect this video product from the power supply immediately and refer servicing to qualified service personnel under the following conditio...

Page 6: ...www acti com Hardware Manual 6 Introduction List of Models This hardware manual contains the following models C11W 1 3MP Wireless Cube with Basic WDR Fixed lens...

Page 7: ...www acti com Hardware Manual 7 Package Contents Camera Antenna Power Adapter Bracket Mounting Screws Quick Installation Guide Warranty Card...

Page 8: ...LED Wireless connection is in progress The flashing speed indicates the speed of the wireless connection slow or fast o Solid Flashing LED with undetermined pattern Indicates that the camera is searc...

Page 9: ...the camera to its factory default settings How to reset the camera 1 Power off the camera 2 Press and hold the RESET button as you power on the camera 3 Continuously press the RESET button until the A...

Page 10: ...ections Connecting the Antenna 1 Screw the antenna to the antenna jack 2 Turn the antenna to its vertical position Connecting to Power Connect one end of the bundled power adapter to the camera DC 12V...

Page 11: ...the LAN port of the camera and the other end to a network switch Connecting Audio Output Device optional If necessary connect the audio out device jack to the audio out port of the camera Installing t...

Page 12: ...www acti com Hardware Manual 12 2 Push the card until it clicks into place NOTE Supports microSDHC cards only...

Page 13: ...he Camera Mounting the Bracket Attach the bracket to the wall using the three 3 supplied screws Mounting the Camera 1 Attach the camera to the bracket and tighten the knob 2 Adjust the tilt angle and...

Page 14: ...focus to get the target view 1 Loosen the knob and tilt the camera towards the target view 2 Tighten the knob to fix the camera position 3 The camera comes with a pre fixed focus applicable for most e...

Page 15: ...connected to the same network access point such as a router Also set the PC default browser to Microsoft Internet Explorer 1 Plug the camera power adapter to the power source Once the camera is power...

Page 16: ...unt and Password and then click Login NOTE Install ActiveX Control for video streaming management when prompted in Internet Explorer 6 After login the Live View page is displayed Click the SETUP icon...

Page 17: ...for details to use this feature To connect or pair devices by WPS a Press the WPS button on the router b Click the Connect button on the Web Configurator c Pairing of devices may take a few minutes t...

Page 18: ...b Click the SSID commonly known as the network name of the wireless network that you want to connect to c Scroll down the WiFi page to see the wireless network security settings The displayed paramete...

Page 19: ...essfully connected the Amber LED will flash quickly f Disconnect the Ethernet cable from the camera Wireless setup is complete g Access the camera via wireless network connection See Accessing the Cam...

Page 20: ...e click on the camera model to launch the default browser of the PC with the IP address of the target camera filled in the address bar of the browser already If you work with our cameras regularly the...

Page 21: ...e list Click on the IP address to automatically launch the default browser of the PC with the IP address of the target camera filled in the address bar of the browser already The user interface called...

Page 22: ...Copyright 2016 ACTi Corporation All Rights Reserved 7F No 1 Alley 20 Lane 407 Sec 2 Ti Ding Blvd Neihu District Taipei Taiwan 114 R O C TEL 886 2 2656 2588 FAX 886 2 2656 2599 Email sales acti com...

Reviews: