background image

8.0 DISASSEMBLY


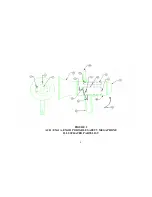
(see Figure 2)


8.1 

Megaphone should be disassembled for repair or replacement of 
components only. 


8.1.1  Remove microphone and mouthpiece assembly (2) by removing 
 

the three set screws (3). 


8.1.2  Remove battery cells (4) from the three tubes by tilting megaphone 
 

to allow cells to drop out into the hand. 


8.1.3  Unplug alarm plug pin (5) from side of housing.* 
 
8.1.4  Remove volume control knob (6) (pulls off). 
 
8.1.5  Remove the three oval head screws (11) at periphery of the speaker 

end of the housing (15). 

  
8.1.6  Extract speaker (7) and megaphone assembly (10) by firstly 

turning horn (18) clockwise 45°.  Pull entire assembly gently until 
it stops.  Turn horn (18) counterclockwise 45°, then pull the entire 
assembly out. 

 
8.1.7  Separate Speaker Assembly (7) and Megaphone Subassembly (10) 

by firstly unplugging the speaker wires from the "out" header.  
Remove hex screw that holds the assemblies together. 

 
8.1.8  Disassembly in steps 8.1.1 through 8.1.7 above is sufficient to 

examine the megaphone for faults and testing.  Further 
disassembly is not recommended.  


9.0 

INSPECTION / CHECK


9.1 

Inspect unit for any evidence of damaged parts, loose mountings or broken 
leads and dirty electrical contacts. 


10.0 REPAIR


10.1 

The megaphone consists of three major sub-assemblies; the Microphone 
and Mouthpiece Assembly, the Megaphone Sub-Assembly, and the Horn 
and Speaker Assembly.  Repairs are restricted to the replacement of these 
defective sub-assemblies or the batteries and lanyard assemblies. 


11.0 ASSEMBLY


Y1-03-0014  Rev. R 

7

Summary of Contents for EM-1A MEGAPHONE

Page 1: ...strated Parts List Rev R Product No 2204 2208 FAA PMA Approved under A3 06 1402 Portable Safety Megaphone ACR Electronics Inc 5757 Ravenswood Road Fort Lauderdale Fl 33312 1 954 981 3333 Fax 1 954 983 5087 www acrelectronics com Email Info acrelectronics com A Chelton Group company ...

Page 2: ...ry Replacement 4 6 0 Testing 4 7 0 Trouble Shooting 5 8 0 Disassembly 6 9 0 Inspection Check 6 10 0 Repair 6 11 0 Assembly 7 12 0 Parts List 9 ILLUSTRATION Figure 1 Block Diagram 3 ACR EM 1A EM 1D Portable Safety Megaphone Figure 2 Illustrated Parts List 8 ACR EM 1A EM 1D Portable Safety Megaphone Y1 03 0014 Rev R 1 ...

Page 3: ...given to the physical size so that it can be used effectively in a crowded environment The EM 1A EM 1D are the same except for installed options OPTIONS MATRIX MODEL MANUAL GAIN ALARM ACTUATOR BATTERY MONITOR Visual Audible EM 1A Yes Yes Yes No EM 1D Yes No Yes Yes 1 2 The integrated circuit amplifier only uses a small current when turned ON Large currents necessary to drive the speaker are utiliz...

Page 4: ...rated into the megaphone is automatically activated by unplugging the alarm plug pin Note A long lanyard with an alarm plug pin is supplied with the megaphone for use as an anti theft alarm optional 3 2 Squeezing the handle automatically stops the siren and the megaphone is ready for use Re insert the alarm pin so that alarm will not be reactivated when pressure on the handle is removed 3 3 Hold t...

Page 5: ...MONITOR MEGAPHONE SUB ASSEMBLY BATTERY PACK 6 x AA LED VISUAL BATTERY CHECK SPEAKER ASSEMBLY N O N C HANDLE SWITCH ALARM PLUG PIN FIGURE 1 BLOCK DIAGRAM ACR EM 1A EM 1D PORTABLE SAFETY MEGAPHONE 3 6 Battery Monitor Two types of battery monitor are available on the EM 1 series megaphones Visual when megaphone is activated by squeezing the handle a green LED indication means the remaining battery ca...

Page 6: ... the microphone and mouthpiece assembly 2 in place The six battery cells contained in three tubes with two cells per tube are immediately accessible and will drop out when the megaphone is tilted New batteries may be dropped into the tubes observing polarity marking adjacent to each tube 5 3 Replace microphone and mouthpiece assembly 2 Align keyway and secure with the three set screws 3 CAUTION Ob...

Page 7: ...speaker If no clicks are heard the speaker is defective Optional Feature see options Matrix 7 0 TROUBLESHOOTING 7 1 Testing procedure for locating defects is given in paragraph 6 0 Possible faults and corrections are summarized below for ready reference TROUBLE POSSIBLE CAUSE CORRECTION No sound from speaker when handle is squeezed Step 6 1 Exhausted batteries defective microphone speaker or ampli...

Page 8: ...n 18 counterclockwise 45 then pull the entire assembly out 8 1 7 Separate Speaker Assembly 7 and Megaphone Subassembly 10 by firstly unplugging the speaker wires from the out header Remove hex screw that holds the assemblies together 8 1 8 Disassembly in steps 8 1 1 through 8 1 7 above is sufficient to examine the megaphone for faults and testing Further disassembly is not recommended 9 0 INSPECTI...

Page 9: ...d align holes 11 1 4 Secure with screws 11 11 1 5 Replace volume control knob 6 on volume control shaft 11 1 6 Plug the alarm plug 5 attached to lanyard into jack in the side of the case near volume control 11 1 7 Replace the six batteries 4 in three tubes at microphone end of megaphone case CAUTION Observe polarity of batteries during installation procedure see instructions at battery tube openin...

Page 10: ...FIGURE 2 ACR EM 1A EM 1D PORTABLE SAFETY MEGAPHONE ILLUSTRATED PARTS LIST 8 ...

Page 11: ...ety Obsolete 2204 2208 2 1 Microphone Mouthpiece Assy 9211 9211 9211 3 1 Socket Setscrew Kit 9416 9416 9416 4 6 Battery AA Alkaline Commercial Commercial Commercial 6 1 Knob control 9022 9022 1 9022 1 7 1 Speaker Assembly 9417 upgrade kit 9418 9418 8 3 Screw Self tap 4 x Commercial N A N A 9 2 Wire leads speaker 26AWG Commercial N A N A 10 1 Megaphone Subassy 9417 upgrade kit 9420 9422 11 3 Screw ...

Reviews: