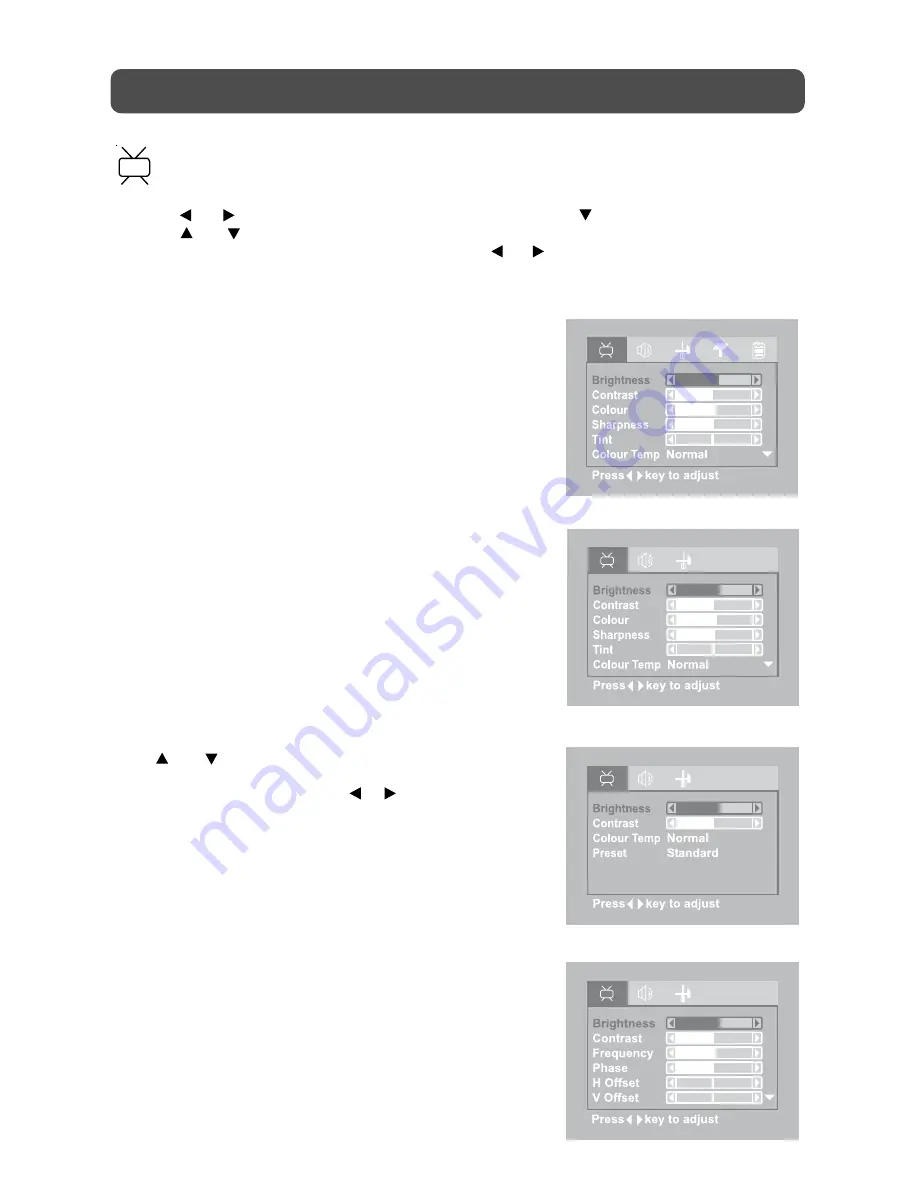
ACOUSTIC SOLUTIONS ASTV1615HDS Owner'S Manual Download Page 12

12

TV SETUP

  PICTURE MENU

1. Press the MENU button.
2. Use 

 or 

 button to select the Picture menu, then press 

 button to enter the setting.

3. Use 

 or 

 button to select the options (Brightness, Contrast, Colour, Sharpness, Tint,

Colour Temp,  Preset) and adjust them using the 

 or   buttons. (The screen will change to

your desired setting).

4. Repeat step 3 to adjust other options.
5. To exit the MAIN MENU and return to the normal

screen, press the EXIT button on remote control.

In TV / AV /  YUV mode

Brightness

: Adjust to brighten the darkest parts of the

picture.

Contrast

: Adjust to sharpen the picture quality. The

black portions of the picture become
richer in darkness and the white become
brighter.

Colour

: Adjust the colour of the picture.

Sharpness

: Adjust the sharpness level to improve

detail in the picture.

Tint

: Adjust the tint of the picture. (Toward

purple / Toward green)

Colour Temp : Adjust the three colour temperature of

the picture.  Select Normal (balanced) /
Cold (blue white) / Warm (red white) mode.

Preset

: Select from preset screen display settings

to match the type of show you are
watching (Standard, Personal, Movie,
Dynamic, & Soft).

Note :
You can also select simply by pressing the PICTURE button.

In PC mode

Use 

 or 

 button to select the options (Brightness,

Contrast, Frequency, Phase, H offset, V offset, Colour Temp,
Preset)
 and adjust them using the  or  buttons. (The screen
will change to your desired setting).
-

Resolution

: 1024 x 768 max

-

Refresh Frequency : 60Hz max.

Brightness

: Adjust to brighten the darkest parts of the

picture.

Contrast

: Adjust to sharpen the picture quality. The

black portions of the picture become richer
in darkness and the white become brighter.

Frequency

: Adjust the frequency of the picture.

Phase

: Adjust when characters have low contrast

or when the image flickers.

H offset

: Centre the image by moving it left or right.

V offset

: Centre the image by moving it up or down.

Colour Temp : Adjust the three colour temperature of the

picture.  Select Normal (balanced) / Cold
(blue white) / Warm (red white) mode.

Preset

: Select from preset screen display settings

to match the type of show you are watching
(Standard, Personal, Movie, Dynamic, &
Soft).

TV MODE

AV MODE

PC MODE

YUV MODE

Summary of Contents for ASTV1615HDS

Page 1: ...Owner s Manual Owner s Manual 15 LCD Television ASTV1615S ...

Page 2: ...carpeting SAFETY INFORMATION When connecting or disconnecting the cord grip the plug and not the AC cord itself Pulling the cord may damage it and create a hazard When you are not going to use the unit for a long period of time disconnect the AC cord The mains plug is used as the disconnecting device It should remain readily operable and should not be obstructed during intended use To completely d...

Page 3: ...nect it at the wall outlet This symbol means that the unit is double insulated No connection to earth is necessary SAFE USE OF YOUR EQUIPMENT This equipment has been designed and manufactured to meet UK safety standards but like any electrical equipment care must be taken to obtain the best results from the equipment and assure your own safety Here are a few tips to help you do this READ this inst...

Page 4: ...INGA POWER CORD 9 DISPLAY 9 TV SETUP 10 13 Setup menu 10 Tuning menu 11 Program menu 11 Picture menu 12 Sound menu 13 TELETEXT 14 15 CONNECTIONS 16 20 Connecting to A V devices VCR Camcorder Game System etc 16 17 Connecting to sources with component video output DVD only 480i 480p 720p 1080i are supported 18 Connecting to sources with scart 18 Connecting an audio amplifier 19 Connecting a PC 19 US...

Page 5: ...ected at all times when removing the base stand Be sure that no hard or sharp or anything that could scratch or damage the LCD display come in contact with it Do NOT place pressure on the rear of the unit at any time because the screen could crack 1 Disconnect any cables or cords connected to the unit 2 Lay the unit down on a flat surface so the back side is facing up making sure to place a soft c...

Page 6: ...become weak the operating distance of the remote control will be greatly reduced and you will need to replace the batteries Note If the Remote Control is not going to be used for a long time remove the batteries to avoid damage caused by battery leakage corrosion Do not mix old and new batteries Do not mix ALKALINE standard CARBON ZINC or rechargeable NICKEL CADMIUM batteries WARNING Do not dispos...

Page 7: ...letext page 8 button Directly select Mono Stereo Dual I II 9 RED YELLOW BLUE GREEN button Press to select the relevant page quickly from Teletext 10 TV TEXT button Directly selects TV mode Teletext mode 11 STANDBY ONbutton Press to turn ON the unit or put it in STANDBY OFF mode 12 YUV IN button Directly selects YUV mode 13 AV IN button Directly selects AV1 AV2 mode 14 LAST CH button Press to switc...

Page 8: ...tton Enter the Setup menu FUNCTION button Select TV AV1 AV2 YUV PC UNIT REFERENCE GUIDE buttons Select a TV channel and highlight selections Up Down on the menu screen VOL controls Adjusts the volume level and highlights selections Left Right on the menu screen 7 Headphone jack 8 PC IN Audio Jack 9 PC IN MONITOR VGA jack 10 Scart AV IN 2 11 AV IN 1 S Video Input 12 AV IN 1 Video Input Jack Audio I...

Page 9: ...splay PICTURE menu SOUND menu SETUP menu TUNING menu PROGRAM menu Satellite Cable or TV antenna cable to TV ANTENNA CABLE Terminal cable not included CONNECTING ATVANTENNA CONNECTING A TV ANTENNA CABLE SATELLITE To view television channels correctly a signal must be received from one of the following sources An indoor or outdoor aerial antenna A cable system A satellite system Note For receiving o...

Page 10: ...Reminder timer Off 5 115 120 Teletext lang Select the teletext language from Pan European Cyrillic Greek Teletext E W Select the teletext from West East Restore setting Reset the TV mode to the factory settings In PC mode OSD Size Select the menu size you prefer Language Select the language you prefer Timers Select the Sleep timer Reminder timer mode Sleep timer Reminder timer Off 5 115 120 Auto A...

Page 11: ...Auto PAL Sound System Select from Auto BG I DK BG NICAM I NICAM DK NICAM Auto tune Searches for usable stations and stores them in memory Manual tune If the reception is not satisfactory adjust using or keys AFC Auto frequency control Skip ON Skip weak channels OFF No channel skip TV MODE PROGRAM MENU 1 Press the MENU button 2 Use or button to select the Program menu then press button to enter the...

Page 12: ...ode Preset Select from preset screen display settings to match the type of show you are watching Standard Personal Movie Dynamic Soft Note You can also select simply by pressing the PICTURE button In PC mode Use or button to select the options Brightness Contrast Frequency Phase H offset V offset Colour Temp Preset and adjust them using the or buttons The screen will change to your desired setting...

Page 13: ... MAIN MENU and return to the normal screen press the EXIT button on remote control Experiment with different sound settings until you find the settings you prefer Bass Adjust the bass range Treble Adjust the treble range Balance Adjust the balance level toward the left or right speakers Preset Select from preset sound settings Personal Voice Music Theatre to match the type of show you are watching...

Page 14: ...e number of the page will appear in the top left hand corner of the screen The page counter will search for your page When it finds it the page will be displayed To move to the next page of text press the CH button To move to the previous page press the CH button To return to the index page enter the 100 by using the Numeric buttons TIME MIX To view a page of the text whilst watching a TV programm...

Page 15: ...ge press the HOLD button HOLD will appear in the top left hand corner To continue moving through the sub pages press the HOLD button again TO SELECT A SUB PAGE To select a sub page press the SUBTITLE button The screen will show S _ _ _ _ then press the page by using the Numeric buttons TO REVEAL INFORMATION Press the REVEAL button to reveal concealed information quiz answers etc Press the REVEAL b...

Page 16: ... play the VCR first press the FUNCTION button or AV IN button to select the AV1 mode Note Please refer to the user manual for the VCR for more information CONNECTIONS Connect to a camcorder Connect the right red and left white audio output from the camcorder to the right red and left white input on this unit Audio cable not included Connect the S VIDEO output from the camcorder to the S VIDEO inpu...

Page 17: ...rst press the FUNCTION button or AV IN button to select the AV1 mode Note Please refer to the user manual for the VCR for more information CONNECTIONS Connect to a camcorder Connect the right red and left white audio output from the camcorder to the right red and left white input on this unit Audio cable not included Connect the video yellow output from the camcorder to the video input on this uni...

Page 18: ...ou connect both audio and video from the same source to YUV mode To operate the connected device and play the source first press the FUNCTION button or YUV IN button to select the YUV mode Note Please refer to the user manual for your component video source for more information and connection details CONNECTINGTO SOURCES WITH SCART Devices with component video output must be connected to the SCART...

Page 19: ...e best image quality for your LCD monitor If used under the other resolutions some scaled or processed picturers may appear on the screen The TV has been pre adjusted to the mode VESA 1 024 x 768 60Hz CONNECTING ANAUDIO AMPLIFIER This connection allows you to use an audio amplifier and external speakers Connect the right red and left white audio OUTPUT from this unit to the right red and left whit...

Page 20: ...t then adjust the volume to your desired level When headphones are connected no sound will come from the front speakers Note Avoid listening to sound at high levels for prolonged periods of time This may be harmful to you and may cause hearing loss USING HEADPHONES ...

Page 21: ...are watching is broadcast in Colour and not Black White Make sure the unit is plugged in and turned on Make sure that the TV mode is selected Try a new channel to check for possible station trouble Make sure the antenna is connected properly Increase the volume Make sure the antenna or audio video source device is working properly Make sure all cables are firmly connected Check for local interfere...

Reviews: