Acoustic Research AWD209 Owner'S Manual Download Page 8

u

SInG

 Y

our

 H

eadpHoneS

8

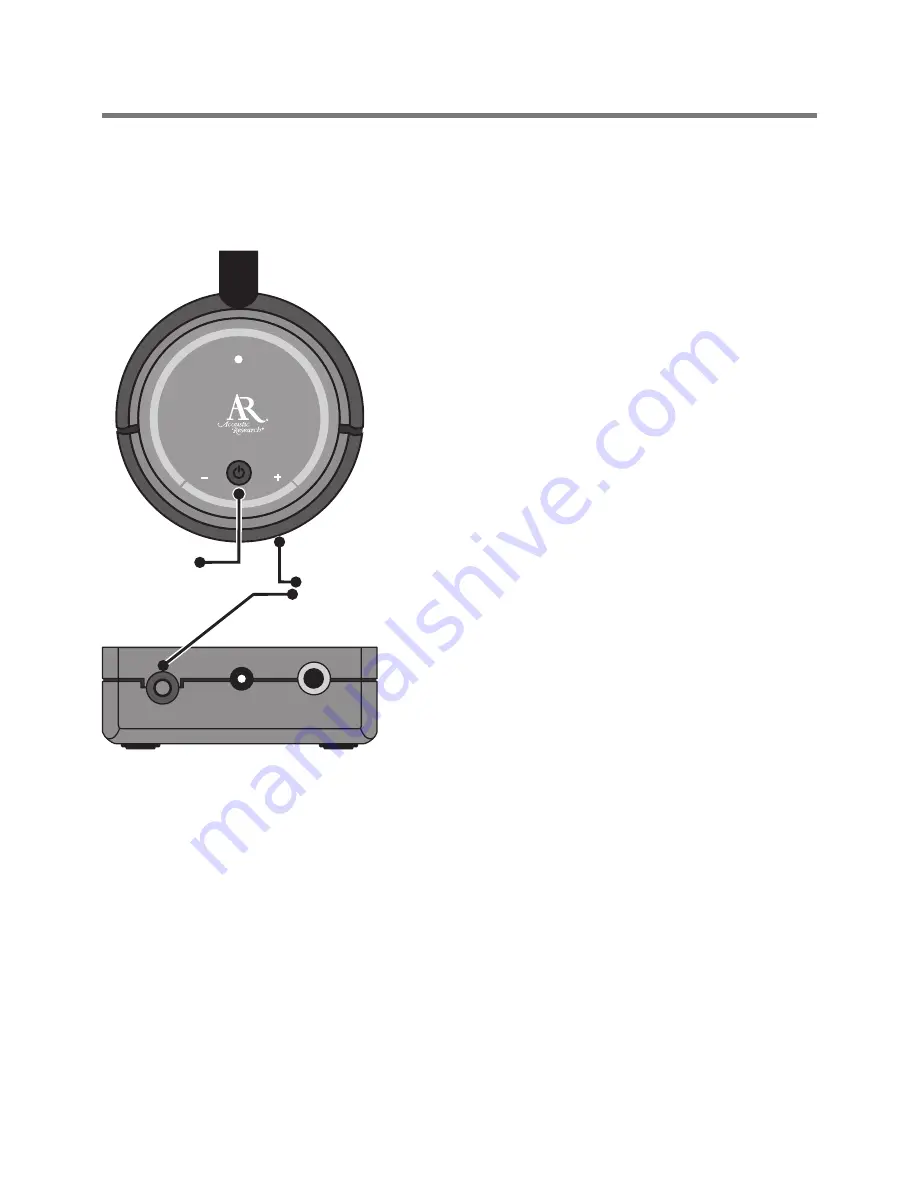
Turning the Headphones On

1.  Make sure the transmitter is plugged in and connected to an audio 

source.

LINK

DC IN

LINE IN

Power 
button

2.  Press the power button on the right 

headphone to turn the headphones 
on.

3.  Switch on the audio source (TV, DVD, 

CD player, etc.) the transmitter is 
connected to. If your audio source is a 
DVD or CD player, start a disc.

4.  Simultaneously press the link buttons 

on the headphones and on the back 
of the transmitter. The headphones 
and transmitter lock onto each other 
for wireless transmission. The LED 
on the headphones flashes while the 
devices are tuning; it stays on once 
the devices are tuned.

5.  Adjust the volume using the volume 

up and down buttons on the right 
earphone.

Link 
buttons

Turning the Headphones Off

To turn the headphones off: Press and hold the power button on the 
headphones for 3 seconds. Don't forget to unplug the transmitter too!
To make sure that your headphones are ready to use at all times, plug 
them in when you're not using them so that they can recharge.

Summary of Contents for AWD209

Page 1: ...2 4GHZ DIGITAL WIRELESS STEREO HEADPHONES OWNER S MANUAL AWD209...

Page 2: ...icing is required when the apparatus has been damaged in any way such as power supply cord or plug is damaged liquid has been spilled or objects have fallen into the apparatus the apparatus has been e...

Page 3: ...nside or outside your home Easy push button pairing makes it simple to get started wirelessly This manual covers various connection options and detailed operating instructions for setup and use of the...

Page 4: ...at end of the AC adapter into the power jack on the bottom of the right headphone 2 Plug the other end of the AC adapter into a wall outlet Important This power unit is intended to be correctly orient...

Page 5: ...onnecting to a 3 5mm mini jack output 1 Plug the 3 5mm cable into the headphone jack on your audio source 2 Connect the other end of the 3 5mm cable to the LINE IN jack on the transmitter s back panel...

Page 6: ...ower unit is intended to be correctly oriented in a vertical or floor mount position LINK DC IN LINE IN Transmitter back panel AC power adapter LINK DC IN LINE IN Transmitter back panel LINE IN jack c...

Page 7: ...buttons increase or decrease the headphone volume Link button tunes the headphones to the transmitter Right headphone LED indicates charging red and communication with transmitter blue Power button t...

Page 8: ...the headphones and on the back of the transmitter The headphones and transmitter lock onto each other for wireless transmission The LED on the headphones flashes while the devices are tuning it stays...

Page 9: ...Select If they are not marked as such they are probably variable outputs see About Variable Level Audio Outputs below Outputs from DVD players are almost always fixed Important Jacks labeled CD DVD D...

Page 10: ...If you have any questions regarding the replacement of the built in battery please call toll free 1 800 732 6866 or visit www araccessories com The following troubleshooting guide takes you through s...

Page 11: ...ed the Tape Monitor Tape 2 button on the front of the receiver This will turn on the Tape 2 outputs which may not have been active Interrupted sound Move closer to the transmitter with the headphones...

Page 12: ...into an AC outlet THE EXTENT OF THE COMPANY S LIABILITY UNDER THIS WARRANTY IS LIMITED TO THE REPAIR OR REPLACEMENT PROVIDED ABOVE AND IN NO EVENT SHALL THE COMPANY S LIABILITY EXCEED THE PURCHASE PRI...

Reviews: