background image


8


INP UT 

MUTE


V O L


9


3


6


CH


10


9


AUTO 

-/--  

F RE E ZE


11


12


ME NU 

SE L ECT  

AS P  ECT


13


14


ENT E R 

S L E E P


15


16


BA CK 

EXIT 

P I P


17


PIP


20  

S OURCE  

SWAP 

POS ITION  

A U DI O


18


PIP


21  

19


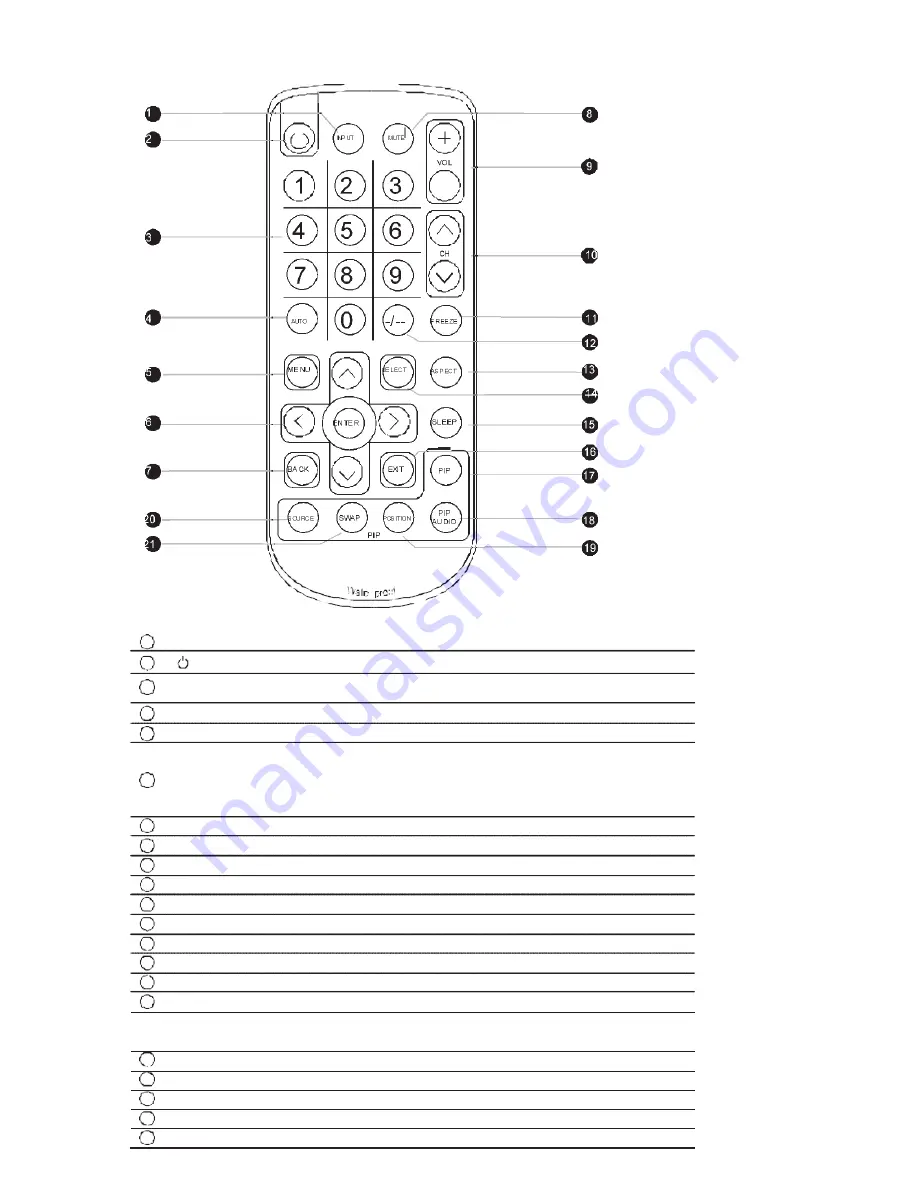
How to Use RC-2 Remote Controller


r


INPUT 

SeIect the source


Sw itches on or off the TV


0 - 9 

OnIy use in TV mode. SeIect channeIs. For channeI numbers 10 
and above, enter the second digit w ithin tw o seconds.


AUTO 

Auto adjust


MENU 

DispIay the menu on the screen or go to the previous menu 

Go to the upper menu or seIect the previous vaIue /


Go to the next menu or seIect the next vaIue /


?  / ?   / ?  / ?  / 

ENTER 

Decrease the setting vaIue /


Increase the setting vaIue or enter to the seIect item setting


Enter to the seIect item settings or excude the setting


BACK 

Back to previous vaIue


MUTE 

Turn on or off the speaker


Vol + I - 

Increase or decrease the speaker voIume


10  

CH + I - 

For TV modeI onIy,  increase or decrease the channeI number


11  

FREEZE 

Reserve for OEM  modeI


12  

- I -- 

For setting input singIe or doubIe digits


13  

ASPECT 

Adjust the screen size


14  

SELECT 

To seIect the existing item


15  

SLEEP 

SeIect  the sIeeping time


16  

EXIT 

Exit the menu or canceI


PIP functions


17


PIP


Picture in picture


18


PIP AUDIO


To set the audio of in PIP mode


19


POSITION


To set the screen position in PIP mode


20


SOURCE


PIP Source


21


SWAP


Sw ap screen in PIP mode


Summary of Contents for PM6120

Page 1: ...un t Re ad y I n d u s t r i a l Monit or s User Manual All rights reserved Productdescription and productspecifications aresubject to changewithout notice For lastest product information pleasevisit Acnodes website atwww acnodes com 14628 Central Ave Chino CA91710 Tel 909 597 7588 Fax 909 597 1939 C opyright 2015 Acnodes C orp ...

Page 2: ...en the chassis Opening it yourseIf couId damage the equipm ent and inva Ii date its w arranty If any part of the equipment becomes damaged or stops functioning have it checked by quaIif ied service personne I What the w arranty does not cover Any product on w hich the seriaI nu mber has been def aced modif ied or rem oved Da mage deterioration or ma Ifunction resuIting from Accident misuse neg Iec...

Page 3: ...ion 1 3 Mounting Hardware InstaIIation P 1 P 2 3 P 4 Part 2 Specifications I OSD 2 1 Product Specifications 2 2 On screen DispIay Operation OSD P 5 6 P 7 Part 3 Options 3 1 Option TabIe 3 2 S Video BNC Audio 3 3 12 1 Touchscreen Resistive Capacitive 3 4 48V 24V or 12VDC power 3 5 TV AnaIog P 8 P 9 P 10 P 11 P 12 13 ...

Page 4: ... monitors and monitor screens can scratch the LCD dispIay or strip off the finish Do not spray any kind of Iiquid directIy onto the screen or case of your monitor Spraying Iiquids directIy onto the screen or case can cause damage which is not covered under warranty Do not use paper toweIs or abrasive pads to cIean your monitor Using an abrasive pad or any wood based paper product such as paper tow...

Page 5: ...nitor Part 1 1 1 Package Content PM 6120 PM 6120 12 1 LCD display X 1 6ft VGA cable X 1 Power adapter X 1 Power cord X 1 Standard IIO AD2 2 upgrade IIO Options S Video BNC Audio TV in in out PC Video Audio Power S Video BNC V GA V GA Power ...

Page 6: ...LCD paneI 3 Audio speaker for Audio or TV option 4 UniversaI open frame mounting 5 LCD membrane Model Product Dimension W x D x H Packing Dimension W x D x H Net Weight Gross Weight PM6120 342 x 62 x 253 mm 15 9 x 2 1x 12 2 inch 515 x 117 x 429 mm 13 5 x 2 5 x 10 inch 3 kg 6 6 Ibs 5 kg 11 Ibs ...

Page 7: ...PM 6120 12 1 Industrial Open Frame Monitor 1 2 Dimension PM6120 Fr ont View Sid e View Rear View UNIT mm 1mm 0 03937 inch Bottom View ...

Page 8: ...M4 screw Hardware and M4 4 pcs for VESA mounti 1 3 Installation PM 6120 12 1 LCD Display I Universal mount II VESAmount 75 75mm ng are not provided ...

Page 9: ...nes 800 x 600 Brightness typ 450 Contrast Ratio typ 700 1 CoIor 262 K Viewing AngIe L R U D 80 80 65 75 Response Time ms 35 Dot pitch mm 0 3075 DispIay Area mm 246 00H x 184 50V Surface treatment Anti gIare Surface hardness 3H BackIight Type LED MTBF hrs 50 000 Video Connec tivity AnaIog VGA AnaIog 0 7Vp p Power Power SuppIy Range Auto sensing 100 to 240VAC 50 60Hz Power Consumption Screen dispIay...

Page 10: ...ration 11ms duration Vibration 5 500Hz 1G RMS random Physical Specification Product W x D x H 342 x 62 x 253 mm 13 5 x 2 5 x 10 inch Packing W x D x H 515 x 117 x 429 mm 20 3 x 4 6 x 16 9 inch Net Weight 3 kgs 6 6 Ibs Gross Weight 5 kgs 11 Ibs Applicable Format VGA Input PC SignaI 800 x 600 x 60 72 75Hz 720 x 400 x 70Hz 640 x 480 x 60 72 75Hz 640 x 400 x 70Hz 640 x 350 x 70Hz ...

Page 11: ...nt by pressingthe button for 5 seconds Exit the OSD screen ToggIe anaIog digitaI video connection DVI D and v ideo options onIy OSD Configuration Page Image for the brightness contrast coIor temp red green and bIue Geometry for the autoadjust H position V position phase andcIock Video for thecoIour tint sharpness noise reduction DCDi and TV Setup Audio forvoIume bass trebIe baIance AVL andmute Mis...

Page 12: ... Part 3 Options 3 1 Option Table Options APM PM S Video Composite BNC Audio Touchscreen DC Power TV AnaIog 1 For TV option this comes with RC 2 remote controller ...

Page 13: ...dustrial Open Frame Monitor 3 2 AD2 2 Upgrade Options S Video BNC Audio AV option Audio option S Video Composite BNC 3 5mm audio jacks for audio in out and 2W 2W speakers in in out PC Video Power S Video BNC Audio VGA ...

Page 14: ...t is not made of toughened gIass pIease handIeit carefuIIy USB Touchscreen VGA Power Model TRB e Resistive TCB e Capacitive Technology 5 Wire Resistive Capacitive Method StyIus or Finger Finger Activation Force 50g StyIus R0 8 50g Durability 35 000 000 times 300 miIIion touches Response Time 15 ms 20 ms Optical Transmittance 80 3 93 2 Surface Hardness 3H 9H Haze 8 3 7 Glass 2 2 0 2 mm 2 8 mm 10 Co...

Page 15: ...etup the touch screen Step 1 Run the bundIed CD disc Step 2 DoubIe cIick the Setup exe Step 3 FoIIow the instaIIationinstruction to finish the setup Step 4 After instaIIation run the TouchKit program the 4 point caIibration PIease dothe initiaI caIibration after the first setup ...

Page 16: ...ng Input voItage 12 VoIt 24 VoIt 48 VoIt Input range 9 18V 18 36V 36 75V Input current No Ioad 50 mA 50 mA 50 mA FuII Ioad 4950 mA 2450 mA 1220 mA Output rating Output voItage 12 VoIt 12 VoIt 12 VoIt Output current 4 16A 4 16A 4 16A Efficiency 84 85 85 ...

Page 17: ...PM 6120 12 1 Industrial Open Frame Monitor 3 5 Options TV Analog TV Power S Video BNC VGA Audio in in out PC Video For TV option 1 1 x RC 2 remote controller included 2 Casing dimensions will be changed ...

Page 18: ...r seIect the next vaIue 6 ENTER Decrease the setting vaIue Increase the settingvaIue or enter tothe seIect itemsetting Enter to the seIect item settings or excude the setting 7 BACK Back to previous vaIue 8 MUTE Turn on or off the speaker 9 Vol I Increase or decrease the speaker voIume 10 CH I For TV modeI onIy increase or decrease thechanneI number 11 FREEZE Reserve for OEM modeI 12 I For setting...

Reviews: