Acnodes KD8124 User Manual Download Page 16


< 2.3 > On-screen Display Operation ( OSD )
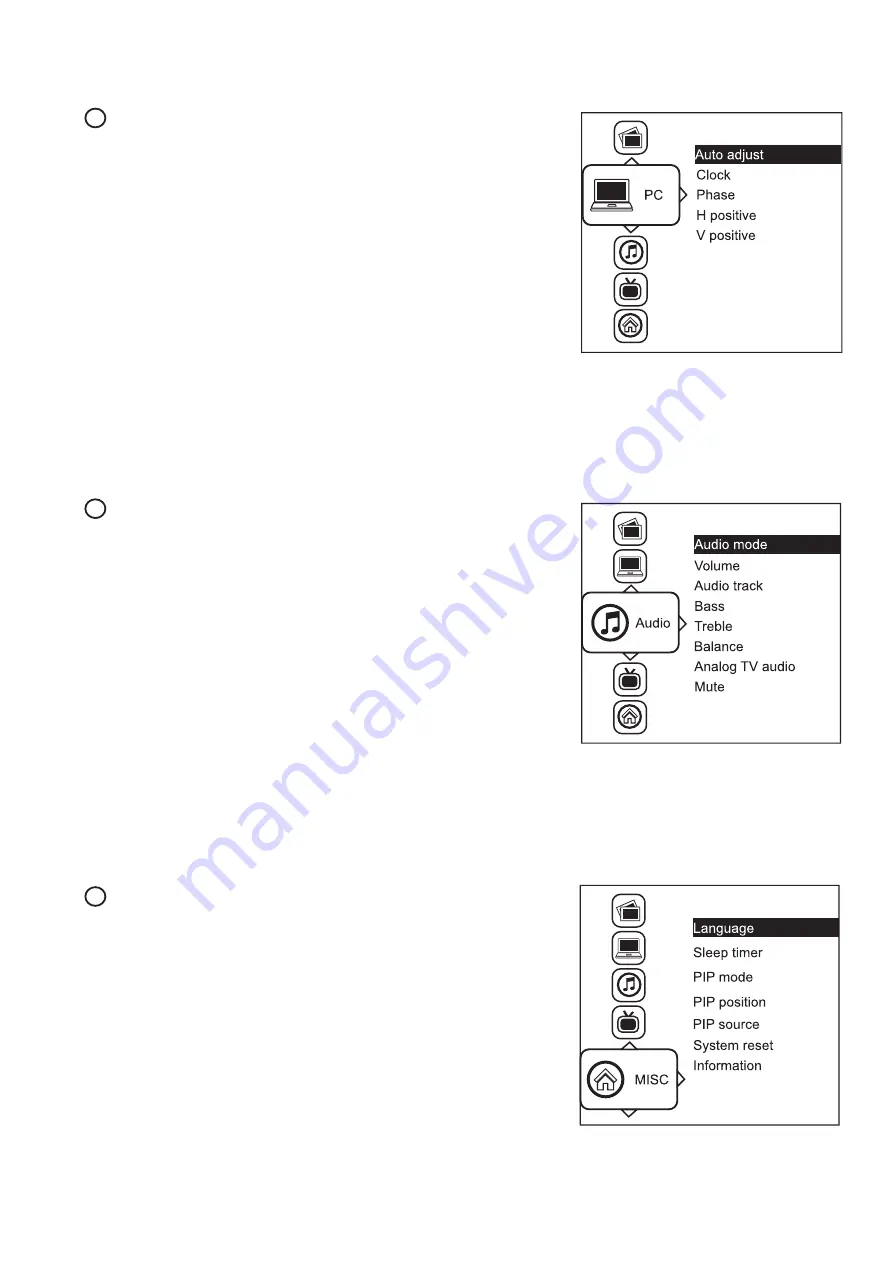
 PC

Auto adjust : 

    Automatically adjust sizes, centers and 

fi

 ne tunes the

video signal to eliminate waviness and distortion.  

Clock : 

    Adjust the clock value

Phase :  

    Adjust the phase value


H. Position :

    Align the screen image left or right

V. Position :

    Align the screen image up or down

2

           MISC


Language : 

   Select the language in which the OSD menu is 
   displayed - English   


Sleep timer : 

   Set the off time

             PIP mode :


   Adjust picture in picture setting     

             PIP position :            Enter into PIP position


PIP source : 

   Enter into the Sub source and sound source

             System reset : 

   Return the adjustment back to factory setting

             Information : 

   Select for Help    

4

P.12

 Audio

Audio mode : 

   Movie / Voice / Normal / Music mode to choose

Volume : 

Adjust the volume of sound

Bass :


Set the value of bass sound

Treble :   

   Set the value of treble sound


Balance : 

Set the balance value of treble and bass sound

Analog TV audio :   Set the value of analog TV audio sound

Mute :                   Turn off the surrounding sound         

3

Summary of Contents for KD8124

Page 1: ...n and productspecifications aresubject to changewithout notice For lastest product information pleasevisit Acnodes website atwww acnodes com 14628 Central Ave Chino CA91710 Tel 909 597 7588 Fax 909 59...

Page 2: ...en the chassis Opening it yourself could damage the equipment and invalidate its warranty If any part of the equipment becomes damaged or stops functioning have it checked by qualified service personn...

Page 3: ...OSD 2 1 Product Specifications 2 2 Keyboard Mouse Specifications 2 3 On screen Display Operation OSD 2 4 Picture In Picture PIP Picture By Picture PBP P 6 7 P 8 10 P 11 12 P 13 14 Part 1 KD8124 1 1 Pa...

Page 4: ...onitors and monitor screens can scratch the LCD display or strip off the finish Do not spray any kind of liquid directly onto the screen or case of your monitor Spraying liquids directly onto the scre...

Page 5: ...the 2 pt lock Membrane switch KVM option Audio speaker for SDI or HDMI option Front USB port for device access USB Hub KVM only 4 5 8 9 10 6 10 5 2 9 1 1 Package Content P 1 Part 1 1 2 Structure Diagr...

Page 6: ...t Weight Gross Weight KD8124 441 6 x 700 x 44 mm 17 4 x 27 6 x 1 73 595 x 910 x 140 mm 23 4 x 35 8 x 5 5 15 3 kg 33 7 lb 19 5 kg 42 9 lb The weight is only for the single console models It varies with...

Page 7: ...ft and right rear mounting brackets into the LCD console drawer Step 1 Step 2 Measure the depth of the front and rear mounting rails Align each rear mounting bracket to a suitable length M6 screw cage...

Page 8: ...m the side Left Right Front Side LCD Panel P 4 1 3 Installation How to use the drawer Operate the LCD console drawer Hold the handle and slide out the drawer Flip up the LCD to a suitable angle Option...

Page 9: ...not be hot pluggable Plugging and unplugging cables while servers and KVM are powered on may cause irreversible damage to the servers KVM and LCD console drawer Before attempting to connect anything...

Page 10: ...lines 1920 x 1200 Brightness typ 300 Contrast Ratio typ 1000 1 Color 16 7 M Viewing Angle L R U D 89 89 89 89 Response Time ms 14 Dot pitch mm 0 27 Display Area mm 518 40H x 324 0V Surface treatment...

Page 11: ...z 640 x 480 x 60 72 75Hz 640 x 400 x 70Hz 640 x 350 x 70Hz HDMI Input PC Signal Same as VGA Video Signal 1080p 60Hz 720p 50 60Hz 480p 60Hz 576p 50Hz Audio Signal 2ch Linear PCM 32 44 1 48 KHz Speaker...

Page 12: ...n life cycle time OS support Windows Linux Unix Mac OS G keyboard integrated with trackball Gb Supporting layouts America United States EMEA United Kingdom Germany France Spain Norway Italy Russia Swi...

Page 13: ...9 How to Use MAC Keyboard Keyboard Features F1 Decrease display brightness F9 Fast forward F2 Increase display brightness F10 Mute sound F3 Mission control Only works with OS X Lion default Keyboard...

Page 14: ...your supplier for full details F9 Audio Mute Display Degauss F11 Audio Decrease volume Display Decrease contrast F12 Audio Increase volume Display Increase contrast P 10 Num LED in Green mode Key pad...

Page 15: ...minutes of idle status except the Power Light up all membrane buttons please press any button for 1 2 seconds except the Power 1 2 P 11 2 3 On screen Display Operation OSD Picture Picture mode Standa...

Page 16: ...d English Sleep timer Set the off time PIP mode Adjust picture in picture setting PIP position Enter into PIP position PIP source Enter into the Sub source and sound source System reset Return the adj...

Page 17: ...right OSD Menu MISC PIP Position top left top right bottom left bottom right top left top right bottom left bottom right Size Adjust the size of the Sub screen Large Small OSD Menu MISC PIP Mode Larg...

Page 18: ...76 2 4 2 Picture By Picture PBP 2 4 3 PIP PBP Source To select an input signal for PIP PBP Sub screen OSD Menu MISC PIP Source VGA S Video Composite DVI HDMI SDI YPbPr TV Sub Main VGA S Video Composit...

Page 19: ...Hz 4 4 4 60 50Hz 4 4 4 HD SDI 1080p 1080i 720p 30 25 24Hz 4 2 2 60 50Hz 4 2 2 60 50Hz 4 2 2 SD SDI 480i 60Hz 4 2 2 ITU R BT 656 576i 50Hz 4 2 2 Max Transmission Distance 75 ohm coaxial cable 3G SDI 15...

Page 20: ...2V 24V 48V 110 125V Input rating Input voltage 12 Volt 24 Volt 48 Volt 110 Volt Input range 9 18V 18 36V 36 75V 66 160V Input current No load 50 mA 50 mA 50 mA 40 mA Full load 4950 mA 2450 mA 1220 mA...

Page 21: ...1 0 0 KC801 KC1601 KC3201 www acnodes com files downloads CKVM UM pdf DVI D KVM Local Remote 12 port 1 0 0 KVD1201 www acnodes com files downloads DVIKVM UM pdf USB Hub DB 15 KVM Local Remote 8 port...

Reviews: