background image


14B 

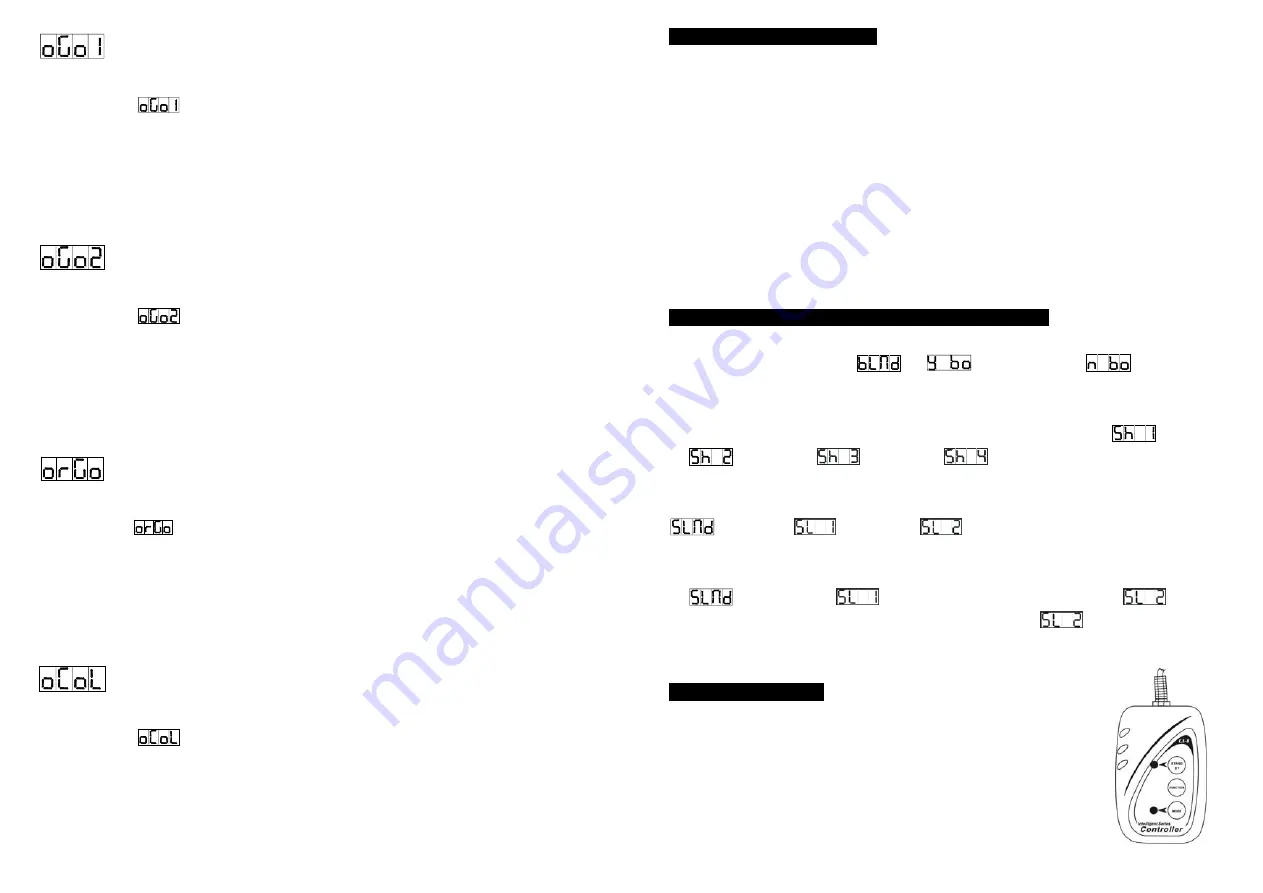
   Gobo 1 offset 

Press the 

MENU

 button for at least 5 seconds into offset mode, use 

DOWN

 and 

UP

 button 

up  to  when  the 

  is  shown  on  the  display.  Pressing 

ENTER

  button and  the  display 

will blink. Use 

DOWN

 and 

UP

 button to adjust the gobo home position. Once the gobo 1 has 

been  selected,  press  the 

ENTER

  button  to  setup  or  automatically  return  to  the  offset 

functions  without  any  change  press  the 

MENU

  button  again,  To  go  back  to  the  main 

functions without any change after 8 seconds. 


   Gobo 2 offset 

Press the 

MENU

 button for at least 5 seconds into offset mode, use 

DOWN

 and 

UP

 button 

up  to  when  the 

  is  shown  on  the  display.  Pressing 

ENTER

  button and  the  display 

will blink. Use 

DOWN

 and 

UP

 button to adjust the gobo home position. Once the gobo 2 has 

been  selected,  press  the 

ENTER

  button  to  setup  or  automatically  return  to  the  offset 

functions  without  any  change  press  the 

MENU

  button  again,  To  go  back  to  the  main 

functions without any change after 8 seconds. 


  R-gobo offset 

Press the 

MENU

 button for at least 5 seconds into offset mode, use 

DOWN

 and 

UP

 button 

up to when the 

  is shown on the display. Pressing 

ENTER

 button and the display will 

blink. Use 

DOWN

 and 

UP

 button to adjust the R-gobo home position. Once the R-gobo has 

been  selected,  press  the 

ENTER

  button  to  setup  or  automatically  return  to  the  offset 

functions  without  any  change  press  the 

MENU

  button  again,  To  go  back  to  the  main 

functions without any change after 8 seconds. 


   Color offset 

Press the 

MENU

 button for at least 5 seconds into offset mode, use 

DOWN

 and 

UP

 button 

up  to  when  the 

  is  shown  on  the  display.  Pressing 

ENTER

  button and  the  display 

will blink. Use 

DOWN

 and 

UP

 button to adjust the color home position. Once the color has 

been  selected,  press  the 

ENTER

  button  to  setup  or  automatically  return  to  the  offset 

functions  without  any  change  press  the 

MENU

  button  again,  To  go  back  to  the  main 

functions without any change after 8 seconds. 


15B 

  5. How To Control The Unit 


You can operate the unit in three ways: 

1. By master/slave built-in preprogram function 

2. By easy controller 

3. By IL-0824 ( only for setting in 8 channel mode, please refer to the user guide of iLead 

controller ) or by universal DMX controller 

No  need  to  turn  the  unit  off  when  you  change  the  DMX  address,  as  new  DMX  address 

setting  will  be  effected  at  once.  Every  time  you  turn  the  unit  on,  it  will  show  575  on  the 

display and move all the motors to their ‘home’ position and you may hear some noises for 

about 20 seconds. After that the unit will be ready to receive DMX signal or run the built-in 

programs. 


  5.1. Master/Slave Built-In Preprogrammed Function   


You can select blackout mode 

  in 

  (yes blackout) or 

  (no blackout) 

mode while the unit is turned on. By linking the units in master/slave connection, the first unit 

will control the other units to give an automatic, sound activated, synchronized light show. 

This function is good when you want an instant show. You have to select 

  (show 1) 

or 

  (show 2) or 

  (show 3) or 

  (show 4) mode by easy controller. Its 

DMX input jack will have nothing plugged into it, and Its master LED will be constantly on 

and  sound  LED  will  flash  to  the  music.  The  other  units  will  have  to  set  in  slave  mode 

  and  select 

  (normal)  or 

  (2  light  show)  mode,  Their  DMX  cables 

plugged into the DMX input jacks (daisy chain) and the slave LED lights will constantly on.


2-light show


In 

  (slave  mode),


means  the  unit  works  normally  and 


means 

2-light show. In order to create a great light show, you can set 


on the second unit to 

get contrast movement to each other, even if you have two units only. 


5.2

Easy Controller


The  easy  remote  control  is  used  only  in  master/slave  mode.  By 

connecting to the 1/4” microphone jack of the first unit, you will find that 

the remote control on the first unit will control all the other units for Stand 

by, Function and Mode. 


Summary of Contents for iSolution

Page 1: ...et The Unit 4 1 Control Panel 4 2 Main Function 4 3 Home Position Adjust 5 How To Control The Unit 5 1 Master Slave Built In Preprogrammed Function 5 2 Easy Controller 5 3 iSolution Operation DMX Controller 5 4 DMX 512 Configuration 5 5 DMX 512 Connection 6 Troubleshooting 7 Fixture Cleaning Широкий ассортимент оборудования ACME на www maxlight ru ...

Page 2: ...the unit immediately Never try to repair the unit by yourself Repairs carried out by unskilled people can lead to damage or malfunction Please contact the nearest authorized technical assistance center Always use the same type spare parts z Don t connect the device to any dimmer pack z Do not touch any wire during operation as high voltage might be causing electric shock Please read carefully the ...

Page 3: ...Channel 3 Pan Tilt Speed select Channel 11 Prism Channel 4 Dimmer Channel 12 Prism Rotation Channel 5 Shutter Shaking Channel 13 Focus Channel 6 Color Channel 14 Pan 16 bit Channel 7 Iris Channel 15 Tilt 16 bit Channel 8 Gobo 1 Channel 16 Reset Lamp on off 5B 8 Channels Luminous intensity Channel 1 Pan Channel 2 Tilt Channel 3 Shutter Channel 4 Gobo Channel 5 Color Channel 6 Gobo Rotation Iris Cha...

Page 4: ... age temperature and improper handling of the lamp Do not use the lamp any longer than its specified life 5 Make sure the lamp is located in the center of the reflector for the best spot In case of replacement of the lamp or maintenance do not open the fixture within 15 minutes until theunit cools down after switching off 7B 4 How To Set The Unit 4 1 Control Panel Display To show the various menus...

Page 5: ...s To go back to the functions without any change press the MENU button again Show Mode Press the MENU button up to when the is showing on the display Pressing ENTER button and the display will blink Use DOWN and UP button to select the show 1 or show 2 or show 3 or show 4 mode Once the mode has been selected press the ENTER button to setup or automatically return to the main functions without any ...

Page 6: ...MENU button up to when the is blinking on the display Use the ENTER button to change to the mode display inversion It will automatically store after 8 seconds Or press the ENTER button again return to the mode display normal To go back to the functions press 11B the MENU button Display normal mode for the fixture putting on the floor Display inversion mode for the fixture fixing under ceiling Gobo...

Page 7: ...an home position Once the position has been selected press the ENTER button to setup or automatically return to the offset functions without any change press the MENU button again To go back to the main functions without any change after 8 seconds Tilt offset Press the MENU button for at least 5 seconds into offset mode use DOWN and UP button up to when the is shown on the display Pressing ENTER b...

Page 8: ...tions without any change press the MENU button again To go back to the main functions without any change after 8 seconds 15B 5 How To Control The Unit You can operate the unit in three ways 1 By master slave built in preprogram function 2 By easy controller 3 By IL 0824 only for setting in 8 channel mode please refer to the user guide of iLead controller or by universal DMX controller No need to t...

Page 9: ...you have to set DMX address from 1 to 512 channel so that the units can receive DMX signal Press the MENU button up to when the is shown on the display Pressing ENTER button and the display will blink Use DOWN and UP button to change the DMX 512 address Once the address has been selected press and keep ENTER button pressed up to when the display stops blinking or storing automatically 8 seconds la...

Page 10: ...annot be branched or split to a Y cable DMX 512 is a very high speed signal Inadequate or damaged cables soldered joints or corroded connectors can easily distort the signal and shut down the system 4 The DMX output and input connectors are pass through to maintain the DMX circuit when power is disconnected to the unit 5 Each lighting unit needs to have an address set to receive the data sent by t...

Page 11: ...the proper address D No response to the sound 1 Make sure the unit that is not receiving DMX signal 2 Check microphone to see if it is good by tapping the microphone E One of the channels is not working well 1 The stepper motor might be damaged or the cable connected to the PCB is broken 2 The motor s drive IC on the PCB might be out of condition F The lamp is cutting out intermittently 1 The lamp...

Page 12: ... D and screws E that fix the bridge 4 Change a new belt F Please adjust the tension of the belt properly Note it is too tight to rupture 5 Reverse the procedures from point 3 to 2 A B C C E D C F 23B Pay attention to the belt tension when install the belt Please refer to the photos below F G Photo 1 Adjust belt tension through loose the screw Photo 2 ...

Page 13: ...lean the external optics at least every 20 days Clean the internal optics at least every 30 60 days EC Declaration of Conformity We declare that our products lighting equipments comply with the following specification and bears CE mark in accordance with the provision of the Electromagnetic Compatibility EMC Directive 89 336 EEC EN55014 2 1997 A1 2001 EN61000 4 2 1995 EN61000 4 3 2002 EN61000 4 4 ...

Reviews: