background image


P/T Feedback 

To select P/T Feedback, press the ENTER button to confirm. Use the UP/DOWN button to select 
No(Pan or tilt’s position will not feedback while out of step) or Yes(Feedback while pan/tilt out of 
step), press the ENTER button to store. Press the MENU button back to the last menu or let the unit 
idle 30 seconds to exit menu mode. 

White Balance 

To select White Balance, press the ENTER button to confirm. Use the UP/DOWN button to select 
Red, Green or Blue, press the ENTER button to confirm. Use the UP/DOWN button to adjust the 
value from 125 to 255, press the ENTER button to store. Press the MENU button back to the last 
menu or let the unit idle 30 seconds to exit menu mode. 

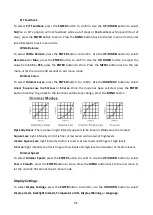
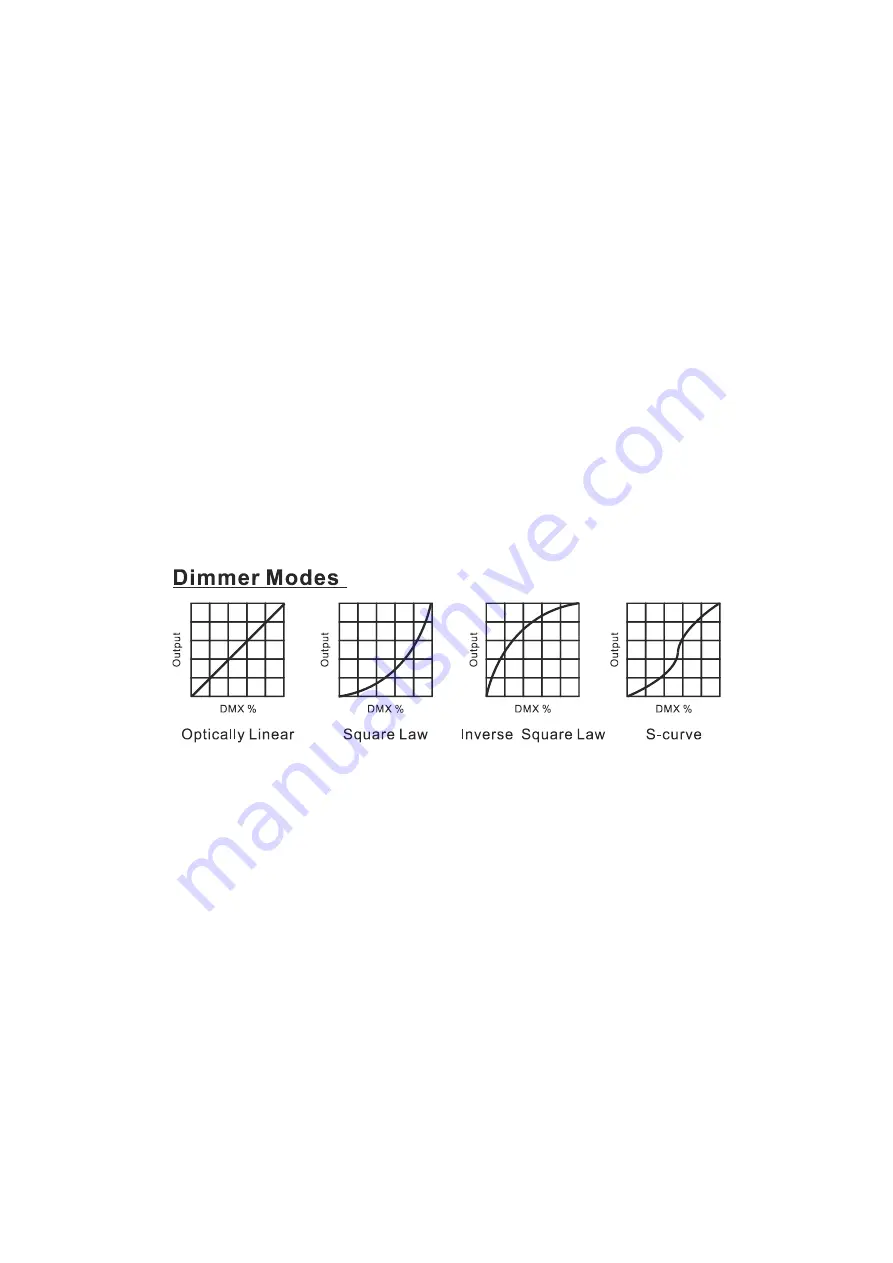
Dimmer Curve 

To select Dimmer Curve, press the ENTER button to confirm. Use the DOWN/UP button to select 
LinearSquare LawInv SQ Law or S Curve. Once the mode has been selected, press the ENTER 
button to setup. To go back to the functions without any change, press the MENU button. 


Optically Linear: The increase in light intensity appears to be linear as DMX value is increased. 
Square Law: 
Light intensity control is finer at low levels and coarser at high levels. 
Inverse Square Law: Light intensity control is coarser at low levels and finger at high levels. 
S-Curve: Light intensity control is finger at low levels and high levels and coarser at medium levels. 

Dimmer Speed 

To select Dimmer Speed, press the ENTER button to confirm. Use the UP/DOWN button to select 
Fast or Smooth, press the ENTER button to store. Press the MENU button back to the last menu or 
let the unit idle 30 seconds to exit menu mode. 


Display Settings 

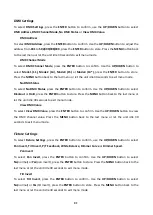
To select Display Settings, press the ENTER button to confirm, use the UP/DOWN button to select 
Display Invert, Backlight Intensit, Temperature Unit, Display Warning
 or Language. 


9E 

Summary of Contents for Diabolo

Page 1: ......

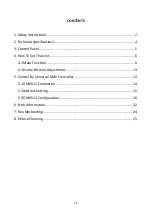
Page 2: ...l Panel 5 4 How To Set The Unit 6 4 1 Main Function 6 4 2 Home Position Adjustment 13 5 Control By Universal DMX Controller 14 5 1 DMX512 Connection 14 5 2 Address Setting 15 5 3 DMX512 Configuration 16 6 Error Information 22 7 Troubleshooting 24 8 Fixture Cleaning 25 1E ...

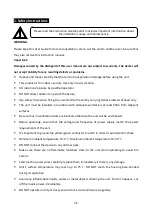
Page 3: ...t no ventilation slots are blocked otherwise the unit will be overheated Before operating ensure that the voltage and frequency of power supply match the power requirements of the unit It s important to ground the yellow green conductor to earth in order to avoid electric shock Minimum ambient temperature TA 0 Maximum ambient temperature TA 40 DO NOT connect the device to any dimmer pack Make sure...

Page 4: ... assistance center if needed Disconnect the mains power if the fixture is has not been used for a long time DO use the original packing materials before transporting it again DO NOT look directly at the light while the bulb is on DO NOT start on the unit without bulb enclosure or when housing is damaged Installation The fixture should be mounted via its Omega Quick Release Clamp bracket Always ens...

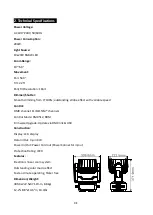
Page 5: ... effect with variable speed Control DMX channel 11 14 15 14 channels Control Mode DMX512 RDM Firmware Upgrade Update via DMX link USB Construction Display LCD display Data In Out 3 pin XLR Power In Out Power Cord out Power Connector in out Protection Rating IP20 Features Electronic linear zoom system Outstanding color macro effect Fast and mute operating flicker free Dimension Weight 309 6x222 5x3...

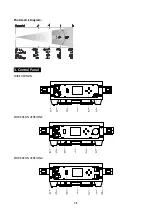
Page 6: ...Photometric Diagram 3 Control Panel WIRE VERSION POWERCON VERSION1 POWERCON VERSION2 5E ...

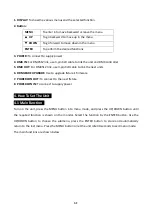
Page 7: ...e to link the next units 6 FIRMWARE UPGRADE Use to upgrade fixture s firmware 7 POWERCON OUT To connect to the next fixture 8 POWERCON IN To connect to supply power 4 How To Set The Unit 4 1 Main Function Turn on the unit press the MENU button into menu mode and press the UP DOWN button until the required function is shown on the monitor Select the function by the ENTER button Use the UP DOWN butt...

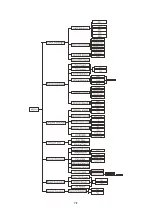
Page 8: ...7E ...

Page 9: ... ENTER button to store Press the MENU button back to the last menu or let the unit idle 30 seconds to exit menu mode View DMX Value To select View DMX Value press the ENTER button to confirm Use the UP DOWN button to view the DMX channel value Press the MENU button back to the last menu or let the unit idle 30 seconds to exit menu mode Fixture Settings To select Fixture Settings press the ENTER bu...

Page 10: ...near Square Law Inv SQ Law or S Curve Once the mode has been selected press the ENTER button to setup To go back to the functions without any change press the MENU button Optically Linear The increase in light intensity appears to be linear as DMX value is increased Square Law Light intensity control is finer at low levels and coarser at high levels Inverse Square Law Light intensity control is co...

Page 11: ...ER button to store Press the MENU button back to the last menu or let the unit idle 30 seconds to exit menu mode Display Warning Select Display Warning press the ENTER button to confirm present mode will blink on the display use the UP DOWN button to select No or Yes press the ENTER button to store Press the MENU button back to the last menu or let the unit idle 30 seconds to exit menu mode Langua...

Page 12: ...our Temperature Fan State USB Upgrade File Firmware Version or Error Logs Fixture Use Hour Select Fixture Use Hour press the ENTER button to confirm fixture use hour will show on the display press the MENU button to exit Temperature Select Temperature press the ENTER button to confirm fixture temperature will show on the display press the MENU button to exit Fan State Select Fan State press the EN...

Page 13: ...firm use the UP DOWN button to select No normal or Yes the unit will run built in program to reset pan and tilt to their home positions press the ENTER button to store Press the MENU button to exit Effect Reset Select Effect Reset press the ENTER button to confirm use the UP DOWN button to select No normal or Yes the unit will run built in program to reset effect to their home positions press the ...

Page 14: ...d the fixture will run the pan invert mode Select the TILT INVERT menu and the fixture will run the tilt invert mode Select the RESET DEVICE menu the WARM RESET COLD RESET option will be displayed When WARM RESET is selected the fixture will start a warm reset and exit when COLD RESET is selected 4 2 Home Position Adjustment Press the MENU button into menu mode then press the ENTER button for abou...

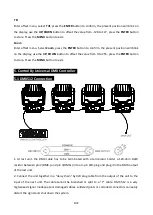
Page 15: ... to store Press the MENU button to exit 5 Control By Universal DMX Controller 5 1 DMX512 Connection 1 At last unit the DMX cable has to be terminated with a terminator Solder a 120 ohm 1 4W resistor between pin 2 DMX and pin 3 DMX into a 3 pin XLR plug and plug it in the DMX output of the last unit 2 Connect the unit together in a daisy chain by XLR plug cable from the output of the unit to the in...

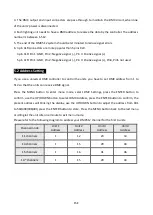
Page 16: ...to control the units you have to set DMX address from 1 to 512 so that the units can receive DMX signal Press the MENU button to enter menu mode select DMX Settings press the ENTER button to confirm use the UP DOWN button to select DMX Address press the ENTER button to confirm the present address will blinking the display use the UP DOWN button to adjust the address from 001 to 502 499 498 499 pre...

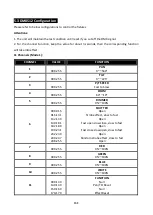
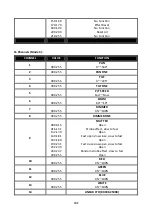
Page 17: ...FUNCTION 1 000 255 PAN 0 540 2 000 255 TILT 0 225 3 000 255 P T SPEED Fast to Slow 4 000 255 ZOOM 60 10 5 000 255 DIMMER 0 100 6 000 015 016 131 132 139 140 181 182 189 190 231 232 239 240 247 248 255 SHUTTER Open Strobe effect slow to fast Open Fast open slow close slow to fast Open Fast close slow open slow to fast Open Random strobe effect slow to fast Open 7 000 255 RED 0 100 8 000 255 GREEN 0...

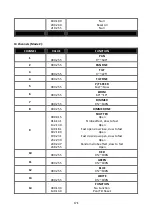
Page 18: ... 255 DIMMER 0 100 8 000 255 DIMMER FINE 9 000 015 016 131 132 139 140 181 182 189 190 231 232 239 240 247 248 255 SHUTTER Open Strobe effect slow to fast Open Fast open slow close slow to fast Open Fast close slow open slow to fast Open Random strobe effect slow to fast Open 10 000 255 RED 0 100 11 000 255 GREEN 0 100 12 000 255 BLUE 0 100 13 000 255 WHITE 0 100 14 000 139 140 149 FUNCTION No Func...

Page 19: ...SPEED Fast Slow 6 000 255 ZOOM 60 10 7 000 255 DIMMER 0 100 8 000 255 DIMMER FINE 9 000 015 016 131 132 139 140 181 182 189 190 231 232 239 240 247 248 255 SHUTTER Open Strobe effect slow to fast Open Fast open slow close slow to fast Open Fast close slow open slow to fast Open Random strobe effect slow to fast Open 10 000 255 RED 0 100 11 000 255 GREEN 0 100 12 000 255 BLUE 0 100 13 000 255 WHITE...

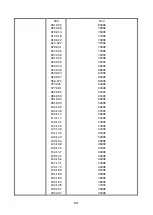
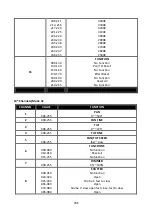
Page 20: ... 127 130 131 135 136 139 140 144 145 148 149 153 154 157 158 162 163 166 167 171 172 175 176 180 181 184 185 189 190 193 194 198 199 202 203 207 Null 8000K 7900K 7800K 7700K 7600K 7500K 7400K 7300K 7200K 7100K 7000K 6900K 6800K 6700K 6600K 6500K 6400K 6300K 6200K 6100K 6000K 5900K 5800K 5700K 5600K 5500K 5400K 5300K 5200K 5100K 5000K 4900K 4800K 4700K 4600K 4500K 4400K 4300K 4200K 4100K 4000K 3900...

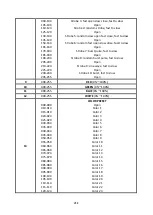
Page 21: ...ffect Reset No Function Reset All No Function 14 Channels Mode 4 CHANNEL VALUE FUNCTION 1 000 255 PAN 0 540 2 000 255 PAN FINE 3 000 255 TILT 0 225 4 000 255 TILT FINE 5 000 255 PAN TILT SPEED fast slow 6 000 009 010 014 015 255 FUNCTIONS No function Reset all No function 7 000 255 DIMMER 0 100 8 000 019 020 024 025 064 065 069 070 084 085 089 SHUTTER No function Open Strobe 1 fast to slow Open St...

Page 22: ...e fast to slow Open Strobe 9 sine wave fast to slow Open Strobe 10 burst fast to slow Open 9 000 255 RED 0 100 10 000 255 GREEN 0 100 11 000 255 BLUE 0 100 12 000 255 WHITE 0 100 13 000 009 010 014 015 019 020 024 025 029 030 034 035 039 040 044 045 049 050 054 055 059 060 064 065 069 070 074 075 079 080 084 085 089 090 094 095 099 100 104 105 109 110 114 115 119 120 124 COLOR PRESET Open Color 1 ...

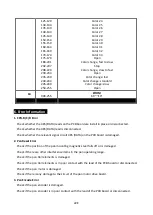
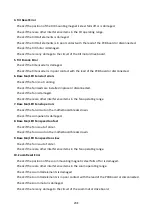
Page 23: ... disconnected Check whether the 485 DATA lead is disconnected Check whether the relevant signal circuit 485 DATA on the PCB board is damaged 2 Pan Reset Error Check if the position of the pan mounting magnetic steel falls off or is damaged Check if there are other interference items in the pan operating range Check if the pan Hall elements is damaged Check if the pan Hall elements is in poor conta...

Page 24: ...k if the fan is damaged Check if there are other interference items in the fan operating range 7 Base Fan LED Fan stop errors Check if the fan circuit on the motherboard breaks down Check if the component is damaged 8 Base Fan LED Fan speed too fast Check if the fan is out of order Check if the fan circuit on the motherboard breaks down 9 Base Fan LED Fan speed too slow Check if the fan is out of ...

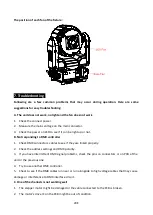
Page 25: ...roller 1 Check DMX connectors cables to see if they are linked properly 2 Check the address settings and DMX polarity 3 If you have intermittent DMX signal problems check the pins on connectors or on PCB of the unit or the previous one 4 Try to use another DMX controller 5 Check to see if the DMX cables run near or run alongside to high voltage cables that may cause damage or interference to DMX i...

Page 26: ...ight output Cleaning frequency depends on the environment in which the fixture operates damp smoky or particularly dirty surrounding can cause greater accumulation of dirt on the unit s optics Clean with soft cloth and use normal glass to clean liquid Always dry the parts carefully Clean the external optics at least every 20 days 25E ...

Page 27: ...26E ...
Page 28: ...Innovation Quality Performance ...

Reviews: