background image

07

08

09

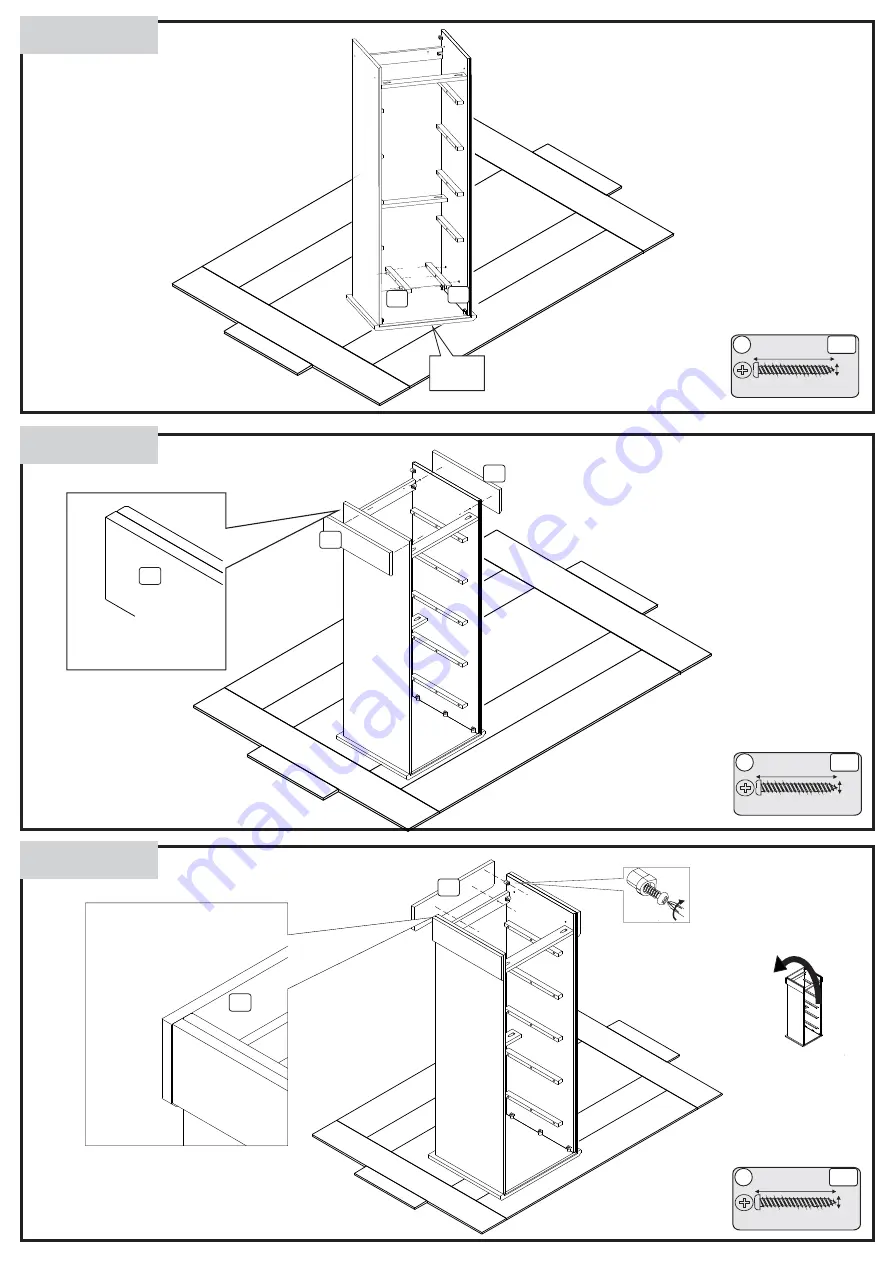
Ensure the drawer runner side

 with 2 holes for dowels part 04 is 

facing towards the top of the panel.

25mm

25mm

Ø4,5

Ø4,5

B

B

x04

x06

P3

P3

GOLD

GOLD

B B

B

B

B

B

B

B

B

B

04

04

07

07

TOP

07

ENSURE FRONT

 EDGE IS LEVEL

B

B

B

B

08

25mm

Ø4,5

B

x04

P3

GOLD

ENSURE FRONT

 EDGE IS LEVEL

08

90º

B

Summary of Contents for Core Products CT117

Page 1: ...Copying in Design Our designs are supported through their intellectual property databank All copyright design rights intellectual property rights existing in this product instructions and related documents are and will remain the property of Core Products We will treat any infringement of these rights seriously Copyright Core Products V2 11 2021 ...

Page 2: ......

Page 3: ...variances in shading and graining These are part of the natural character of the furniture itself Caring for your Pine furniture Extreme temperature can cause slight movements in the wood itself so please avoid placing your furniture close to radiators or other direct sources of heat Humidity should also be avoided Please avoid exposing your furniture to continued bright sunlight as it can affect ...

Page 4: ... x20 A A 05 06 Ø8 25mm A x12 D x02 A D D A A A A A A A D 02 D x08 Ø8 25mm A x04 D 02 D D D A A D 03 D D D D A A TOP TOP BACK BACK Build your furniture on a soft clean cover to stop the components getting marked during assembly ...

Page 5: ...g towards the top of the panel 25mm Ø4 5 B x06 P3 GOLD 03 02 B B B B B B BACK BACK 90º 05 06 05 TOP TOP TOP TOP BACK BACK 02 04 04 04 04 B B B B B B B B B B B B 03 04 04 04 04 B B B B B B B B B B B B 25mm Ø4 5 B x24 P3 GOLD 06 25mm Ø4 5 x06 P3 GOLD B B B B BACK B 01 BACK 01 TOP B ...

Page 6: ...holes for dowels part 04 is facing towards the top of the panel 25mm 25mm Ø4 5 Ø4 5 B B x04 x06 P3 P3 GOLD GOLD B B BB B B B B B B 04 04 07 07 TOP 07 ENSURE FRONT EDGE IS LEVEL B B B B 08 25mm Ø4 5 B x04 P3 GOLD ENSURE FRONT EDGE IS LEVEL 08 90º B ...

Page 7: ...11 09 Z Z Z Z Z Z Z Z Z ZZ Z Z Z Z Z ZZ Z ZZZZ Z 90º Z x24 8 x 8 10 BACK 5x 5x 13 12 Ø8 25mm A x20 A A A A 12 13 25mm Ø4 5 B x20 P3 GOLD 5x 5x 12 13 11 B B B 14 2 1 ...

Page 8: ...NT A A 11 11 11 11 11 A 10x Fixing drawer safety stops 2 3 1 Insert drawers into frame by approximately 50mm 2 Push wooden dowels in through the pre drilled holes close to the back of the drawer sides until they are level with the inside edge of the drawer sides 3 Check the position of the drawer stops are correct by opening and closing the drawers ...

Page 9: ... the wall surface Attach fixing strip to the wall using the 25mm screw washer and securely tighten Pre drill small pilot hole on the back edge of the furniture top using a 2mm drill bit Attach the other end of fixing strip to the back edge of the furniture top using the 14mm screw washer and securely tighten Y Y 14mm 14mm 25mm Y x01 18 IMPORTANT NOTICE Please avoid opening all drawers simultaneous...

Reviews: