


DGX-106
STANDBY
KARAOKE
USB/DISC
5.1CH
STEREO
VIDEO
1
2
3
4
5
6
7
8
9
0
PROGRAM
CLEAR
P/N
VGA
SEARCH
TITLE
MENU
SETUP
REPEAT
SUBTITLE
ENTER
A-B
PBC
ANGLE
ZOOM
VIEW
VOL +
VOL -
RETURN
RESUME
AUDIO
EQ
L/R
MUTE
DISPLAY
STEP
RANDOM
SLOW
MUSIC MODE
MUSIC MODE
1
2
3
5
4
6
8
7
9
11
10
12
14
13
16
15
18
17
19
21
20
23
24
26
28
29
27
30
31
32
33
34
35
36
37
38
39
40
41
42
43
25
44
46
47
45
22
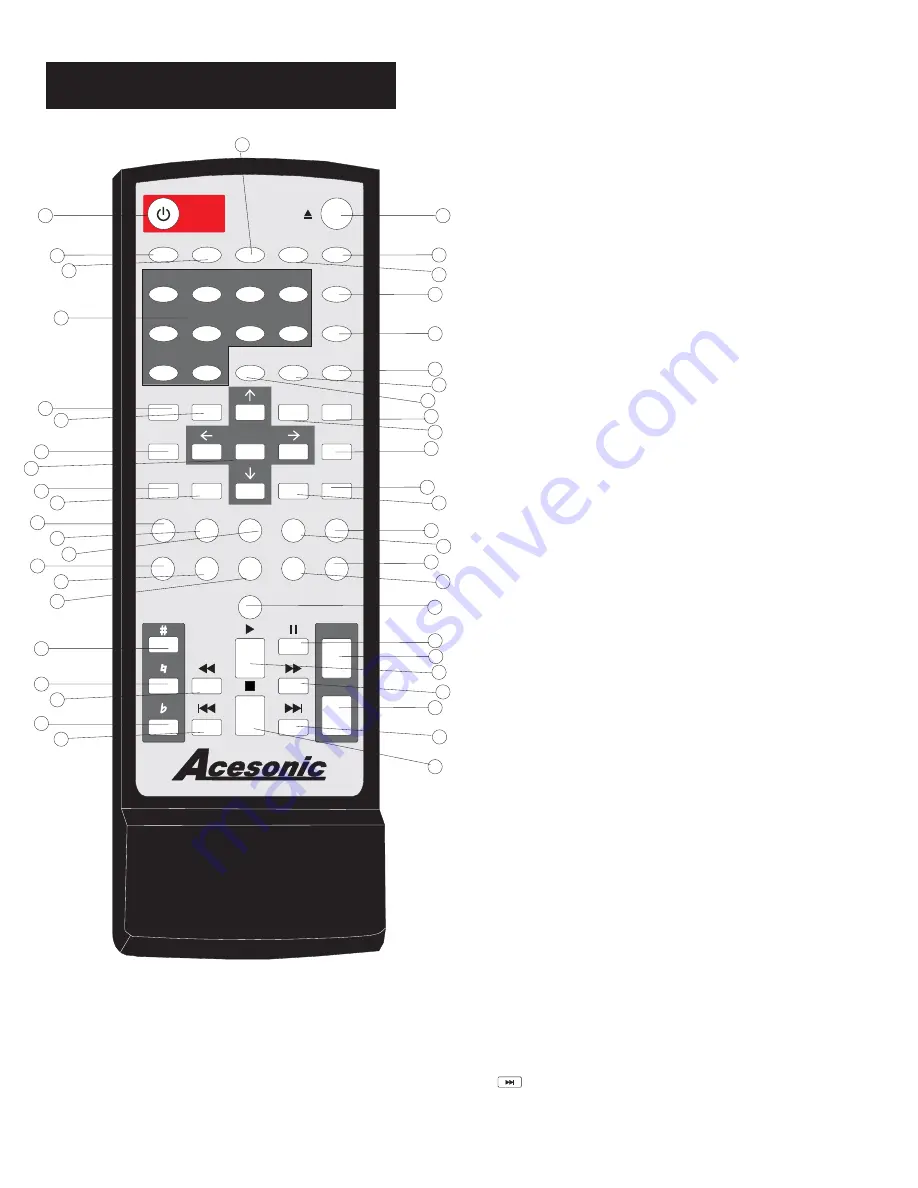
Remote Functions
5
27. VGA BUTTON -
Press this button then press
ENTER to swith between SCART and YCBCR output.
27. VGA BUTTON -
Press this button then press
ENTER to swith between SCART and YCBCR output.
26. P/N BUTTON -
PAL/NTSC switch. Press P/N and
within 2 seconds, press ENTER to complete switch.
26. P/N BUTTON -
PAL/NTSC switch. Press P/N and
within 2 seconds, press ENTER to complete switch.
28. PROGRAM BUTTON
-
,
p. 8
To program tracks
ress
STOP
PROGRAM
to
.
ress
the PLAY
p
then press
. Enter your tracks
selection and press PROGRAM again
accept P
to start programmed tracks.
28. PROGRAM BUTTON
-
,
p. 8
To program tracks
ress
STOP
PROGRAM
to
.
ress
the PLAY
p
then press
. Enter your tracks
selection and press PROGRAM again
accept P
to start programmed tracks.
29. CLEAR BUTTON
-
p. 10
Used t
This button is
also used to turn the EQUALIZER on and off.
EQUALIZER can be set to any of the preset settings.
Use the ENTER button to choose any of the presets.
o delete all
programmed tracks you have entered.
29. CLEAR BUTTON
-
p. 10
Used t
This button is
also used to turn the EQUALIZER on and off.
EQUALIZER can be set to any of the preset settings.
Use the ENTER button to choose any of the presets.
o delete all
programmed tracks you have entered.
30. SEARCH BUTTON
-
p. 9
You may directly enter a
time to search for on a disc; the disc plays from that
point.
30. SEARCH BUTTON
-
p. 9
You may directly enter a
time to search for on a disc; the disc plays from that
point.
32. STEP BUTTON-
Press to play the frame step by
step. Press the PLAY button once to resume playback.
normal.
32. STEP BUTTON-
Press to play the frame step by
step. Press the PLAY button once to resume playback.
normal.
31. REPEAT BUTTON
-
p. 9
Allows you to repeat a
track or disc.
1.Repeat a track - Press REPEAT, the screen shows
REP ONE, the unit plays the current track.
2.Repeat all - Press REPEAT, the screen shows REP
ALL, the unit plays all the tracks on the disc.
31. REPEAT BUTTON
-
p. 9
Allows you to repeat a
track or disc.
1.Repeat a track - Press REPEAT, the screen shows
REP ONE, the unit plays the current track.
2.Repeat all - Press REPEAT, the screen shows REP
ALL, the unit plays all the tracks on the disc.
33. A-B BUTTON
-
p. 9
A-B REPEAT allows you to
repeat a segment of a track until stopped. To use this
function:
1.Set a starting point A.
2.Set an end point B.
Afterwards, the unit plays from A to B.
3. Press A-B again, till A-B disappears.
33. A-B BUTTON
-
p. 9
A-B REPEAT allows you to
repeat a segment of a track until stopped. To use this
function:
1.Set a starting point A.
2.Set an end point B.
Afterwards, the unit plays from A to B.
3. Press A-B again, till A-B disappears.
34. VIEW BUTTON -
Swith the views when playing
multi-views media such as DVD.
34. VIEW BUTTON -
Swith the views when playing
multi-views media such as DVD.
35. ZOOM BUTTON -
Used to enlarge a section of
video or picture corrently being viewed.
35. ZOOM BUTTON -
Used to enlarge a section of
video or picture corrently being viewed.
36. RANDOM BUTTON -
.
Allow you to random play any
track from whole disc
36. RANDOM BUTTON -
.
Allow you to random play any
track from whole disc
37. DISPLAY BUTTON -
Show the elapsed or remain
time for single track or the total disc.
37. DISPLAY BUTTON -
Show the elapsed or remain
time for single track or the total disc.
38. MUTE BUTTON
- Turn On or Off the sound
38. MUTE BUTTON
- Turn On or Off the sound
39. STEP BUTTON-
Press to play the frame step by
step. Press the PLAY button once to resume playback.
normal.
39. STEP BUTTON-
Press to play the frame step by
step. Press the PLAY button once to resume playback.
normal.
40. MUSIC MODE BUTTON -
Enable or disable digital
3D sound effect.
40. MUSIC MODE BUTTON -
Enable or disable digital
3D sound effect.
4 . VOL+ BUTTON-
2
Press to turn up the music volume.
4 . VOL+ BUTTON-
2
Press to turn up the music volume.
4
Press the button while the disc is
playing, to pause playback.
1. PAUSE BUTTON-
4
Press the button while the disc is
playing, to pause playback.
1. PAUSE BUTTON-
43. PLAY BUTTON
-
p. 8
Press to being playback or to
close disc tray for playing automatically.
43. PLAY BUTTON
-
p. 8
Press to being playback or to
close disc tray for playing automatically.
44. FF>>(FAST FORWARD) BUTTON
-
p. 8
Shifts the
playing location forward quickly.
44. FF>>(FAST FORWARD) BUTTON
-
p. 8
Shifts the
playing location forward quickly.
45.VOL- BUTTON -
Press to lower the music volume.
45.VOL- BUTTON -
Press to lower the music volume.
46.
SKIP FORWARD BUTTON
-
p. 8
Press to go to
the beginning of the next track.
46.
SKIP FORWARD BUTTON
-
p. 8
Press to go to
the beginning of the next track.
47. STOP BUTTON -
Press to STOP a playback.
47. STOP BUTTON -
Press to STOP a playback.
25. KARAOKE BUTTON
-
p. 10
Toggles KARAOKE
MODE on and off. Enable key control funcion if on.
25. KARAOKE BUTTON
-
p. 10
Toggles KARAOKE
MODE on and off. Enable key control funcion if on.
Summary of Contents for DGX-506
Page 18: ...Notes 13 ...


