background image

14 


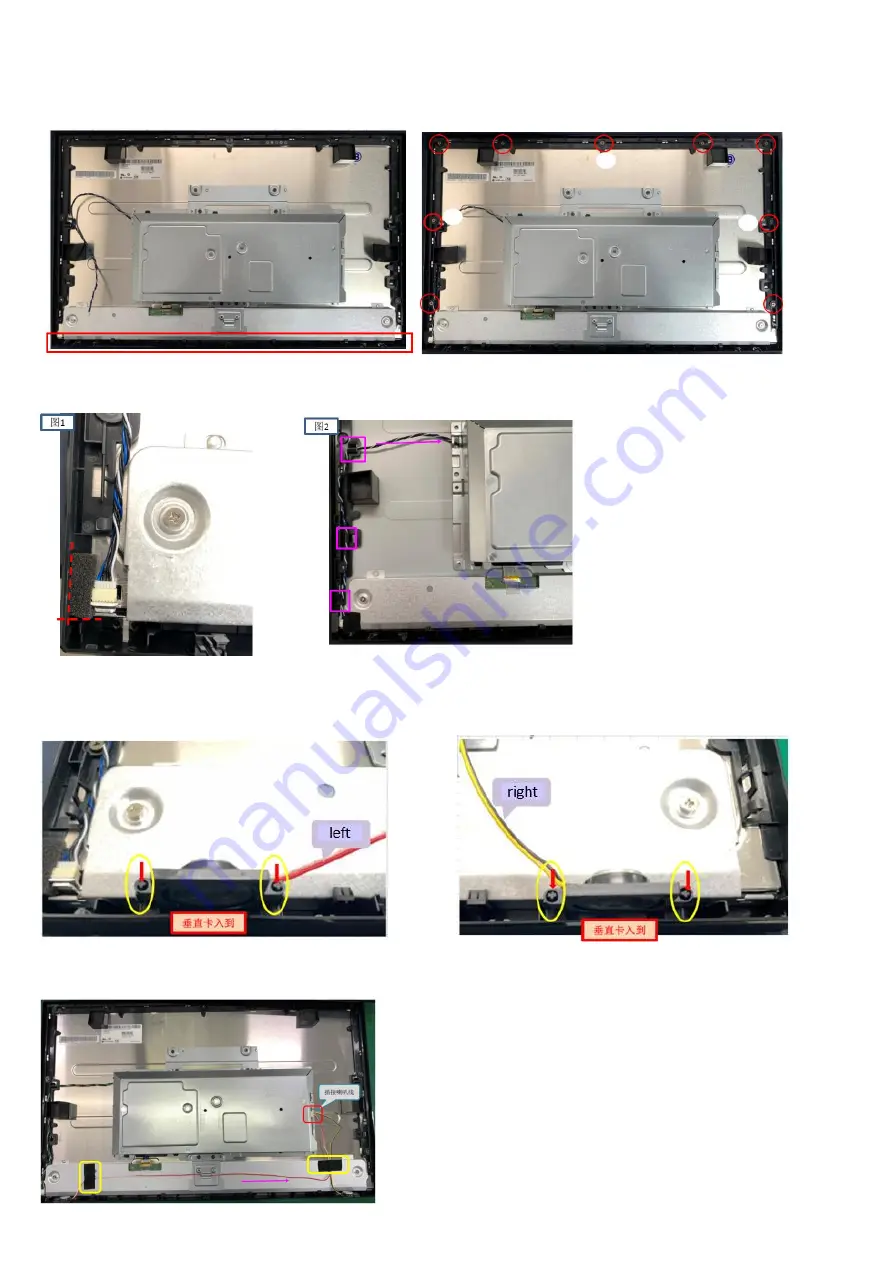
Step10. Assembly middle frame with panel and fix by screws (in red circle). 


Step11. Tape 1pcs CR sponge on the left side, and fix the backlight LVDS into the hook of mid frame. 


Step12. Assembly speaker on middle frame, and assembly speaker cable on main board. (red and white 
cable is on left side, yellow and black is on right side.) 


Step13. Tape speaker cable with acetate cloth tape (in yellow circle). 


Summary of Contents for VG272

Page 1: ...1 ACER Monitor_VG272 LIFECYCLE EXTENSION GUIDE...

Page 2: ...Mechanical Instructure 6 4 Assembly and Disassembly Procedures 7 5 Troubleshooting 15 6 FRU List 18 Safety Notice Any person attempting to service this chassis must familiarize with the chassis and be...

Page 3: ...epairing method may damage equipment or products It is recommended that service engineers should have repairing knowledge experience as well as appropriate product training per new model before perfor...

Page 4: ...4 1 Exploded Diagram...

Page 5: ...5 2 Wiring Connectivity diagram...

Page 6: ...and size of the tools that would typically can be used to disassemble the product to a point where components and materials requiring selective treatment can be removed Tool Description working table...

Page 7: ...sembly and Disassembly Procedures Disassembly Procedure Step 1 Pull the base neck assembly out Step 2 Unscrew four screws using a screwdriver Step 3 Use tools to separate the R C shell from the middle...

Page 8: ...4 Pull up the Rear Cover and pull out 2 pcs connecters Step 5 Separate 2pcs SPK from MID_FRAME Step 6 Use screwdriver unscrew four screws Step 7 pull out 2 Pcs connectors and remove main shielding fr...

Page 9: ...ing s hook Step 9 Use screwdriver unscrew six screws and remove main board and PSU from main shielding Step 10 Remove connecter cable and separate main board and power board Step 11 Use screwdriver un...

Page 10: ...s screws and separate shielding holder from the LCM Step 13 Use screwdriver unscrew 2pcs screws and disassemble key board from rear cover and separate navi key FFC Step 14 Use screwdriver unscrew the...

Page 11: ...p1 Insert 6pin backlight LVDS and 4pin PSU LVDS on main board Step2 Tape mylar on shielding as red mark Step3 Insert 30pin FFC to main board and 4pin LVDS to PSU then assembly main board and PSU into...

Page 12: ...4 Cover the big mylar on power board and tape small mylar at the side as pic 2 Fix the backlight cable on the hook of shielding Step5 Fix the bracket on panel by 4 screws Step6 Tape gasket block on sh...

Page 13: ...13 Step7 Insert 30pin FFC to panel Step8 Insert 6P backlight cable to panel Step9 Fix the shielding on panel by screws...

Page 14: ...sponge on the left side and fix the backlight LVDS into the hook of mid frame Step12 Assembly speaker on middle frame and assembly speaker cable on main board red and white cable is on left side yello...

Page 15: ...y on keypad and insert 8pin FFC to connecter Step15 Fix keypad on rear cover by screws then use yellow tape to tape FFC Insert FFC to main board Step14 Assembly rear cover and push around the surround...

Page 16: ...16 Step15 Lock the screw on rear cover in red circle...

Page 17: ...g into AC source AC power Check Power Board Key s LED indicator is light or blink No input signal Black screen but a little brightness Re insert 30pin edp cable between LCM and main board Still BLACK...

Page 18: ...ace keyboard Check U5 works END N Y Key works Disconnect edp cable Replace panel Check set is ok Check U5 works N Y Check LCM power R43 is 10V Check U7 pin2 is 19V Y N N Check U7 pin7 is High LCM powe...

Page 19: ...k Net 19V_BLD is 19V Replace BL1 BL1 is open BD1 is damaged BU1 is damaged Replace BU1 Check U5 works END N Y Y N Y N Replace BD1 Backlight on Y N Open BR27 Y N Check BU2 pin5 is High Check NET VB_CTR...

Page 20: ...20 6 FRU Field Replaceable Unit List...

Page 21: ...21...

Reviews: