background image

52

English ...

Replacing the lamp

The projector automatically detects the lamp life. When the lamp life is nearing the 

end of use, you will receive a warning message.

Lamp is approaching the end of its useful life 
Replacement suggested!

Warning! Lamp

When you see this message, please contact your local reseller or service center 

to change the lamp as soon as possible. Make sure the projector has been cooled 

down for at least 60 minutes before changing the lamp. 

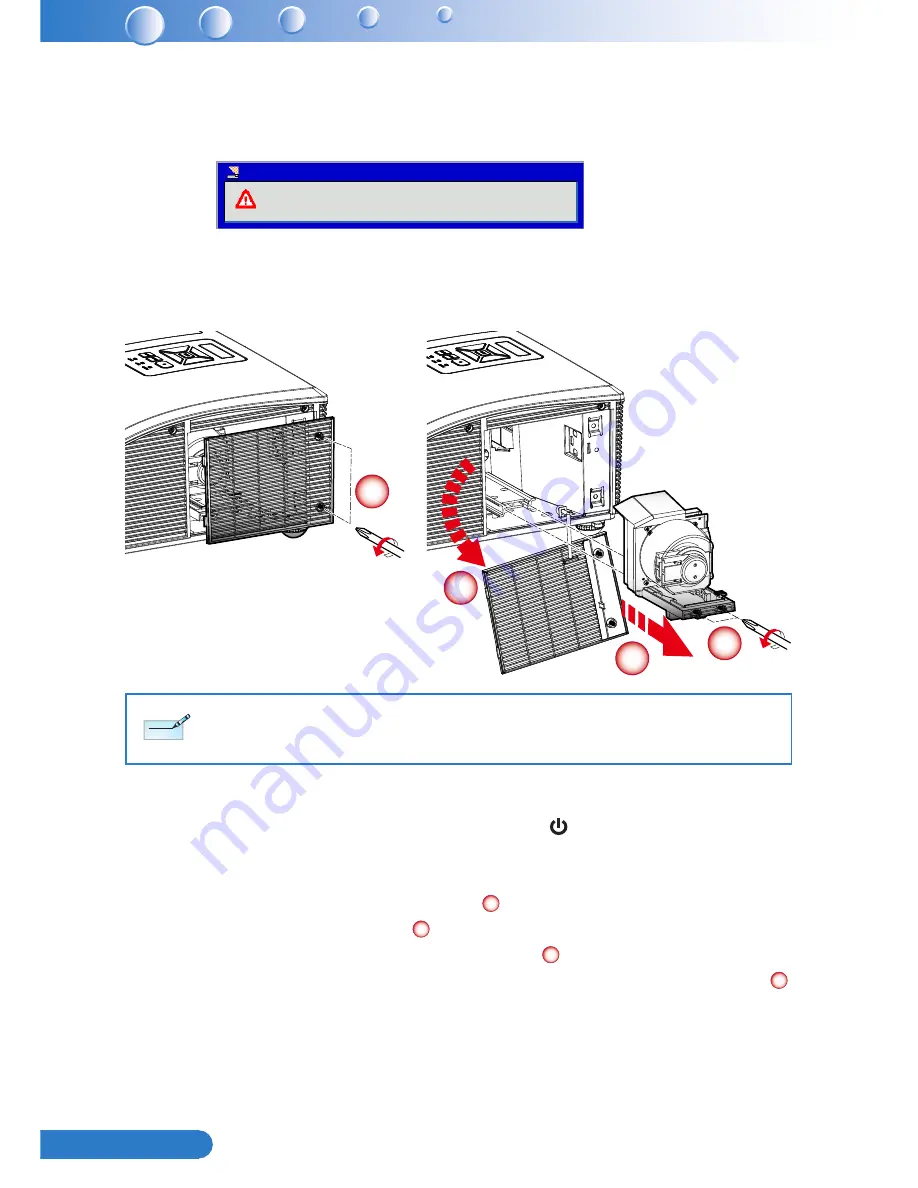
Lamp Replacement Procedure:

1.  Switch off the projector power by pressing the “

” button. 

2.  Allow the projector to cool down for at least 60 minutes.
3.  Disconnect the power cord.
4.  Unscrew the two screws on the cover. 

1

5.  Lift up and remove the cover. 

2

6.  Unscrew the two screws on the lamp module. 

3

7.  Pull up the lamp handle and remove the lamp module slowly and carefully. 

4

To replace the lamp module, reverse the previous steps.
8.   Turn on the projector and use “Lamp Reset” after the lamp module is 


replaced.

1

3

4

2

The screws on the lamp cover and the lamp cannot be removed.


The projector cannot be turned on if the lamp cover has not been placed back on the projector.


Do not touch the glass area of the lamp. Hand oil can cause the lamp to shatter. Use a dry cloth to clean 


the lamp module if it was accidentally touched.

N

ote

N

ote

Summary of Contents for U5213 Series

Page 1: ...Acer Projector U5313W U5213 U5310W Series User s Guide ...

Page 2: ...r s Height 15 Adjusting the Projector s Focus 16 Adjusting Projection Image Size 16 User Controls 17 Using the Control Panel 17 Using the Remote Control 18 Remote Control Battery Installation 18 On screen Display Menus 20 How to operate 20 Structure 21 Picture 23 Screen 25 Setting 27 Setting Security 29 Volume 31 Options 32 Options Lamp Settings 34 3D 35 LAN 36 Web Management 37 Appendices 43 Trou...

Page 3: ... of the lamp itself Please be sure to change the lamp when it shows warning messages Warning When the lamp is approaching the end of its lifetime the message Lamp Warning Lamp life exceeded will show on the screen Please contact your local reseller or service center to change the lamp as soon as possible Warning Reset the Clear Lamp Hours function from the on screen display Options Lamp Settings m...

Page 4: ...y please contact the service center Do not own wipe to avoid scratching the lens Block the slots and openings on the unit provided for ventilation Use abrasive cleaners waxes or solvents to clean the unit Use under the following conditions In extremely hot cold or humid environments Ensure that the ambient room temperature is within 5 40 C Relative Humidity is 5 40 C 80 Max non condensing In areas...

Page 5: ... device does cause harmful interference to radio or television reception which can be determined by turning the device off and on the user is encouraged to try to correct the interference by one or more of the following measures Reorient or relocate the receiving antenna Increase the separation between the device and receiver Connect the device into an outlet on a circuit different from that to wh...

Page 6: ...y not cause harmful interference and 2 This device must accept any interference received including interference that may cause undesired operation Notice Canadian users This Class B digital apparatus complies with Canadian ICES 003 Remarque à l intention des utilisateurs canadiens Cet appareil numerique de la classe B est conforme a la norme NMB 003 du Canada Declaration of Conformity for EU count...

Page 7: ...essories AC Power Cord Unpack and inspect the box contents to ensure all parts listed below are in the box If something is missing please contact our customer service Documentation User s Guide CD y y Battery Projector Remote Control Introduction Package Overview Note Note VGA Cable CR2025 3V ...

Page 8: ...ocus Ring 1 Lens 2 IR Receiver 3 Control Panel 4 Lamp Cover 5 Main Unit 3 4 8 6 1 3 2 Input Output Connection Ports 6 Power Socket 7 Elevator Feet 8 Elevator Feet 9 Elevator Feet Spacer 10 Front View Rear View Bottom View 9 5 7 10 ...

Page 9: ...English Control Panel Power LED 1 Power 2 Menu Exit 3 Lamp LED 4 Temp Temperature LED 5 Source 6 Resync 7 Four Directional Select Keys 8 IR Receiver 9 MENU POWER TEMP LAMP RESYNC SOURCE 5 1 4 2 7 6 8 3 9 ...

Page 10: ...ector 6 Left Right RCA Audio Input Connector For S Video Connector 7 Audio Output Connector 8 12V Trigger Relay Connector 12V 250mA 9 RS232 Connector 10 VGA In 1 Connector 11 VGA In 2 Connector 12 Audio In 2 Connector For VGA In 2 Connector 13 Composite Video Input Connector 14 Left Right RCA Audio Input Connector For Composite Video Input Connector 15 3 5mm Microphone Input Connector 16 Power Soc...

Page 11: ...7 Freeze 8 Blank 9 Mute 10 Power 11 PC 12 Keystone 13 Aspect 14 Volume 15 Remote Control 2 5 6 7 14 11 13 4 12 1 3 13 8 9 15 10 3V O L T S C R 2 0 2 5 Before using the remote control for the first time remove the transparent insulation tape See page 18 for battery installation Note Note ...

Page 12: ...ch country some regions may have different accessories Optional accessory Note Note 12V DC Jack 1 USB Cable 2 HDMI Cable 3 RS232 Cable 4 VGA Cable 5 Notebook Computer Power socket 1 2 6 7 7 7 VGA to DVI A Cable 6 Audio Cable 7 Network Cable 8 Power Cord 9 Monitor Audio Output 12V Output 3 5 5 5 4 8 9 ...

Page 13: ...crophone Cable 7 Power Cord 8 Composite Video Cable 9 DVD player Set top box HDTV receiver Video output S Video output 1 7 2 12V Output Power socket Audio Output DVD player Set top box HDTV receiver 3 3 4 4 9 8 6 4 6 5 Due to the difference in applications for each country some regions may have different accessories Optional accessory Note Note ...

Page 14: ... control The Power LED will turn blue Turn on your source that you want to display on the screen computer note 3 book video player etc The projector will detect the source automatically and will display on the screen If you connected multiple sources at the same time press the Source button 4 on the remote control to switch between inputs Powering On Off the Projector MENU POWER TEMP LAMP RESYNC S...

Page 15: ...d to indicate standby mode 4 It is now safe to unplug the power cord LED Indicator Messages Message Lamp LED Red Temp LED Red Power LED Red Power LED Blue Power Plug Flash ON to OFF 100ms Flash ON to OFF 100ms Flash ON to OFF 100ms Standby ON Power button ON ON Cooling state 0 5 second H ON 0 5 second L OFF flashing Power button OFF Cooling completed Standby Mode ON Firmware download ON ON ON Ther...

Page 16: ...To raise the image y y Use screw in feet to raise the image to the desired height angle and fine tune the display angle To lower the image y y Use screw in feet to lower the image to the desired height angle and fine tune the display angle Adjusting the Projected Image 1 2 Elevator Feet Elevator Feet Elevator Feet Spacer ...

Page 17: ...Projection Distance B Diagonal inch mm Inch mm Inch mm 70 1778 20 4 517 7 2 182 80 2032 23 5 596 10 3 262 87 2 2215 25 8 655 12 6 320 90 2286 26 7 677 13 5 343 100 2540 29 9 759 16 7 424 XGA Series Screen Size 4 3 Projection Distance A Projection Distance B Diagonal inch mm Inch mm Inch mm 60 1524 20 6 522 7 4 187 70 1778 24 3 617 11 1 282 77 1956 27 0 684 13 7 349 80 2032 28 0 712 14 9 378 90 228...

Page 18: ... screen display OSD Exit a menu ReSync Automatically synchronize the PC analog timing to its opti mized condition Source Select an input signal Four Directional Select Keys Use to select items or make adjustments to your selection Lamp LED Indicate the projector s lamp status Temp LED Indicate the projector s temperature status MENU POWER TEMP LAMP RESYNC SOURCE ...

Page 19: ...up O L T S J A P A N H 5 3V O L T S C R 2 0 2 5 M 3V O L T S C R 2 0 2 5 To ensure safe operation please observe the following precautions Use CR2025 type battery Avoid contact with water or liquid Do not expose the remote control to moisture or heat Do not drop the remote control If the battery has leaked in the remote control carefully wipe the case clean and install new battery Risk of an explo...

Page 20: ...al Select Keys Press direction buttons to select items or make adjustments 8 Freeze Press to freeze the image Press it again to un freeze the image 9 Blank Hide the screen picture Press again to display screen picture 10 Mute Mute the volume of speakers and audio out Press again and switch to normal volume 11 Power Power on off the projector 12 PC Switch to VGA 1 VGA2 source 13 Keystone Adjust ima...

Page 21: ...ust the settings by the buttons If the setting has 3 icon you could press the button to enter another sub menu Press the Menu button to close the sub menu after adjustment After adjusting the settings press the Menu button to go back to the main 4 menu To exit press the Menu button again The OSD menu will be closed and the 5 projector will automatically save the new settings On screen Display Menu...

Page 22: ...Screen 12V Out Off On Test Pattern Off On Security Off On Change Password 000000 Reset No Yes Mute Off On Volume 0 32 Microphone Volume 0 32 Logo Default User Logo Capture Auto Source Off On Input HDMI VGA 1 VGA 2 S Video Composite Auto Power Off Min 0 120 Lamp Hours Used Normal Lamp Hours Used ECO Lamp Life Reminder Off On Lamp Power Mode ECO Normal Clear Lamp Hours No Yes Dynamic Black Off On Hi...

Page 23: ...gs 3D 3D Auto Off On 3D Invert Off On 3D Format Frame Packing Side by Side Half Top and Bottom Frame Sequential Field Sequential 1080p 24 96Hz 144Hz DHCP Off On IP Address Subnet Mask Gateway DNS Store No Yes Reset No Yes LAN LAN Settings ...

Page 24: ...lor deviation due to the wall color to show the correct image tone Brightness Adjust the brightness of the image Press the button to darken image Press the button to lighten the image Contrast The Contrast controls the difference between the lightest and darkest parts of the picture Adjusting the contrast changes the amount of black and white in the image Press the button to decrease the contrast ...

Page 25: ...Adjust the color balance of red and green Press the button to increase the amount of green in the image Press the button to increase the amount of red in the image Sharpness Saturation and Hue functions are only supported under video mode Note Note Gamma Effects the representation of dark scenery With greater gamma value dark scenery will look brighter Color Temp Adjust the color temperature At hi...

Page 26: ...hase Synchronize the signal timing of the display with the graphic card If the image appears to be unstable or flickers use this function to correct it Clock Change the display data frequency to match the frequency of your computer s graphic card Use this function only if the image appears to flicker vertically H Position Press the button to move the image left Press the button to move the image r...

Page 27: ...tortion vertically If the image looks trapezoidal this option can help make the image rectangular Ceiling Mount Front The image is projected straight on the screen Front Ceiling This is the default selection When selected the image will turn upside down Rear When selected the image will appear reversed Rear Ceiling When selected the image will appear reversed in upside down position ...

Page 28: ...enu location on the display screen Closed Caption Use this function to enable close caption menu Select an appropriate closed captions option Off CC1 CC2 CC3 CC4 LAN Standby Choose On to enable LAN connection Choose Off to disable LAN connection VGA OUT Standby Choose On to enable VGA OUT connection Setting Language Menu Location Closed Caption VGA OUT Standby LAN Standby Auto Screen 12V Out Test ...

Page 29: ...e On the down up move of electronic screen will be related with power on off of Projector Test Pattern Display a test pattern Security Refer next page Reset Choose Yes to return the parameters on all menus to the factory default settings ...

Page 30: ... new password on the screen and then press to confirm it Change Password Use the y y or on the remote control to enter your current password on the screen and then press to confirm it Enter a new password 6 digits in length then press y y Enter to confirm it Enter the new password again and press y y Enter to confirm it If the incorrect password is entered for 3 times the projector will automatica...

Page 31: ...30 English Password default value is 000000 first time Note Note Select Enter Exit Securtiy Enter Security Code 6 digits Incorrect security code Re enter again ...

Page 32: ...Volume Press the button to decrease the volume Press the button to increase the volume Microphone Volume Press the button to decrease the microphone Volume Press the button to increase the microphone Volume Volume Volume Mute Volume Microphone Volume Off Select Enter Exit ...

Page 33: ...xceed the projector s native resolution WXGA 1280x800 Logo Capture is not available when 3D is enabled Before active this function it is recommended that Aspect Ratio is set to the Auto Note Note Auto Source On The projector will search for other signals if the current input signal is lost Off The projector will only search current input connection Input Press button to enable disable input source...

Page 34: ...ode is set to Movie Dynamic Black is not available when 3D or Interactive is enabled When Dynamic Black is available Lamp Power Mode selection is not available Note Note High Altitude On The built in fans run at high speed Select this option when using the projector at altitudes above 2500 feet 762 meters or higher Off The built in fans automatically run at a variable speed according to the intern...

Page 35: ...to hide the lamp end of life warning message Lamp Power Mode Normal Normal mode ECO Use this function to dim the projector lamp which will lower power consumption and extend the lamp life Clear Lamp Hours Choose Yes to reset the lamp hour counter after replacing the lamp Options Lamp Settings Select Enter Exit Lamp Settings Lamp hours used Normal Lamp hours used ECO Lamp life reminder Lamp Power M...

Page 36: ...re to select the 3D format Options are Frame Packing Side by Side Half Top and Bottom Frame Sequential and Field Sequential Frame Sequential is supported the DLP Link 3D input signals from VGA HDMI connector Frame Sequential Field Sequential are supported the HQFS 3D input signals from Composite S video connector connector Frame Packing Side by Side Half Top and Bottom are supported from HDMI 1 4a...

Page 37: ...nd Gateway Use or to select the number of IP address Subnet Mask and Gateway IP Address Select an IP address Subnet Mask Configure the Subnet Mask of the LAN connection Gateway Check the Gateway address with your network system administrator if you configure it manually DNS Check the DNS Server IP address with your network system administrator if you configure it manually Store Choose Yes to save ...

Page 38: ...ed on network web page for the input string in tools tab the limitation for 333 Input Length is in the below list space and the other punctuation key included Category Item Input Length characters Projector Projector Name 21 Location 21 Administrator 21 Admin Password New Password 4 Confirm 4 Note The characters allowed to be input are 0 9 and a Z Web Management Use Internet Explore 7 8 9 or Safar...

Page 39: ...e General tab under This connection uses the following items click Internet Protocol TCP IP and then click Properties Step 4 Click Use the following IP address and type in as below IP address 192 168 10 99 Subnet mask 255 255 255 0 Step 5 To open Internet Options click IE web browser click Internet Options click the Connections tab and click LAN Settings Step 6 The Local Area Network LAN Setting d...

Page 40: ...nguage for web management LAN Settings Page Set up the Projector Name Location and Administrator information up to 21 characters for each field Press Save to store the settings Choose DHCP to assign an IP address to the projector from a DHCP server automatically or Manual to assign an IP address manually Set up the IP Address Device ID and Port information on the Crestron function ...

Page 41: ...s Front Front Ceiling Rear and Rear Ceiling See Ceiling Mount function Source Select The Source Select menu allows you to select your projector s input source You can select VGA 1 VGA 2 S Video Composite Video and HDMI Color Mode Select a mode to optimize the display image based on how the projector is being used See Color Mode function Blank Screen Select On Off to hide unhide the screen picture ...

Page 42: ...ition You can select the abnormalities or warnings to be notified by email When any of the alert conditions occur an email will be sent to the recipients To Cc Click the Save button to the save settings Security Setting Page Set up an administrator password to access the Web Management Step 1 Password Click Enable first Step 2 New Password Enter the new password Step 3 Confirm Password Confirm the...

Page 43: ...or Password and click Login button Welcome to Web Management Projector Name IP Address Administrator Password Login Projector Information D21211 192 168 0 100 Web Management Crestron For more information please visit http www crestron com www crestron com getroomview ...

Page 44: ...ure that the Blank feature is not turned on Partial scrolling or incorrectly displayed image Press Auto Sync on the remote control If you are using a PC y y For Windows 95 98 2000 XP Windows 7 Open the My Computer icon the Control Panel folder and 111 then double click on the Display icon Select the Settings tab 222 Verify that your display resolution setting is lower than or equal to 333 1080p Cl...

Page 45: ...le Fn F4 Notebook Brand Function Keys Acer Fn F5 Asus Fn F8 Dell Fn F8 Gateway Fn F4 IBM Lenovo Fn F7 HP Compaq Fn F4 NEC Fn F3 Toshiba Fn F5 Mac Apple System Preference Display Arrangement Mirror display If you experience difficulty changing resolutions or your monitor freezes y y restart all equipment including the projector The screen of the Notebook or PowerBook computer is not displaying your...

Page 46: ...mat on projector side If you play 4 3 format DVD title please change the format as 4 3 in projector OSD If the image is still stretched you will also need to setup the display format as 16 9 wide aspect ratio type on your DVD player Image is too small or too large Move the projector closer to or further from the screen Press Menu on the remote control or on the control panel Go to Screen Aspect Ra...

Page 47: ... of the remote control is within 30 both horizon tally and vertically of one of the IR receivers on the projector Make sure there are not any obstructions between the remote control and the projector Move to within 7 m 0 of the projector Make sure the batteries are inserted correctly Replace batteries if they are exhausted Sound Problems If no sound from the projector If you are playing an externa...

Page 48: ...OSD and choose Side by Side Half for input signal is HDMI 1 4a 3D 3D Format is only supported on 3D Timing on page 51 On Screen Messages Power off confirm y y Power Off Press power key again Fan lock error y y The proejctor will switch off automatically Warning FAN LOCKED No source found y y VGA 1 No Source Found Out of display range y y VGA Out of display range Over temperature y y Warning TEMPER...

Page 49: ...0x400 70 31 5 SVGA 800x600 56 35 1 800x600 60 37 9 800x600 72 48 1 800x600 75 46 9 800x600 85 53 7 800x600 120 77 4 Apple MAC II 832x624 75 49 1 XGA 1024x768 60 48 4 1024x768 70 56 5 1024x768 75 60 0 1024x768 85 68 7 1024x768 120 99 0 Apple MAC II 1152x870 75 68 7 SXGA 1280x1024 60 64 0 1280x1024 72 77 0 1280x1024 75 80 0 QuadVGA 1280x960 60 60 0 1280x960 75 75 2 SXGA 1400x1050 60 65 3 UXGA 1600x1...

Page 50: ...50 60 65 3 Component signal Modes Resolution V Frequency Hz H Frequency Hz 480i 720x480 1440x480 59 94 29 97 15 7 576i 720x576 1440x576 50 25 15 6 480p 720x480 59 94 31 5 576p 720x576 50 31 3 720p 1280x720 60 45 0 720p 1280x720 50 37 5 1080i 1920x1080 60 30 33 8 1080i 1920x1080 50 25 28 1 1080p 1920x1080 23 98 24 27 0 1080p 1920x1080 60 67 5 1080p 1920x1080 50 56 3 ...

Page 51: ...31 5 SVGA 800x600 56 35 1 800x600 60 37 9 800x600 72 48 1 800x600 75 46 9 800x600 85 53 7 800x600 120 77 4 Apple MAC II 832x624 75 49 1 XGA 1024x768 60 48 4 1024x768 70 56 5 1024x768 75 60 0 1024x768 85 68 7 1024x768 120 99 0 Apple MAC II 1152x870 75 68 7 SXGA 1280x1024 60 64 0 1280x1024 72 77 0 1280x1024 75 80 0 QuadVGA 1280x960 60 60 0 1280x960 75 75 2 SXGA 1400x1050 60 65 3 UXGA 1600x1200 60 75...

Page 52: ... 1440x576 50 25 15 6 480p 720x480 59 94 31 5 576p 720x576 50 31 3 720p 1280x720 60 45 0 720p 1280x720 50 37 5 1080i 1920x1080 60 30 33 8 1080i 1920x1080 50 25 28 1 1080p 1920x1080 23 98 24 27 0 1080p 1920x1080 60 67 5 1080p 1920x1080 50 56 3 HDMI 1 4a mandatory 3D timing Video Signal Modes Resolution V Frequency Hz H Frequency Hz Frame Packing 720p 50 31 5 720p 59 94 60 15 7 1080p 23 98 24 15 6 Si...

Page 53: ...n 2 Allow the projector to cool down for at least 60 minutes 3 Disconnect the power cord 4 Unscrew the two screws on the cover 1 5 Lift up and remove the cover 2 6 Unscrew the two screws on the lamp module 3 7 Pull up the lamp handle and remove the lamp module slowly and carefully 4 To replace the lamp module reverse the previous steps 8 Turn on the projector and use Lamp Reset after the lamp modu...

Page 54: ... procedure Cleaning the Dust Filter Procedure 1 Switch off the projector power by pressing the button 2 Disconnect the power cord 3 Pull the latch by the arrow direction 1 4 Remove the dust filter slowly and carefully 5 Clean or replace the dust filter 2 To install the dust filter reverse the previous steps 6 Turn on the projector and use Reset Dust Filter after the dust filter is re placed 1 2 Th...

Page 55: ...attach a mount to the projector meet the following specifications Screw type M4x4 y y Diameter 4 mm Length 11 mm Please note that damage resulting from incorrect installation will invalidate the warranty Note Note Ceiling Mount Installation 137 49 85 50 151 30 112 50 74 75 357 00 367 00 Unit mm Lens Center ...

Page 56: ...size 80 2 96 6 Diagonal 68 81 9 Diagonal Max focus screen size 70 100 Diagonal 60 90 Diagonal Projection distance 517 mm 759 mm 10mm 522 mm 802 mm 10mm Throw ratio 0 35 0 43 Horizontal scan rate 30 k 100 kHz Vertical refresh scan rate 50 120 Hz Keystone correction 15 degrees Weight 8 Kg 17 64 lbs Dimensions W x D x H 357 W x 367 D x 135 H mm excluding foot 357 W x 367 D x 231 H mm including reflec...

Page 57: ... 1 y y 3 5 mm audio jack input x 2 y y RCA L R audio jack input x 2 y y 3 5 mm audio jack input Microphone x 1 y y 3 5 mm audio jack input x 1 y y Mini USB B x 1 y y Standard package contents AC power cord x 1 y y VGA cable x 1 y y Remote control x 1 y y CR2025 x1 y y User s guide CD x 1 y y Design and specifications are subject to change without prior notice Note Note ...

Reviews: