background image

 2 Customising my computer

38

English

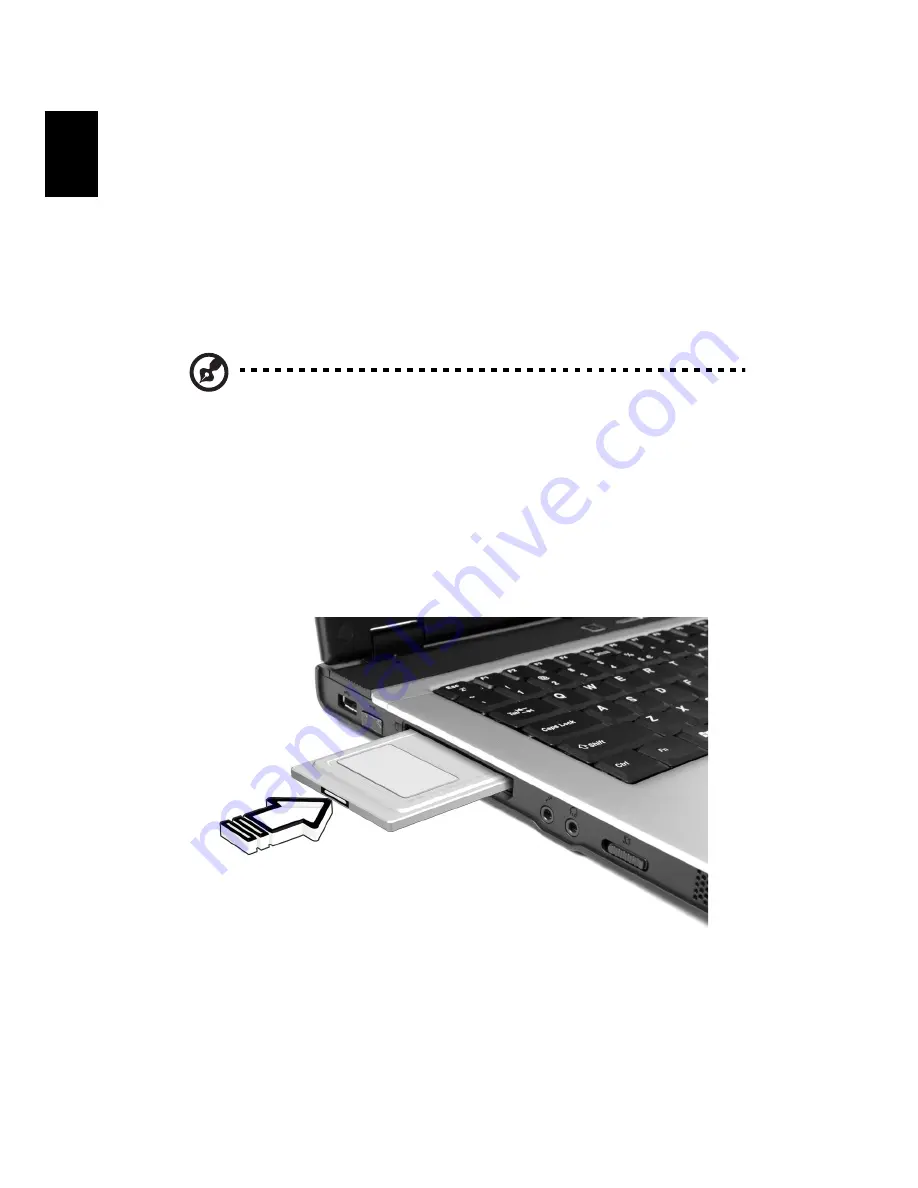
PC Card slot

The Type II PC Card slot found on the left side of the computer accepts 
PC Cards that enhance the usability and expandability of the computer. 
These cards should have a PC Card logo on them.

PC Cards (formerly PCMCIA) are add-on cards for portable computers, 
giving you expansion possibilities long afforded by desktop PCs. 
Popular PC Cards include flash, fax/data modem, LAN, wireless LAN and 
SCSI cards. CardBus improves on the 16-bit PC card technology by 
expanding the bandwidth to 32 bits.

Note: Refer to your card's manual for details on how to install and 
use the card, and its functions.

Inserting a PC Card

Insert the card into the slot and make the proper connections (e.g., 
network cable), if necessary. See your card manual for details.

Ejecting a PC Card

Before ejecting a PC Card:

1

Exit the application using the card.

Summary of Contents for TRAVELMATE TravelMate 2350

Page 1: ...TravelMate 2350 Series User s Guide...

Page 2: ...rning your unit should include the serial number model number and purchase information No part of this publication may be reproduced stored in a retrieval system or transmitted in any form or by any m...

Page 3: ...com First off the Just for Starters poster helps you get started with setting up your computer This User s guide introduces you to the many ways your computer can help you be more productive This gui...

Page 4: ...nagement functions See Windows help for more information Use the customised functions for power management You can also shut down the computer by closing the display cover or by pressing the Sleep hot...

Page 5: ...on top of it Carefully route the power cord and any cables away from where people walk When unplugging the power cord do not pull on the cord itself but pull on the plug If you are using an extension...

Page 6: ...r Use a soft cloth moistened with water Do not use liquid or aerosol cleaners To clean the display screen use an LCD cleaning kit If any of the following occurs The computer has been dropped or the bo...

Page 7: ...Hard disc 23 Optical drive 23 Using software 24 Audio 25 Adjusting the volume 25 Power management 25 Moving around with your TravelMate 26 Disconnecting from the desktop 26 Moving around 26 Taking the...

Page 8: ...re without a Recovery CD 43 Setup password and exit 44 3 Troubleshooting my computer 45 Frequently asked questions 47 Troubleshooting tips 50 Error messages 51 Requesting service 52 International Trav...

Page 9: ...1 Getting to know your TravelMate...

Page 10: ...combines high performance versatility power management features and multimedia capabilities with a unique style and ergonomic design Work with unmatched productivity and reliability with your powerfu...

Page 11: ...computer as illustrated in the Just for Starters poster let us show you around your new TravelMate computer Front open view Item Description 1 Screen Also called Liquid Crystal Display LCD displays co...

Page 12: ...and right The left and right buttons function like the left and right mouse buttons 7 Touchpad Touch sensitive pointing device which functions like a computer mouse 8 Status indicators Light Emitting...

Page 13: ...atch Latch for opening and closing the computer 5 Power indicator Lights when the computer is on 6 Battery indicator Lights when the battery is being charged 7 Wireless Bluetooth communications Lights...

Page 14: ...ard 3 PC Card eject button Ejects the PC Card from the slot 4 Microphone line in jack Accepts input from external microphones or other audio line in devices e g audio CD player stereo walkman and etc...

Page 15: ...ish Item Description 1 Stereo speaker Generates sound 2 HDD Houses the computer s hard disc 3 DC in jack Connects the AC adaptor 4 Ventilation slots Enable the computer to stay cool even after prolong...

Page 16: ...ternal display port Connects to a display device e g external monitor LCD projector and displays up to 16 7 million colors and up to 1600 x 1200 at 85 Hz and 2048 x 1536 at 75 Hz resolution 3 Two USB...

Page 17: ...depending on the optical drive type 2 Memory compartment Houses the computer s main memory 3 Hard disc bay Houses the computer s hard disc secured by a screw 4 Battery compartment release latch Unlatc...

Page 18: ...drive High capacity Enhanced IDE hard disc Li ion main battery pack Power management system with advanced configuration power interface ACPI Display 14 1 or 15 0 thin film transistor TFT displaying at...

Page 19: ...ed fax data modem port Ethernet Fast Ethernet port Three USB 2 0 ports two at the rear and one on left 802 11b g Wireless LAN manufacturing option Bluetooth manufacturing option Expansion One Type II...

Page 20: ...elow the display screen and three on the front of the computer The Power and Battery status indicators are visible even when the display is closed Icon Function Description HDD Lights when hard disc d...

Page 21: ...en Pad Lock is activated Num Lock Lights when Num Lock is activated Power indicator Lights when the computer is on Battery indicator Lights when the battery is being charged Wireless Bluetooth communi...

Page 22: ...Pad Lock Fn F10 When Pad Lock is on the embedded keypad is enabled In this mode the keypad acts as cursor keys Num Lock Fn F11 When Num Lock is on the embedded keypad is in numeric mode The marked key...

Page 23: ...cated by small characters located on the right hand side of the keycaps Desired action Num Lock on Num Lock off Type numbers Use embedded keypad in the same was as the numeric keypad on a standard key...

Page 24: ...y Description Windows logo key Start button Combinations with this key perform shortcut functions Below are a few examples Tab Activates next taskbar button E Explore My Computer F Find document M Min...

Page 25: ...her key in the hot key combination Hot key Icon Function Description Fn Esc Sleep Puts the computer in Sleep mode See Power management on page 25 Fn F5 Display toggle Switches display output between t...

Page 26: ...set to United States International To verify the keyboard type in Windows Millennium Edition and Windows 2000 follow the steps below 1 Click on Start Settings Control Panel 2 Double click on Keyboard...

Page 27: ...n English United States is set to United States International If not select and click on ADD then select United States International and click on OK 5 Click on OK To type the Euro symbol 1 Locate the...

Page 28: ...e buttons The left most button is the power button To the right of the power button are the two launch keys They are designated as the Empowering Key and a programmable button Launch key Default appli...

Page 29: ...almrest provides optimum comfort and support Touchpad basics The following items teach you how to use the touchpad Move your finger across the touchpad to move the cursor Press the left and right butt...

Page 30: ...ing harder will not increase the touchpad s responsiveness Function Left button Right button Tap Execute Click twice quickly Tap twice at the same speed as double clicking a mouse button Select Click...

Page 31: ...where your programs and data are stored Optical drive Your computer comes equipped with an optical drive which may be one of the following DVD CD RW Combo drive DVD Dual drive DVD Super Multi drive Ej...

Page 32: ...region code a maximum of five times including the first time after which the last region code set will remain permanent Recovering your hard disc does not reset the number of times the region code ha...

Page 33: ...refers to any activity involving one or more of the following devices keyboard mouse floppy drive hard disc peripherals connected to the serial and parallel ports and video memory If no activity is d...

Page 34: ...d other external devices 7 Disconnect the Kensington lock if you are using one to secure the computer Moving around When you are just moving within short distances for example from your office desk to...

Page 35: ...about 4 5 hours If your meeting is shorter than that you probably do not need to take anything with you other than the computer What to bring to long meetings If your meeting lasts longer than 4 5 ho...

Page 36: ...de Special considerations Follow these guidelines to protect your computer while traveling to and from work Minimise the effects of temperature changes by keeping the computer with you If you need to...

Page 37: ...ake sure that the battery in the computer is charged Airport security may require you to turn on your computer when carrying it into the gate area What to take with you Take the following items with y...

Page 38: ...toms officials International Traveler s Warranty passport Special considerations Follow the same special considerations as when traveling with the computer In addition these tips are useful when trave...

Page 39: ...d an immovable object such as a table or handle of a locked drawer Insert the lock into the notch and turn the key to secure the lock Some keyless models are also available Using passwords Passwords p...

Page 40: ...when you press F2 to enter the BIOS Utility at boot up Type the Supervisor Password and press Enter to access the BIOS Utility If you enter the password incorrectly a warning message appears Try agai...

Page 41: ...2 Customising my computer...

Page 42: ...basics of your TravelMate computer let s get acquainted with the advanced features of your computer In this chapter you will learn how to add options upgrade components for better performance and cust...

Page 43: ...vices to the computer see your online guide for more details Fax Data modem Your computer has a built in V 92 56Kbps AC 97 Link fax data modem Warning This modem port is not compatible with digital ph...

Page 44: ...ature The built in network feature allows you to connect your computer to an Ethernet based 10 100 Mbps network To use the network feature connect an Ethernet cable from the network jack on the rear o...

Page 45: ...Serial Bus The USB 2 0 port is a high speed serial bus which allows you to connect USB peripherals without taking up precious system resources Your computer has three ports available one on the left...

Page 46: ...bilities long afforded by desktop PCs Popular PC Cards include flash fax data modem LAN wireless LAN and SCSI cards CardBus improves on the 16 bit PC card technology by expanding the bandwidth to 32 b...

Page 47: ...uter allows you to upgrade key components when you need increased performance Note Contact your authorised dealer if you decide to perform a key component upgrade Memory upgrade Memory is expandable t...

Page 48: ...its base 2 a Remove the screws from the memory cover then b lift up and remove the memory cover 3 a Insert the memory module diagonally into the slot then b gently press it down until it clicks into...

Page 49: ...r eManager user interface appears featuring four main settings Acer eSetting Acer ePresentation Acer ePowerManagement and Acer eRecovery manufacturing option To set the Acer Empowering Key see Launch...

Page 50: ...tility The BIOS Utility is a hardware configuration program built into your computer s BIOS Your computer is already properly configured and optimised and you do not need to run this utility However i...

Page 51: ...perations 5 The system will install the operating system and language you choose Restore without a Recovery CD This recovery process helps you restore the C drive with the original software content th...

Page 52: ...d press Enter to select Setup password and exit Press F3 to setup password or press F5 to exit the system recovery process when the Acer Self Configuration Preload window appears If F3 is pressed the...

Page 53: ...3 Troubleshooting my computer...

Page 54: ...ad it before calling a technician if a problem occurs Solutions to more serious problems require opening up the computer Do not attempt to open the computer by yourself Contact your dealer or an autho...

Page 55: ...uter and to the power outlet If it is lit check the following Is a non bootable non system disc in the external USB floppy drive Remove or replace it with a system disc and press Ctrl Alt Del to resta...

Page 56: ...from the computer Check the following The volume may be muted In Windows look at the volume control speaker icon on the taskbar If it is crossed out click on the icon and deselect the Mute option The...

Page 57: ...printing to an infrared printer During the POST press F2 to access the BIOS Utility and verify that the infrared port is enabled Make sure both devices are IrDA compliant The printer does not work Che...

Page 58: ...ncorporates an advanced design that delivers onscreen error message reports to help you solve problems If the system reports an error message or an error symptom occurs see Error messages on page 51 I...

Page 59: ...r or an authorised service center Disc Boot Failure Insert a system bootable disc into the floppy drive A then press Enter to reboot Equipment Configuration Error Press F2 during POST to enter the BIO...

Page 60: ...passport contains all you need to know about the ITW program A list of available authorised service centers is in this handy booklet Read this passport thoroughly Always have your ITW passport on han...

Page 61: ...eported by your computer write them down as they appear on the screen or the number and sequence in the case of beeps You are required to provide the following information Name _______________________...

Page 62: ...3 Troubleshooting my computer 54 English...

Page 63: ...Appendix A Specifications...

Page 64: ...This appendix lists the general specifications of your computer...

Page 65: ...e internal optical drive Display and video 14 1 or 15 0 thin film transistor TFT displaying at 1024 x 768 XGA resolution or 15 0 TFT displaying at 1024 x 768 XGA resolution Simultaneous LCD and CRT di...

Page 66: ...ne speaker headphone out jack 3 5 mm mini jack One microphone in jack Three USB 2 0 ports two at the rear and one on left side Weight and dimensions 2 51 kg 5 53 lbs for 14 1 LCD model 2 65 kg 5 84 lb...

Page 67: ...rge in use AC adapter 65 Watt Auto sensing 90 to 264 V AC 47 to 63 Hz Options 256 and 512 MB or 1 GB memory upgrade modules Additional Li ion battery pack Type No BATCL50L 8 Cell Tech No 14 8Vdc 4300m...

Page 68: ...Appendix A Specifications 60 English...

Page 69: ...Appendix B Notices...

Page 70: ...This appendix lists the general notices of your computer...

Page 71: ...evice does cause harmful interference to radio or television reception which can be determined by turning the device off and on the user is encouraged to try to correct the interference by one or more...

Page 72: ...e and 2 this device must accept any interference received including interference that may cause undesired operation Notice Canadian users This Class B digital apparatus complies with Canadian ICES 003...

Page 73: ...d in advance to give you an opportunity to maintain uninterrupted telephone service If this equipment should fail to operate properly disconnect the equipment from the phone line to determine if it is...

Page 74: ...tes no endorsement of the product by Telecom nor does it provide any sort of warranty Above all it provides no assurance that any item will work correctly in all respects with another item of Teleperm...

Page 75: ...that any product is compatible with all of Telecom s network services 2 This equipment is not capable under all operating conditions of correct operation at the higher speeds for which it is designed...

Page 76: ...ther similar surface This product should never be placed near or over a radiator or heat register or in a built in installation unless proper ventilation is provided 6 This product should be operated...

Page 77: ...s uses lithium batteries Replace the battery with the same type as the product s battery we recommend in the product specification list Use of another battery may present a risk of fire or explosion 1...

Page 78: ...E IKKE IND I STR LEN VARO LAVATTAESSA OLET ALTTINA LASERS TEILYLLE VARNING LASERSTR LNING N R DENNA DEL R PPNAD L TUIJOTA S TEESEENSTIRRA EJ IN I STR LEN VARNING LASERSTR LNING NAR DENNA DEL R PPNADST...

Page 79: ...any country or region in which it has been approved for wireless use Depending on configurations this product may or may not contain wireless radio devices such as wireless LAN and or Bluetooth modul...

Page 80: ...mal operation is minimized as follows 1 Users are requested to follow the RF safety instructions on wireless option devices that are included in the user s manual of each RF option device Caution To c...

Page 81: ...rated indoors and installation outdoors is subject to licensing c Operation in 5 GHz band The device for the band 5150 5250 MHz is only for indoor usage to reduce potential for harmful interference to...

Page 82: ...site at www hc sc gc ca rpb Note Acer Wireless Mini PCI Adapter implements a transmission diversity function The function does not emit radio frequencies simultaneously from both antennas One of the...

Page 83: ...blank Is in compliance with the essential requirements and other relevant provisions of the following EC directives Reference No Title 89 336 EEC Electromagnetic Compatibility EMC directive 73 23 EEC...

Page 84: ...Appendix B Notices 76 English...

Page 85: ...on indicator 5 13 performance 10 security 31 setting up a home office 29 taking home 27 traveling internationally 30 traveling on local trips 29 troubleshooting 46 turning off iv connections network 3...

Page 86: ...ion for modem use 49 S safety CD or DVD 70 FCC notice 63 general instructions 68 modem notices 65 scroll lock 14 on indicator 12 security keylock 31 passwords 31 service when to call vi speakers hotke...

Reviews: