background image

English

1

PB

Unpacking

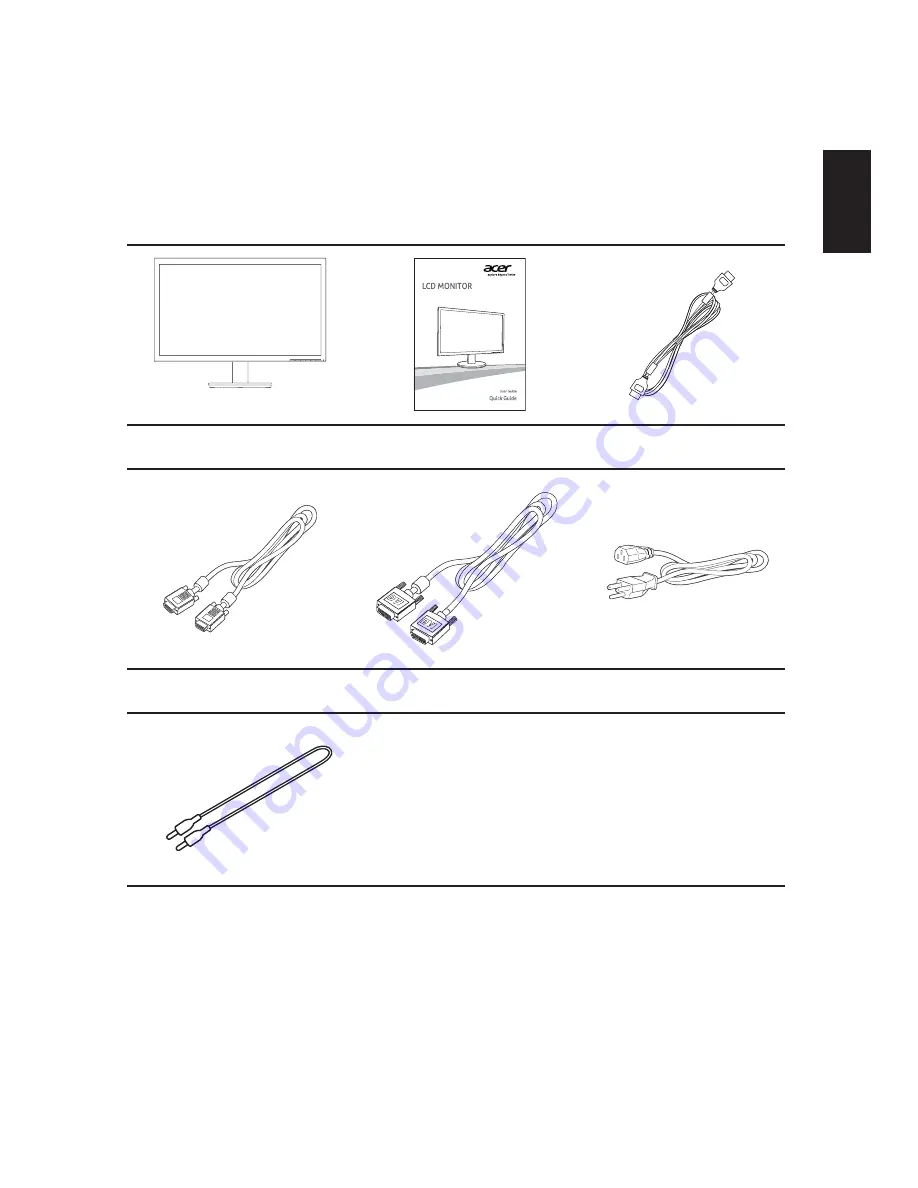
Please check that the following items are present when you unpack the box, and save 
the packing materials in case you need to ship or transport the monitor in the future.

LCD monitor

Quick start guide

HDMI cable (Option)

D-sub cable

DVI cable (Optional)

AC Power cord

Audio cable (Optional)

Summary of Contents for K242HQL

Page 1: ...Acer LCD Monitor User s Guide ...

Page 2: ...ided below The serial number and model number are recorded on the label affixed to your computer All correspondence concerning your unit should include the serial number model number and purchase information No part of this publication may be reproduced stored in a retrieval system or transmitted in any form or by any means electronically mechanically by photocopy recording or otherwise without th...

Page 3: ...nging the image or turning off the power switch for a few hours Information for your safety and comfort Safety instructions Read these instructions carefully Keep this document for future reference Follow all warnings and instructions marked on the product Cleaning your monitor Please carefully follow these guidelines when cleaning the monitor Always unplug the monitor before cleaning Use a soft c...

Page 4: ...r covered The openings should never be blocked by placing the product on a bed sofa rug or other similar surface This product should never be placed near or over a radiator or heat register or in a built in installation unless proper ventilation is provided Never push objects of any kind into this product through cabinet slots as they may touch dangerous voltage points or short out parts that coul...

Page 5: ...sted CSA certified type SPT 2 rated 7 A 125 V minimum VDE approved or its equivalent 4 5 meters 15 feet maximum length Product servicing Do not attempt to service this product yourself as opening or removing covers may expose you to dangerous voltage points or other risks Refer all servicing to qualified service personnel Unplug this product from the wall outlet and refer servicing to qualified se...

Page 6: ...n dust or metal powders Additional safety information Your device and its enhancements may contain small parts Keep them out of the reach of small children IT Equipment Recycling Information Acer is strongly committed to environmental protection and views recycling in the form of salvaging and disposal of used equipment as one of the company s top priorities in minimizing the burden placed on the ...

Page 7: ...n shipped enabled for power management Activate display s Sleep mode within 15 minutes of user inactivity Activate computer s Sleep mode within 30 minutes of user inactivity Wake the computer from Sleep mode by pushing the power button Tips and information for comfortable use Computer users may complain of eyestrain and headaches after prolonged use Users are also at risk of physical injury after ...

Page 8: ... footrest or raising your sitting height to achieve maximum comfort Observe the following tips refrain from staying too long in one fixed posture avoid slouching forward and or leaning backward stand up and walk around regularly to remove the strain on your leg muscles Taking care of your vision Long viewing hours wearing incorrect glasses or contact lenses glare excessive room lighting poorly foc...

Page 9: ...ight by using drapes shades or blinds using a task light changing the display s viewing angle using a glare reduction filter using a display visor such as a piece of cardboard extended from the display s top front edge Avoid adjusting your display to an awkward viewing angle Avoid looking at bright light sources such as open windows for extended periods of time Developing good work habits Develop ...

Page 10: ...ard or other standardizing documents EN55022 2010 Class B EN55024 2010 EN 61000 3 2 2006 A1 2009 A2 2009 Class D EN61000 3 3 2008 EN60950 1 2006 A11 2009 A1 2010 A12 2011 Regulation EC No 1275 2008 EN 50564 2011 IEC 62301 2011 EN50581 2012 We hereby declare above product is in compliance with the essential requirements and other relevant provisions of EMC Directive 2004 108 EC Low Voltage Directiv...

Page 11: ...armful interference and 2 this device must accept any interference received including interference that may cause undesired operation The following local Manufacturer Importer is responsible for this declaration Product LCD Monitor Model Number K242HQL K242HYL SKU Number K242HQL K242HYL xxxxxx x 0 9 a z orA Z Name of Responsible Party AcerAmerica Corporation Address of Responsible Party 333 West S...

Page 12: ...e use vii Finding your comfort zone viii Taking care of your vision viii Developing good work habits ix Declaration of Conformity Federal Communications Commission Declaration of Conformity Unpacking 1 Attaching the Base 2 Screen position adjustment 2 Connecting the Power cord 3 Power saving 3 Display Data Channel DDC 3 Connector pin assignment 4 Standard timing table 6 Installation 7 Users contro...

Page 13: ...g items are present when you unpack the box and save the packing materials in case you need to ship or transport the monitor in the future LCD monitor Quick start guide HDMI cable Option D sub cable DVI cable Optional AC Power cord Audio cable Optional ...

Page 14: ...ewingposition youcanadjustthemonitortiltbyusingbothofyourhandsto holdtheedgesofthemonitorasshownbelow Themonitorcanbeadjustedto25degreesupor5 degrees down Note Remove the monitor and monitor base from its packaging Carefully place the monitor face down on a stable surface use acloth to avoid scratching the screen 25 ...

Page 15: ...ipmentwillbeinstalled Power saving The monitor will be switched to power saving mode by the control signal from the display controller as indicated by the amber colored power LED Mode LED light On Blue Power saving Amber The power saving mode will be kept until a control signal has been detected or the keyboard or mouse is activated The recovery time from power saving mode back to on is around 3 s...

Page 16: ...sync 7 G ground 15 DDC serial clock 8 B ground 24 pin color display signal cable PIN No Description PIN No Description 1 TMDS data 2 13 NC 2 TMDS data 2 14 5 V power 3 TMDS data 2 4 shield 15 GND return for 5 V hsync vsync 4 NC 16 Hot plug detection 5 NC 17 TMDS data 0 6 DDC clock 18 TMDS data 0 7 DDC data 19 TMDS data 0 5 shield 8 NC 20 NC 9 TMDS data 1 21 NC 10 TMDS data 1 22 TMDS clock shield 1...

Page 17: ...tion PIN No Description 1 TMDS Data2 2 TMDS Data2 Shield 3 TMDS Data2 4 TMDS Data1 5 TMDS Data1 Shield 6 TMDS Data1 7 TMDS Data0 8 TMDS Data0 Shield 9 TMDS Data0 10 TMDS Clock 11 TMDS Clock Shield 12 TMDS Clock 13 CEC 14 Reserved N C on device 15 SCL 16 SDA 17 DDC CEC Ground 18 5V Power 19 Hot Plug Detect ...

Page 18: ...480 66 66 Hz 3 VESA 720x400 70 Hz 4 SVGA 800x600 56 Hz 5 SVGA 800x600 60 Hz 6 XGA 1024x768 60 Hz 7 XGA 1024x768 70 Hz 8 VESA 1152x864 75 Hz 9 SXGA 1280x1024 60 Hz 10 VESA 1280x720 60 Hz 11 WXGA 1280x800 60 Hz 12 WXGA 1440x900 60 Hz 13 WSXGA 1680x1050 60 Hz 14 FHD 1920x1080 60 Hz ...

Page 19: ... Optional only HDMI Input Model a Make sure both the monitor and computer are powered OFF b Connect the HDMI cable to the computer 2 Connect the power cord Connect the power cord to the monitor then to a properly grounded AC outlet 3 Optional Connect the audio input socket AUDIO IN of the LCD monitor and the line out port on the computer with the audio cable 4 Turn on the monitor and computer Turn...

Page 20: ...he HPos VPos Clock and Focus Only available on VGA port MENU OSD functions Press this button to activate the OSD menu Volume adjust Press this button to activate the volume OSD menu INPUT Input Key Use Input key to select from different video sources that may be connected to your monitor a VGA input b DVI input c HDMI input Option As you cycle through the sources you will see the following message...

Page 21: ...menu Features and benefits Main Menu icon Sub Menu icon Sub Menu item Description N A User mode User defined Settings can be fine tuned to suit any situation N A ECO mode Adjusts the settings to reduce power consumption N A Standard mode Default Setting Reflects native display capability N A Grahpic mode Enhances colors and emphasize fine detail Pictures and photographs appear in vibrant colors wi...

Page 22: ...ge Adjusting the picture quality Exit Entert Picture Acer eColor Management Blue Light Brightness Contrast H Position V Position Focus Clock 100 50 0 0 0 0 OFF 1 Press the MENU key to bring up the OSD 2 Using the keys select Picture from the OSD Then navigate to the picture element you wish to adjust 3 Use the keys to adjust the sliding scales 4 The Picture menu can be used to adjust the current B...

Page 23: ...Adjusting the OSD position Exit Enter OSD OSD Timeout 10 1 Press the MENU key to bring up the OSD 2 Using the directional keys select OSD from the on screen display Then navigate to the feature you wish to adjust ...

Page 24: ...t Language Reset Full ON OD Normal OFF VGA English 1 Press the MENU key to bring up the OSD 2 Using the keys select Setting from the OSD Then navigate to the feature you wish to adjust 3 The Setting menu can be used to adjust the screen Menu Language and other important settings ...

Page 25: ... Information S N ETRLA00803104000502400 1920x1080 H 68KHz V 60Hz VGA Input 1 Press the MENU key to bring up the OSD 2 Using the keys select Information from the OSD Then the basic information of LCD monitor will show up for current input ...

Page 26: ...f monitor Check if the computer system is switched on and in power saving standby mode Unstable picture Blue Check if the specification of graphics adapter and monitor is in compliance which may be causing the input signal frequency mismatch Abnormal picture Image is missing off center too large or too small on the screen Using the OSD menu adjust focus clock H position and V position with non sta...

Page 27: ...nnected at the back of monitor Check if the computer system is switched on and in power saving standby mode HDMI mode Problem LED status Remedy No picture visible Blue Using the OSD adjust brightness and contrast to maximum or reset to their default settings Off Check the power switch Check if the AC power cord is properly connected to the monitor Amber Check if the video signal cable is properly ...

Reviews: