background image


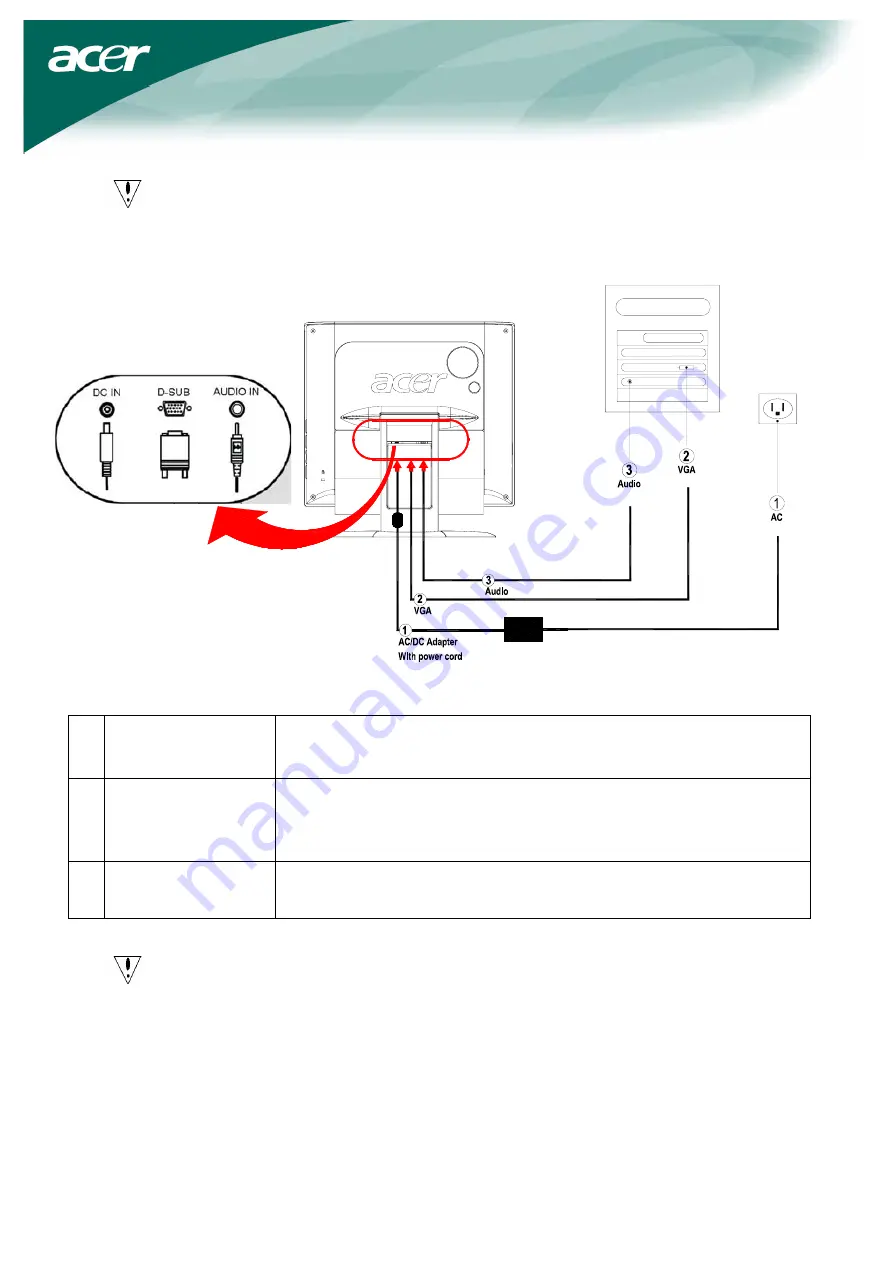
Connecting the Devices 


Caution

:


Make sure that the computer and the monitor are both disconnected from the 
power supply. 


c

  AC/DC Adapter 

With power cord 

Connect the plug of the AC/DC adapter to the (DC IN ) socket of the   
monitor , then be insert the power cord into the adapter and a properly 
grounded electric socket. 

d

  VGA Cable   

Connect the signal cable to the VGA input socket (VGA IN) of the 
monitor , and connect the signal cable to the VGA output socket of the 
graphics card on the computer. Then tighten the thumbscrews on the 
connector. 

e

  Audio Cable 


Connect the audio input socket (AUDIO IN) of the LCD monitor and 
the computer by means of the audio cable. 


WARNING

:

 The D-Sub 15 pin plug of the VGA cable is trapezoid in shape. Make sure 

the shape of the plug matches the shape of the socket it is inserted into, and 
that none of the pins are bent or otherwise damaged. 


Switching the Power 

First, switch the power on to the monitor, then switch the power on to the computer. When you 
see the LED on the power button go blue, this indicates the computer is ready for use. Allow 
about 10 seconds for the video signal to appear. If you do not see the blue light LED on the power 
button or a video signal, check the connections. 
 

Summary of Contents for F-20 - Ferrari - 20" LCD Monitor

Page 1: ...ing the Viewing Angle 4 Connecting the Devices 5 Switching the Power 5 Adjusting display settings 6 External Controls 6 OSD options 7 OSD Menu 7 Troubleshooting 9 General specifications 10 Recycling Information Any question about recycling monitors please contact Acer agents For more information about Acer please visit http www acer com ...

Page 2: ...d or damage to the unit z If you encounter a problem please check the Troubleshooting section first If this does not resolve the problem do not attempt to repair the monitor by yourself opening or removing covers can lead to injury or death through electrocution among other hazards Please contact a qualified engineer if you find the troubleshooting section does not help SPECIAL NOTES ON LCD MONITO...

Page 3: ...Monitor Power Cord Audio Cable VGA Cable AC DC Adapter User Manual CD Quick Start Guide Installation instructions Assembling the Monitor 1 Put the base of monitor on the desk carefully 2 Put the monitor on flat table or plate ...

Page 4: ... the monitor 1 Unplug the power cord to make sure the power is off 2 Put the monitor into carton carefully Important To find a clean and flat surface table place the monitor To select clean and dry clothes put under the monitor for avoiding scratches Adjusting the Viewing Angle The viewing angle of the monitor ranges from 5 35 ...

Page 5: ...e thumbscrews on the connector e Audio Cable Connect the audio input socket AUDIO IN of the LCD monitor and the computer by means of the audio cable WARNING The D Sub 15 pin plug of the VGA cable is trapezoid in shape Make sure the shape of the plug matches the shape of the socket it is inserted into and that none of the pins are bent or otherwise damaged Switching the Power First switch the power...

Page 6: ... or adjust OSD options If OSD is inactive press once then press the buttons marked or to adjust the volume 4 DOWN MINUS If OSD is active press to select or adjust OSD options If OSD is inactive press once then press the buttons marked or to adjust the volume 5 AUTO If OSD is active press to enter a selection in OSD If OSD is inactive press and the monitor will automatically optimize the position f...

Page 7: ...Contrast This adjusts dark and light shades of color relative to each other to achieve a comfortable contrast Focus This removes any horizontal distortion and makes the picture clear and sharp Clock If there are any vertical stripes seen on the background of the screen this renders them less noticeable by minimizing their size It also changes the size of the horizontal screen H Position This adjus...

Page 8: ...shows brief information on the screen Reset Recall to default settings Settings OSD H Position OSD V Position OSD Time out This changes the position of the OSD window on the screen and staying time Language Select the OSD menu language from English French German Italian Spanish Simplified Chinese Traditional Chinese Japanese and Russian ...

Page 9: ...e shows inappropriate colors See Color temp to adjust RGB color or to select color temperature Picture bounces or a wave pattern is present in the picture Move or switch off electrical devices that may be causing interference Inspect the monitor s video cable and ensure that none of the pins are bent Image is not sized or centered properly Press Auto key and the monitor will automatically optimize...

Page 10: ...Options Auto config Wide mode Information Reset Settings OSD H Position OSD V Position OSD time out Language Video Interface Video Analog 0 7V Sync TTL Audio 5W x 2 Plug Play DDC2B Power Power Source 100 240V AC 50 60 Hz Power consumption during normal operation 65W approx Power consumption during active off operation 3W Dimension and Weight Dimension W H D 510 3X443 9X206 6 mm with stand Weight N...

Reviews: