background image

2

Eng

lis

h

Touchpad basics (with two-click buttons)

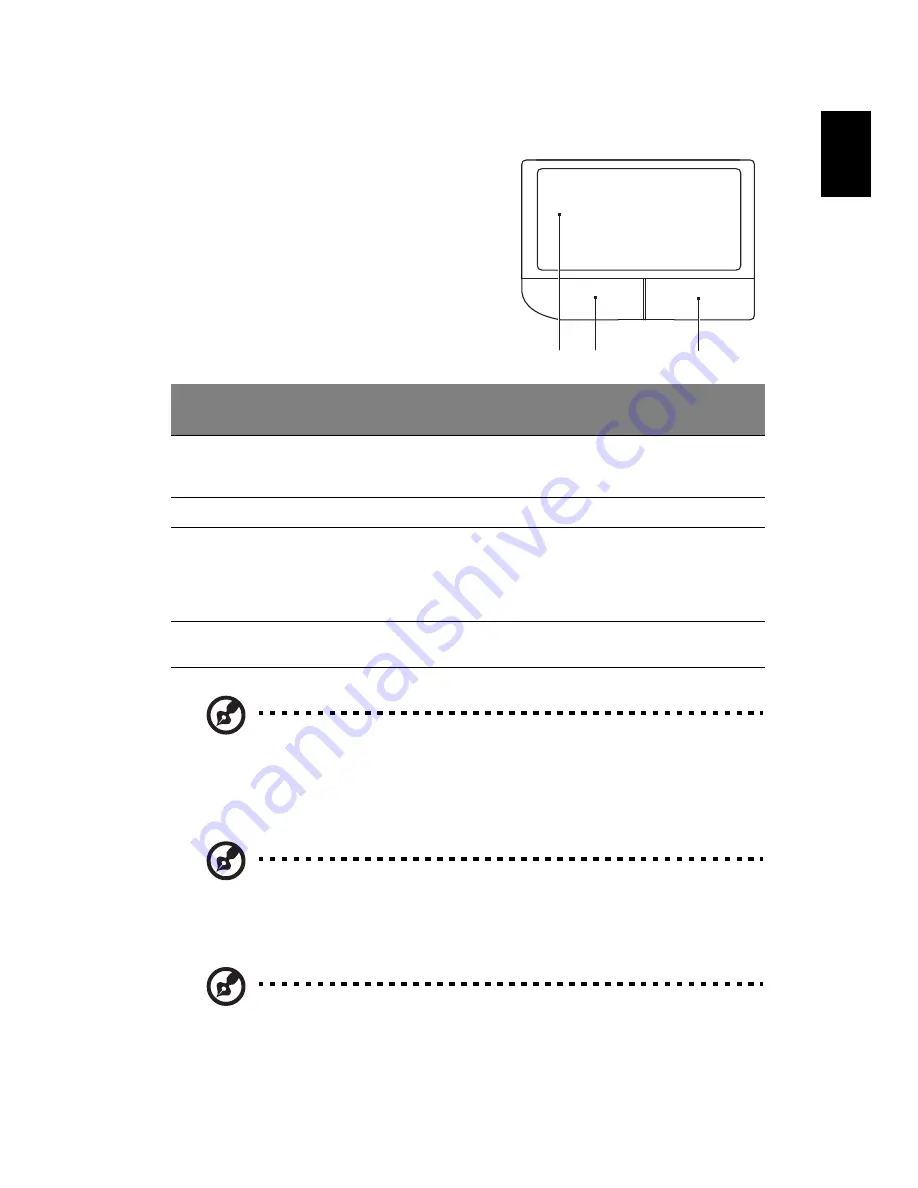
The following items show you how to use 
the touchpad with two-click buttons.

Move your finger across the touchpad 
(1) to move the cursor.
Press the left (2) and right (3) buttons 
located beneath the touchpad to 
perform selection and execution 
functions. These two buttons are similar 
to the left and right buttons on a 
mouse. Tapping on the touchpad is the 
same as clicking the left button.

Note1: When using the touchpad, keep it — and your fingers — 
dry and clean. The touchpad is sensitive to finger movement; 
hence, the lighter the touch, the better the response. Tapping 
harder will not increase the touchpad's responsiveness.

Note2: By default, vertical and horizontal scrolling is enabled on 
your touchpad. It can be disabled under Mouse settings in 
Windows Control Panel.

Note: Illustrations for reference only. The exact configuration of 
your PC depends on the model purchased.

Function

Left button (2)

Right 
button (3)

Main touchpad (1)

Execute

Quickly click twice.

Tap twice (at the same speed 

as double-clicking a mouse 

button).

Select

Click once.

Tap once.

Drag

Click and hold, then 

use finger on the 

touchpad to drag 

the cursor.

Tap twice (at the same speed 

as double-clicking a mouse 

button); rest your finger on 

the touchpad on the second 

tap and drag the cursor.

Access context 

menu

Click once.

1

2

3

Summary of Contents for Extensa Series

Page 1: ...Extensa Series Generic User Guide...

Page 2: ...tions or warranties either expressed or implied with respect to the contents hereof and specifically disclaims the implied warranties of merchantability or fitness for a particular purpose Record the...

Page 3: ...g all power cords from the power supplies CAUTION for Accessibility Be sure that the power outlet you plug the power cord into is easily accessible and located as close to the equipment operator as po...

Page 4: ...ventilation openings and AC adapter may get hot To avoid injury ensure they do not come in contact with your skin or body Your device and its enhancements may contain small parts Keep them out of the...

Page 5: ...wall outlet and refer servicing to qualified service personnel when the power cord or plug is damaged cut or frayed liquid was spilled into the product the product was exposed to rain or water the pr...

Page 6: ...rminals may damage the battery or the connecting object The capacity and lifetime of the battery will be reduced if the battery is left in hot or cold places such as in a closed car in summer or winte...

Page 7: ...TR LING NAR DEKSEL PNESSTIRR IKKE INN I STR LEN Telephone line safety Disconnect all telephone lines from the equipment when not in use and or before servicing To avoid the remote risk of electric sho...

Page 8: ...intained between wireless devices and a pacemaker to avoid potential interference with the pacemaker These recommendations are consistent with the independent research by and recommendations of Wirele...

Page 9: ...plosion or fire resulting in bodily injury or even death Switch off the device at refueling points such as near gas pumps at service stations Observe restrictions on the use of radio equipment in fuel...

Page 10: ...at are ENERGY STAR qualified use less energy and prevent greenhouse gas emissions by meeting strict energy efficiency guidelines set by the U S Environmental Protection Agency Acer is committed to off...

Page 11: ...tips refrain from staying too long in one fixed posture avoid slouching forward and or leaning backward stand up and walk around regularly to remove the strain on your leg muscles take short rests to...

Page 12: ...ge Avoid adjusting your display to an awkward viewing angle Avoid looking at bright light sources such as open windows for extended periods of time Developing good work habits Develop the following wo...

Page 13: ...eader is not installed on your computer clicking on AcerSystem User Guide will run the Adobe Reader setup program first Follow the instructions on the screen to complete the installation For instructi...

Page 14: ...will serve you well if you take care of it Do not expose the computer to direct sunlight Do not place it near sources of heat such as a radiator Do not expose the computer to temperatures below 0 C 3...

Page 15: ...our battery pack Use only batteries of the same kind as replacements Turn the power off before removing or replacing batteries Do not tamper with batteries Keep them away from children Dispose of used...

Page 16: ...xvi...

Page 17: ...battery pack xv Cleaning and servicing xv Touchpad 1 Touchpad basics with fingerprint reader 1 Touchpad basics with two click buttons 2 Using the keyboard 3 Lock keys and embedded numeric keypad 3 Wi...
Page 18: ...rity lock 20 Using passwords 20 Entering passwords 21 Setting passwords 21 Expanding through options 22 Connectivity options 22 Fax data modem only for certain models 22 Built in network feature 23 Fa...

Page 19: ...xel statement 38 Radio device regulatory notice 38 General 38 The FCC RF safety requirement 38 Canada Low power license exempt radio communication devices RSS 210 40 Exposure of humans to RF fields RS...
Page 20: ...touchpad is the same as clicking the left button Use Acer Bio Protection fingerprint reader 3 supporting Acer FingerNav 4 way control function only for certain models to scroll up or down and move lef...

Page 21: ...r the touch the better the response Tapping harder will not increase the touchpad s responsiveness Note2 By default vertical and horizontal scrolling is enabled on your touchpad It can be disabled und...

Page 22: ...F11 When Num Lock is on the embedded keypad is in numeric mode The keys function as a calculator complete with the arithmetic operators and Use this mode when you need to do a lot of numeric data entr...

Page 23: ...M Minimizes all windows R Open the Run dialog box T Cycle through programs on the taskbar U Open Ease of Access Center X Open Windows Mobility Center BREAK Display the System Properties dialog box SHI...

Page 24: ...ction varies according to the language settings Audio The computer comes with 32 bit High Definition HD Audio and stereo speakers Acer PureZone only for certain models The system provides you whole ne...

Page 25: ...gs and click OK to complete the process Acer GridVista is a handy utility that offers four pre defined display settings so you can view multiple windows on the same screen To access this function plea...

Page 26: ...7 English 3 Enjoy the convenience of a well organized desktop Note Please ensure that the resolution setting of your second monitor is set to the manufacturer s recommended value...

Page 27: ...screen The computer s power management system automatically blanks the screen to save power Press any key to turn the display back on If pressing a key does not turn the display back on three things...

Page 28: ...oes not work Check the following Make sure that the printer is connected to a power outlet and that it is turned on Make sure that the printer cable is connected securely to the computer s parallel po...

Page 29: ...nd all data will be erased It is important to back up all data files before using this option Before performing a restore operation please check the BIOS settings 1 Check to see if Acer disk to disk r...

Page 30: ...ll get in contact with our offices worldwide Please consult http global acer com Before you call Please have the following information available when you call Acer for online service and please be at...

Page 31: ...ra fully charged battery pack available as backup Contact your dealer for details on ordering a spare battery pack Maximizing the battery s life Like all other batteries your computer s battery will d...

Page 32: ...of the battery is adversely affected by the following usage patterns Using the computer on constant AC power with the battery inserted If you want to use constant AC power you are advised to remove t...

Page 33: ...y charged battery Checking the battery level The Windows power meter indicates the current battery level Rest the cursor over the battery power icon on the taskbar to see the battery s present charge...

Page 34: ...outlet are available 1 Plug the AC adapter into the computer and then connect to the mains power supply 2 Save all necessary files 3 Resume work Turn off the computer if you want to recharge the batte...

Page 35: ...ation 2 Make sure the security lock key of ezDock II II is in place and in the unlocked position 3 Press the undock button until the computer moves up 4 Grasping both sides of the computer remove the...

Page 36: ...n the battery by putting the computer in Sleep mode Press Fn F4 or close the display cover whenever you are not actively using the computer To resume open the display if closed then press and release...

Page 37: ...re between outside and room temperature Setting up a home office If you frequently work on your computer at home you may want to purchase a second AC adapter for use at home With a second AC adapter y...

Page 38: ...cords that are appropriate for the country to which you are traveling Spare fully charged battery packs Additional printer driver files if you plan to use another printer Proof of purchase in case you...

Page 39: ...otect your computer from unauthorized access Setting these passwords creates several different levels of protection for your computer and data Supervisor Password prevents unauthorized entry into the...

Page 40: ...s Enter When the User Password is set and the password on boot parameter is enabled a prompt appears at boot up Type the User Password and press Enter to use the computer If you enter the password inc...

Page 41: ...ices to the computer read the following section Fax data modem only for certain models Your computer has a built in V 92 56 Kbps fax data modem Warning This modem port is not compatible with digital p...

Page 42: ...net RJ 45 port on the chassis of the computer to a network jack or hub on your network Fast Infrared FIR only for certain models The computer s Fast Infrared FIR port allows you to do wireless data tr...

Page 43: ...to connect USB peripherals without taking up precious system resources IEEE 1394 port only for certain models The computer s IEEE 1394 port allows you to connect to an IEEE 1394 compatible device lik...

Page 44: ...io and video equipment Single cable implementation allows tidy setup and fast connection PC Card slot only for certain models The Type II PC Card slot of the computer accepts PC Cards that enhance the...

Page 45: ...ain models The ExpressCard is the newest version of the PC Card It is a smaller and faster interface that further enhances the usability and expandability of your computer ExpressCards support a vast...

Page 46: ...icon on the taskbar and stop the card operation 3 Push the card gently into the slot and release to pop out the card Then pull the card free from the slot Installing memory Follow these steps to inst...

Page 47: ...clicks into place 4 Replace the memory cover and secure it with the screw 5 Reinstall the battery pack and reconnect the AC adapter 6 Turn on the computer The computer automatically detects and recon...

Page 48: ...sequence in the BIOS utility activate the BIOS utility then select Boot from the categories listed at the top of the screen Enable disk to disk recovery To enable disk to disk recovery hard disk reco...

Page 49: ...ding the first time after which the last region code set will remain permanent Recovering your hard disk does not reset the number of times the region code has been set Refer to the table below for DV...

Page 50: ...to the computer and video memory If no activity is detected for a period of time called an inactivity timeout the computer stops some or all of these devices in order to conserve energy This computer...

Page 51: ...sages in alphabetical order together with the recommended course of action Error messages Corrective action CMOS battery bad Contact your dealer or an authorized service center CMOS checksum error Con...

Page 52: ...lish If you still encounter problems after going through the corrective measures please contact your dealer or an authorized service center for assistance Some problems may be solved using the BIOS ut...

Page 53: ...e of the following measures Reorient or relocate the receiving antenna Increase the separation between the device and receiver Connect the device into an outlet on a circuit different from that to whi...

Page 54: ...abel that contains among other information the FCC Registration Number and Ringer Equivalence Number REN for this equipment Upon request you must provide this information to your telephone company If...

Page 55: ...CSA Certified Telecommunication Line Cord TBR 21 This equipment has been approved Council Decision 98 482 EC TBR 21 for single terminal connection to the Public Switched Telephone Network PSTN However...

Page 56: ...pment shall go on hook for a period of not less than 30 seconds between the end of one attempt and the beginning of the next call attempt 4 Some parameters required for compliance with Telecom s Telep...

Page 57: ...ormity for EU countries Hereby Acer declares that this notebook PC series is in compliance with the essential requirements and other relevant provisions of Directive 1999 5 EC List of applicable count...

Page 58: ...nsure good quality radiocommunication 2 This device is restricted to indoor use due to its operation in the 5 15 to 5 25 GHz frequency range FCC requires this product to be used indoors for the freque...

Page 59: ...hc sc gc ca rpb LCD panel ergonomic specifications Design viewing distance 500 mm Design inclination angle 0 0 Design azimuth angle 90 0 Viewing direction range class Class IV Screen tilt angle 85 0 D...

Reviews: