Chapter 3
97
Removing the Inverter Board and FPC Cable
1.
See “Removing the Battery Pack” on page 60.
2.
See “Removing the Lower Cover” on page 62.
3.
See “Removing the DIMM” on page 63.
4.
See “Removing the WLAN Board Modules” on page 64.
5.
See “Removing the Middle Cover and the Power Board” on page 75.
6.
See “Removing the Keyboard” on page 77.
7.
See “Removing the LCD Module” on page 79.
8.
See “Removing the LCD Bezel” on page 95.
9.
See “Removing the LCD module with the Brackets” on page 96.
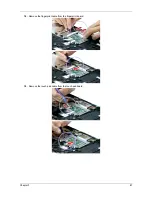
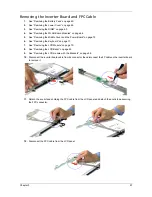
10. Disconnect the inverter board cable from its connector, then disconnect the 2P cable on the inverter board
to remove it.
11. Detach the acetic tapes holding the FPC cable from the LCD panel and detach the acetic tape securing
the FPC connector.
12. Disconnect the FPC cable from the LCD panel.
Summary of Contents for Extensa 5420G
Page 6: ...VI ...
Page 10: ...X Table of Contents ...
Page 65: ...Chapter 2 55 ...
Page 66: ...56 Chapter 2 ...
Page 112: ...102 Chapter 3 ...
Page 126: ...116 Chapter 4 F5h Boot to Mini DOS F6h Clear Huge Segment F7h Boot to Full DOS Code Beeps ...
Page 138: ...128 Chapter 5 ...
Page 172: ...Appendix A 162 ...
Page 178: ...168 Appendix C ...


