14
Remote Control & OSD Operating instructions
Using the Remote Control
.
Chapter 3
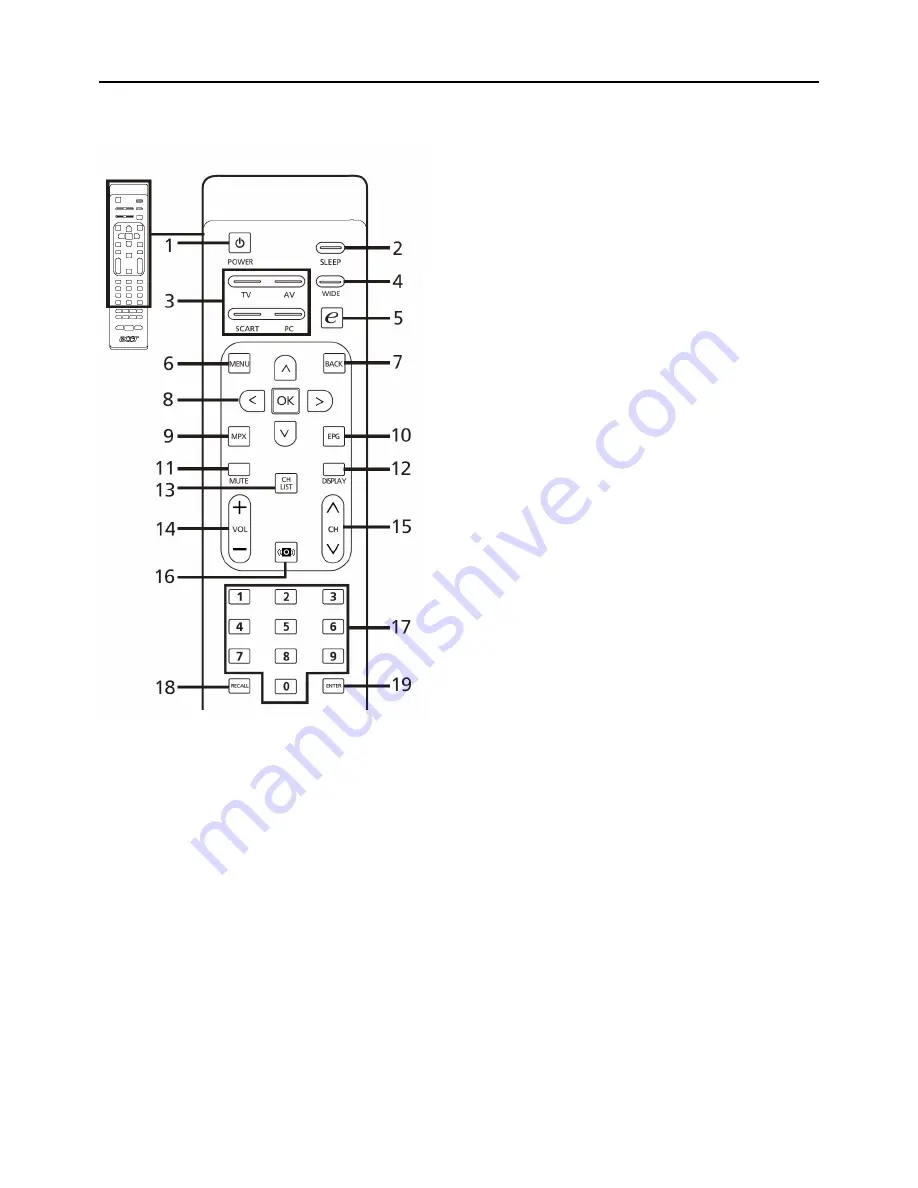
5 e (Empowering Technology)
Press to activate and select the scenario mode. See
page 9.
6 MENU
Press to open or close the Menu.
7 Back
Press to back to previous Menu.
8 Directional keys/OK
9 MPX
Press to select the audio type, displayed in the top
right-hand corner (mono, stereo, bilingual).
10 EPG (No function for these models)
11 MUTE
Press to toggle audio on and off.
12 DISPLAY
Press to display or change input/ channel
information (dependent on input/source type).
13 CH LIST
Press to launch the channel/program
list.
14 VOL (+/-)
Press to increase or decrease the
volume.
15 CH (up/down)
Press to sequentially select the TV
channel.
16 Audio effects
Press to turn audio mode to Surround
mode.
17 Number keys
.
18 RECALL
Press to return to the previous channel.
19 ENTER (No function for these models)
1 POWER
Press to turn your TV on/off.
2 SLEEP
Press to set a time period after which the TV will
switch itself to standby (5, 0, 5, 20, 25 ... 80
minutes).
3 Input buttons (TV/AV/SCART/PC)
Press to select correct input mode.
4 WIDE
Press to toggle scaling mode between Super
zoom, 4:3, 4:9, 6: 0, 6: 0 subtitle, Full screen and
Wide detect modes.
Summary of Contents for AT1930
Page 1: ...1 Acer AT2230 AT2231 Service Guide ...
Page 7: ...7 Monitor Features General Specifications Chapter 1 ...
Page 10: ...10 Factory Preset Display Modes Analog RGB Signal Timing ...
Page 12: ...12 Optical Specifications Test Conditions Optical Specifications ...
Page 13: ...13 Connecting Peripherals Front panel controls Chapter 2 ...
Page 16: ...16 Using the OSD Menus ...
Page 17: ...17 ...
Page 18: ...18 ...
Page 19: ...19 ...
Page 20: ...20 ...
Page 21: ...21 ...
Page 35: ...35 4 Click the button Read to load the software file and then click the Auto ...
Page 36: ...36 5 When the picture showed as below we can click the run to finish to upgrading ...
Page 42: ...42 5 Main Board 6 Key Board 7 IR Board 8 Speaker ...
Page 43: ...43 EDID Data DDC DATA for D Sub Input ...
Page 44: ...44 PCB Layout Main Board Chapter 9 ...
Page 45: ...45 ...
Page 46: ...46 Power Board ...
Page 47: ...47 Key Board IR board ...


