background image

Recovery - 29

4. Click the latest restore point (at a time when your system worked 

correctly), click 

Next

, then 

Finish

5. A confirmation window appears; click 

Yes

. Your system is restored 

using the restore point you specified. This process may take several 
minutes, and may restart your computer.

Returning your system to its factory condition

If your computer experiences problems that are not recoverable by 
other methods, you may need to reinstall everything to return your 
system to its factory condition. You can recover from either your hard 
drive or the recovery backup you have created.
• If you can still run Windows and have not deleted the recovery 

partition, see 

Recovering from Windows

 below.

• If you cannot run Windows, your original hard drive has been 

completely re-formatted or you have installed a replacement hard 
drive, 

see Recovering from a recovery backup on page 32

.

Recovering from Windows

Start Acer Recovery Management:
• From 

Start

, type ’Recovery’ and then click 

Acer Recovery 

Management

 in the list of apps.

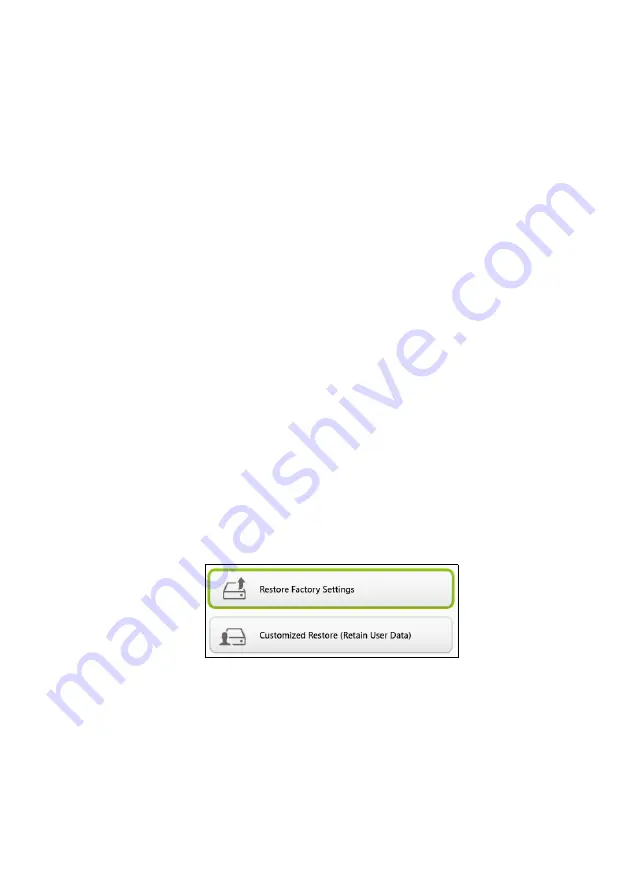
Two options are available, 

Restore Factory Settings

 (Reset my PC) 

or 

Customized Restore

 (Refresh my PC). 

Restore Factory Settings

 deletes everything on your hard drive, then 

reinstalls Windows and all software and drivers that were pre-installed 
on your system. If you can access important files on your hard drive, 
back them up now. 

See Restore Factory Settings with Acer 

Recovery Management on page 30

.

Customized Restore

 will attempt to retain your files (user data) but 

will reinstall all software and drivers. Software installed since you 
purchased your PC will be removed (except software installed from 

Summary of Contents for Aspire V 15 Series

Page 1: ... 1 Aspire V 15 Series User s Manual ...

Page 2: ...y service For more information please visit the AcerCloud website www acer com acercloud Model number _________________________________ Serial number _________________________________ Date of purchase ______________________________ Place of purchase ______________________________ Important This manual contains proprietary information that is protected by copyright laws The information contained in...

Page 3: ... Setting passwords 41 Securing your computer 42 Using a computer security lock 42 Using passwords 42 Entering passwords 43 Power management 44 Saving power 44 Battery pack 46 Battery characteristics 46 Charging the battery 46 Optimizing battery life 47 Checking the battery level 48 Battery low warning 48 Installing and removing the battery pack 49 Traveling with your computer 50 Disconnecting from...

Page 4: ...ore information 72 Troubleshooting 73 Troubleshooting tips 73 Error messages 73 Internet and online security 75 First steps on the net 75 Protecting your computer 75 Choose an Internet Service Provider 75 Network connections 77 Surf the Net 79 Security 79 Playing Blu Ray or DVD movies 86 ...

Page 5: ...ing for your computer and your health Where to find the power button ports and connectors Tips and tricks for using the touchpad and keyboard How to create recovery backups Guidelines for connecting to a network and using Bluetooth Information on using Acer s bundled software ...

Page 6: ...al This guide contains detailed information on such subjects as system utilities data recovery expansion options and troubleshooting In addition it contains general regulations and safety notices for your notebook It is available from the desktop double click the Help icon and click User s Manual in the menu that opens Basic care and tips for using your computer Turning your computer off To turn t...

Page 7: ...on top of the computer Do not slam the computer display when you close it Never place the computer on uneven surfaces Taking care of your AC adapter Here are some ways to take care of your AC adapter Do not connect the adapter to any other device Do not step on the power cord or place heavy objects on top of it Carefully route the power cord and any cables away from foot traffic When unplugging th...

Page 8: ...atteries Do not tamper with batteries Keep them away from children Dispose of used batteries according to local regulations Recycle if possible Cleaning and servicing When cleaning the computer follow these steps 1 Turn off the computer and remove the battery pack 2 Disconnect the AC adapter 3 Use a soft moist cloth Do not use liquid or aerosol cleaners If either of the following occurs The comput...

Page 9: ...Your Acer notebook tour 9 YOUR ACER NOTEBOOK TOUR After setting up your computer as illustrated in the Setup Guide let us show you around your new Acer computer ...

Page 10: ...pts one Secure Digital card SD or SDHC To remove the card simply pull it from the slot The card sticks from the side of the computer Ensure you don t damage your card 4 Power indicator Indicates the computer s power status Battery indicator Indicates battery status Charging The light is amber when the battery is charging Fully charged The light is blue 5 Microphone Internal stereo microphone for s...

Page 11: ...he keyboard on page 16 Do not use a keyboard protector or similar cover as the keyboard includes ventilation intakes for cooling 3 Touchpad Touch sensitive pointing device The touchpad and selection buttons form a single surface Press down firmly on the touchpad surface to perform a left click Press down firmly on the lower right corner to perform a right click 1 2 3 ...

Page 12: ...vailable 2 Ventilation Allows the computer to stay cool Do not cover or obstruct the openings 3 External display VGA port Connects to a display device e g external monitor LCD projector 4 Ethernet RJ 45 port Connects to an Ethernet 10 100 1000 based network 5 HDMI port Supports high definition digital video connections 6 USB port Connects to USB devices 7 Headset speaker jack Connects to audio dev...

Page 13: ...Your Acer notebook tour 13 For optimal performance use USB 3 0 certified devices Defined by the USB 3 0 specification SuperSpeed USB ...

Page 14: ... CDs or DVDs 3 Optical disk access indicator Lights up when the optical drive is active 4 Optical drive eject button Ejects the optical disk from the drive 5 Emergency eject hole Ejects the optical drive tray when the computer is turned off Carefully insert a straightened paper clip to eject the optical drive tray 6 DC in jack Connects to an AC adapter ...

Page 15: ...bay Houses the computer s battery pack 2 Battery release latch Releases the battery for removal Insert a suitable tool and slide to release 3 Speakers Deliver stereo audio output 4 Ventilation and cooling fan Allows the computer to stay cool Do not cover or obstruct the openings ...

Page 16: ...bination Lock key Description Caps Lock When Caps Lock is on all alphabetic characters typed are in uppercase Num Lock When Num Lock is on the keypad is in numeric mode The keys function as a calculator complete with the arithmetic operators and Use this mode when you need to do a lot of numeric data entry Scroll Lock Fn F12 When Scroll Lock is on the screen moves one line up or down when you pres...

Page 17: ... toggle Turns the speakers on and off Fn F12 Scr Lk Turns the scroll lock feature on or off Fn Brightness up Increases the screen brightness Fn Brightness down Decreases the screen brightness Fn Volume up Increases the sound volume Fn Volume down Decreases the sound volume Fn Home Play Pause Play or pause a selected media file Fn Pg Up Stop Stop playing the selected media file Fn Pg Dn Previous Re...

Page 18: ...ions Key Description Windows key Pressed alone it toggles between the Start screen and Desktop It can also be used with other keys for special functions please check Windows Help Application key This key has the same effect as clicking the right mouse button it opens the application s context menu ...

Page 19: ...ss in the bottom right corner Press the bottom right corner of the touchpad to perform a right click In the Start screen this will toggle the app commands in most apps this will open a context menu related to the selected item Drag Press and hold the bottom left corner of the touchpad or tap twice anywhere on the touchtap then slide a second finger across the touchpad to select all items in an are...

Page 20: ...pad from the right or left Swipe in from right edge Toggle the charms Swipe in from left edge Switch to the previous app Two finger slide Swiftly scroll through web pages documents and playlists by placing two fingers on the touchpad and moving both in any direction Two finger pinch Zoom in and out of photos maps and documents with a simple finger and thumb gesture ...

Page 21: ...reate a recovery backup The recovery backup includes the entire original contents of your computer s hard drive including Windows and all factory loaded software and drivers Using this backup will restore your computer to the same state as when you purchased it while giving you an option to retain all settings and personal data Note Acer Recovery Management is only available with a pre installed W...

Page 22: ...nt in the list of apps 2 Click Create Factory Default Backup The Recovery Drive window opens Make sure Copy contents from the recovery partition to the recovery drive is selected This provides the most complete and safest recovery backup 3 Plug in the USB drive then click Next ...

Page 23: ...our computer If you delete this information you can only use the USB recovery backup to restore your computer if you lose or erase the USB drive you cannot restore your computer 7 Unplug the USB drive and label it clearly Creating a drivers and applications backup To create a Drivers and Applications Backup that contains the factory loaded software and drivers needed by your computer you Important...

Page 24: ...click Next If you are using a USB drive make sure your USB drive has enough capacity before continuing If using DVDs it will also show the number of blank recordable discs you will need to complete the recovery discs Make sure that you have the required number of identical blank discs 3 Click Start to copy files You will be shown the backup progress on the screen 4 Follow the process until it comp...

Page 25: ...documentation or support Web site 2 Revert to a previous system condition If reinstalling software or drivers does not help then the problem may be solved by returning your system to a previous state when everything was working correctly For instructions see Returning to an earlier system snapshot on page 28 3 Reset your operating system If nothing else has solved the problem and you want to reset...

Page 26: ...o reinstall software that did not come pre installed on your computer you need to follow that software s installation instructions New device drivers If you need to reinstall device drivers that did not come pre installed on your computer follow the instructions provided with the device If you are reinstalling using Windows and the recovery information stored on your computer 1 From Start type Rec...

Page 27: ... reinstalling from a Drivers and Applications Backup on a DVD or USB drive 1 Insert the Drivers and Applications Backup into the disc drive or connect it to a free USB port If you inserted a DVD wait for Acer Resource Center to start If Acer Resource Center does not start automatically press the Windows key E then double click on the optical drive icon If you are using a USB drive press the Window...

Page 28: ...software problems you can return to one of these restore points to get your system running again Windows automatically creates an additional restore point each day and also each time you install software or device drivers Returning to a restore point 1 From Start type Control Panel and then click Control Panel in the list of apps 2 Click System and Security Action Center then click Recovery at the...

Page 29: ... run Windows your original hard drive has been completely re formatted or you have installed a replacement hard drive see Recovering from a recovery backup on page 32 Recovering from Windows Start Acer Recovery Management From Start type Recovery and then click Acer Recovery Management in the list of apps Two options are available Restore Factory Settings Reset my PC or Customized Restore Refresh ...

Page 30: ... choose how to erase your files a Just remove my files quickly erases all files before restoring your computer and takes about 30 minutes b Fully clean the drive completely cleans the drive after each file is erased so no files can be viewed after the recovery Cleaning the drive takes much longer up to 5 hours but is much more secure as old files are completely removed 4 Click Reset Important Rest...

Page 31: ...ing startup A screen appears asking you to choose the keyboard layout 2 Several options are now presented Click Troubleshoot 3 Click either Refresh your PC or Reset your PC 4 Click Next The process will take several minutes Customized Restore with Acer Recovery Management 1 Click Customized Restore Retain User Data Note Refresh your PC enables you to restore your computer to the default factory co...

Page 32: ...ur computer 4 If it is not already enabled you must enable the F12 Boot Menu a Press F2 when starting your computer b Use the left or right arrow keys to select the Main menu c Press the down key until F12 Boot Menu is selected press F5 to change this setting to Enabled d Use the left or right arrow keys to select the Exit menu e Depending on the type of BIOS your computer uses select Save Changes...

Page 33: ...Reset your PC deletes everything on your hard drive then reinstalls Windows and all software and drivers that were pre installed on your system If you can access important files on your hard drive back them up now See Reset your PC from the recovery backup below c Click Refresh your PC to start the refresh process Refresh your PC will attempt to retain your files user data but will reinstall all s...

Page 34: ...tes b Fully clean the drive completely cleans the drive after each file is erased so no files can be viewed after the recovery Cleaning the drive takes much longer up to 5 hours but is much more secure as old files are completely removed 6 Click Reset 7 After the recovery has finished you can start using your computer by repeating the first start process Refresh your PC from the recovery backup 1 ...

Page 35: ... to the Internet using a cable But first an Internet Service Provider ISP usually a phone or cable company will have to go to your home or office to set up Internet service The ISP will install a small box called a router that will allow you to connect to the Internet Once your router is set up all you have to do is plug one end of a network cable into the network port on your computer and the oth...

Page 36: ...nection on or off You can use the network management options to turn your wireless network on off or control what is shared over the network From the Start screen start typing wireless then select Connect to a network or Change Wi Fi settings Otherwise open Internet Explorer and follow the instructions Warning Using wireless devices while flying in aircraft may be prohibited All wireless devices m...

Page 37: ...ter has a SIM slot you can connect to the Internet using a 3G cellular phone network To do this you must have a compatible SIM card and a data contract with your cellular provider Note Please contact your cellular provider for details on connecting to the Internet via 3G ...

Page 38: ... adapter is available Enable Bluetooth and add a device Every new device must first be paired with your computer s Bluetooth adapter This means it must first be authenticated for security purposes You only need to pair once After that simply turning on the Bluetooth adapter of both devices will connect them Bluetooth on your computer is disabled by default To enable your computer s Bluetooth adapt...

Page 39: ...ode displayed on your device Select Yes Then accept the pairing from your device Note Some devices using older versions of the Bluetooth technology require both devices to enter a PIN In the case of one of the devices not having any inputs as in a headset the passcode is hardcoded into the device usually 0000 or 1234 Consult your device s user manual for more information ...

Page 40: ...40 Keeping your computer and data safe In this section you will find How to secure your computer Setting passwords What you need to prepare when you re traveling How to get the most out of your battery ...

Page 41: ...need to run it To activate the BIOS utility press F2 during the POST while the computer logo is being displayed Boot sequence To set the boot sequence in the BIOS utility activate the BIOS utility then select Boot from the categories listed at the top of the screen Setting passwords To set a password on boot activate the BIOS utility then select Security from the categories listed at the top of th...

Page 42: ...rom unauthorized access Setting these passwords creates several different levels of protection for your computer and data Supervisor Password prevents unauthorized entry into the BIOS utility Once set you must enter this password to gain access to the BIOS utility See Setting passwords on page 41 User Password secures your computer against unauthorized use Combine the use of this password with pas...

Page 43: ...ge appears Try again and press Enter When the User Password is set and the password on boot parameter is enabled a prompt appears at boot up Type the User Password and press Enter to use the computer If you enter the password incorrectly a warning message appears Try again and press Enter Important You have three chances to enter a password If you fail to enter the password correctly after three t...

Page 44: ...ower Disable Fast startup Your computer uses Fast startup to start quickly but also uses a small amount of power to check for signals to start These checks will slowly drain your computer s battery If you prefer to reduce your computer s power requirements and environmental impact turn off Fast startup 1 Open the desktop 2 Click Power Options in the Notification area 3 Select More Power Options 4 ...

Page 45: ...Power management 45 5 Select Change settings that are currently unavailable 6 Scroll down and disable Turn on fast startup 7 Select Save changes ...

Page 46: ... that it is correctly installed in the battery bay Plug the AC adapter into the computer and connect to a mains power outlet You can continue to operate your computer on AC power while your battery is charging However charging the battery with the computer turned off significantly reduces charge time Conditioning a new battery pack Before you use a battery pack for the first time there is a condit...

Page 47: ...tant AC power with the battery inserted If you want to use constant AC power you are advised to remove the battery pack after it is fully charged Not discharging and recharging the battery to its extremes as described above Frequent use the more you use the battery the faster it will reach the end of its effective life A standard computer battery has a life span of about 300 charges Optimizing bat...

Page 48: ... battery low warning appears the recommended course of action depends on your situation Important Connect the AC adapter as soon as possible after the battery low warning appears Data may be lost if the battery is allowed to become fully depleted and the computer shuts down Situation Recommended Action The AC adapter and a power outlet are available 1 Plug the AC adapter into the computer and then...

Page 49: ...h until the battery locks in place To remove a battery pack 1 Slide the battery release latch to release the battery 2 Pull the battery from the battery bay The AC adapter or a power outlet is unavailable You have no spare battery pack 1 Save all necessary files 2 Close all applications 3 Turn off the computer Situation Recommended Action Important Before removing the battery from the unit connect...

Page 50: ...ternal monitor and other external devices 7 Disconnect the Kensington lock if you are using one to secure the computer Moving around When you are just moving within short distances for example from your office desk to a meeting room Preparing the computer Before moving the computer close and latch the display cover to place it in Sleep mode You can now safely take the computer anywhere you go with...

Page 51: ... putting the computer in Sleep mode Press Fn F4 or close the display cover whenever you are not actively using the computer Taking the computer home When you are moving from your office to your home or vice versa Preparing the computer After disconnecting the computer from your desktop follow these steps to prepare the computer for the trip home Check that you have removed all media and compact di...

Page 52: ...t Changes in temperature and humidity can cause condensation Allow the computer to return to room temperature and inspect the screen for condensation before turning on the computer If the temperature change is greater than 10 C 18 F allow the computer to come to room temperature slowly If possible leave the computer for 30 minutes in an environment with a temperature between outside and room tempe...

Page 53: ...ke the following items with you AC adapter Spare fully charged battery pack s Additional printer driver files if you plan to use another printer Special considerations In addition to the guidelines for taking the computer home follow these guidelines to protect your computer while traveling Always take the computer as carry on luggage Always take the spare battery pack with you as carry on luggage...

Page 54: ...ravelers Warranty passport Special considerations Follow the same special considerations as when traveling with the computer In addition these tips are useful when traveling internationally When traveling in another country check that the local AC voltage and the AC adapter power cord specifications are compatible If not purchase a power cord that is compatible with the local AC voltage Do not use...

Page 55: ... 55 Ports and connectors In this section you will find Information on the ports and connectors fitted to your computer ...

Page 56: ...ou find you need to use any force to insert the card try reorientating the card slightly 3 Push the card until it clicks into place A few millimetres of the card will extend from beyond the slot If the card contains some files the Windows Auto Play window may appear this depends on the contents of the card and ask you if you wish to use a program to access the contents of the card Select an option...

Page 57: ...dden icons arrow in the Notification Area next to the clock 2 Click on the Safely Remove Hardware icon 3 Click on Eject SD Card or the name of the device 4 Wait until a Safe to Remove Hardware message is displayed 5 Remove the card Note SDXC memory cards can only be used in an SDXC compatible reader SD and SDHC cards can be used in either type 3 2 1 ...

Page 58: ...n power to the monitor then the computer 6 Make sure that the current resolution and refresh rate do not exceed the specifications of the monitor If necessary change the display settings used by the computer Headphones and microphone These ports allow you to connect audio devices Use the headphone port to plug in stereo headphones or powered speakers Plugging an audio device to the headphone port ...

Page 59: ...y compatible digital audio video source such as your computer a set top box DVD player and audio video receiver to any compatible digital audio and or video monitor such as a digital television DTV with a single cable The single cable keeps everything neat and tidy while ensuring easy connection and the best audio and visual quality ...

Page 60: ...e devices to a single USB port Note Two USB standards are currently available on Acer computers USB 2 0 High speed USB and USB 3 0 SuperSpeed USB USB 2 0 ports on Acer computers have a black tongue in the port while USB 3 0 ports have a blue tongue For best performance USB 3 0 devices should always be plugged into USB 3 0 ports Consult your device s documentation to see which standard it supports ...

Page 61: ...question In this section you will find Frequently asked questions Tips for using Windows 8 1 Troubleshooting information How to protect yourself while online Where to find Acer service center contact information ...

Page 62: ...cal drive Remove it and press Ctrl Alt Del to restart the system Do you have a USB storage device USB disk or smartphone plugged into your computer Unplug it and press Ctrl Alt Del to restart the system Nothing appears on the screen The computer s power management system automatically blanks the screen to save power Press any key to turn the display back on If pressing a key does not turn the disp...

Page 63: ...y turn off I want to eject the optical drive tray without turning on the power There is a mechanical eject hole on the optical drive Simply insert the tip of a pen or straightened out paperclip into the hole and push to eject the tray The keyboard does not respond Try attaching an external keyboard to a USB port on the computer If it works contact your dealer or an authorized service center as the...

Page 64: ...elers Warranty ITW that gives you security and peace of mind when traveling An ITW passport came with your computer and contains all you need to know about the ITW program A list of available authorized service centers is in this handy booklet Read this passport thoroughly Always have your ITW passport on hand especially when you travel to receive the benefits from our support centers Attach your ...

Page 65: ...educe the amount of time a call takes and help solve your problems efficiently If there are error messages or beeps reported by your computer write them down as they appear on the screen or the number and sequence in the case of beeps You are required to provide the following information Name _______________________________________ Address ______________________________________ Telephone number __...

Page 66: ...Clicking it will open Start where you can launch apps How do I see all of my apps Click the arrow icon that appears at the bottom of Start when you move your cursor Can I make the All apps view the default for Start Yes you can just follow these steps 1 Go to the desktop 2 Right click the taskbar and select Properties from the menu that opens 3 From the Navigation tab check Show the Apps view auto...

Page 67: ...ettings Power and select the action you d like to take Can I just turn off notifications You can turn off notifications during certain hours so that you can leave your computer running but not be disturbed by notifications 1 Move your cursor to the upper right hand corner of the screen and click Settings Change PC settings Search apps Notifications 2 Move the Quiet hours slider to On and select ti...

Page 68: ...reen 2 Move the slider to On and select if the slideshow should be played while the computer is running on battery power 3 Click Add a folder and open the folder you wish to use your Pictures folder will open by default Click Use this folder OK 4 You can see the list of folders under Add a folder Select a folder name and click Remove to remove the folder from the lock screen slideshow 5 Change the...

Page 69: ...alf way point of the screen Can I change the screen resolution Move your cursor to the upper right hand corner of the screen and click Search click the text box to open the onscreen keyboard and start typing Control Panel to display the results click Control Panel Adjust screen resolution How do I set the alarm Your computer can act as an alarm clock Start typing Alarms to search for the Alarms ap...

Page 70: ...e an app appear on Start If you re in All apps and you want to make an app appear on Start Right click a tile to select it and open the Customize menu Click Pin to Start from the menu that appears at the bottom of the screen How do I remove a tile from Start Right click a tile to select it and open the Customize menu Click the tile s you wish to remove and click Unpin from Start from the menu that...

Page 71: ...han one app at a time 1 Click on a tile to open an app from the Start screen 2 Return to the Start screen and repeat the process 3 Swipe right from the left edge of the screen to display the last app that was opened 4 Swipe right from the left edge of the screen until you see a column divider to display both apps simultaneously Up to three apps may be displayed via three columns at the same time C...

Page 72: ...er of the screen and click Settings Change PC settings Accounts Connect to a Microsoft account and follow the onscreen instructions How do I add a favorite to Internet Explorer Internet Explorer 10 doesn t have traditional favorites instead you can pin shortcuts to Start Once you have the page open swipe upwards from the bottom edge of the screen to open the menu at the bottom of the screen Click ...

Page 73: ...ealer Error messages If you receive an error message note the message and take the corrective action The following table lists the error messages in alphabetical order together with the recommended course of action Error messages Corrective action CMOS battery bad Contact your dealer or an authorized service center CMOS checksum error Contact your dealer or an authorized service center Disk boot f...

Page 74: ...ed service center for assistance Keyboard error or no keyboard connected Contact your dealer or an authorized service center Keyboard interface error Contact your dealer or an authorized service center Memory size mismatch Press F2 during POST to enter the BIOS utility then press Exit in the BIOS utility to reboot Error messages Corrective action ...

Page 75: ...e Provider ISP which supplies the connection between your computer and the Internet You should research the ISPs available in your region not forgetting to talk to friends and family about their experiences or to check reviews and consumer reports The ISP you select will provide instructions on how to connect to the Internet you may need additional software or a special box that connects to your p...

Page 76: ...and always on Internet service via a cable television line This service is generally available in large cities You can use your telephone and watch cable TV at the same time you are connected to the Internet 3G WWAN or Wireless Wide Area Network A 3G connection allows you to use cellular networks such as those used by a mobile phone to connect to the Internet while away from home The socket for a ...

Page 77: ...k Mobility Wireless LAN systems allow you and other users of your home network to share access to files and devices connected to the network for example a printer or scanner Also you can share an internet connection with other computers in your home Installation speed and simplicity Installing a wireless LAN system can be fast and easy and eliminates the need to pull cables through walls and ceili...

Page 78: ... a working network 1 Access point router 2 Desktop computer 3 Modem 4 Printer 5 Portable computer 6 PDA Smartphone 7 Network cables RJ45 Turning on off a wireless network connection Most computers feature a Wi Fi button that turns the network connection on or off If your computer has wireless access but does not feature a Communication button you may turn your wireless network on or off or control...

Page 79: ...e latest information and downloads Security You are probably eager to explore everything the Internet has to offer In order for you to be safe online Acer has pre installed McAfee Internet Security Suite on your computer McAfee Internet Security Suite runs quietly in the background to block today s complex threats and protect your identity when you shop bank or browse online McAfee Internet Securi...

Page 80: ...s posing a serious security risk What is malware Malicious software also known as malware is software designed to deliberately harm your computer For example viruses worms and Trojan horses are malicious software To help protect your computer against malware make sure it is using up to date antivirus and anti malware software What is a personal firewall A personal firewall is a software program de...

Page 81: ...p to date will not protect you from all attacks it makes it much more difficult for hackers to gain access to your system blocks many basic and automated attacks completely and might be enough to discourage less determined attackers so they will give up and look for a more vulnerable computer elsewhere More recent versions of Microsoft Windows and other popular software can be configured to downlo...

Page 82: ...rotection updates Make sure you Activate it Choose strong passwords and keep them safe Passwords are a fact of life on the Internet today we use them for everything from ordering flowers and online banking to logging into our favorite airline Web site to see how many miles we have accumulated The following tips can help make your online experiences secure Selecting a password that cannot be easily...

Page 83: ...t open update your security or urge you to provide information immediately or else something bad will happen Don t take the bait Don t respond to email messages that ask for personal information Legitimate companies will not use email messages to ask for your personal information When in doubt contact the company by phone or by typing in the company Web address into your Web browser Don t click on...

Page 84: ...ly pay for the software or service with money the free software or service you asked for may have been bundled with advertising software adware that tracks your behavior and displays unwanted advertisements You may have to divulge personal information or purchase something else in order to claim your supposed content winnings If an offer looks so good it s hard to believe ask for someone else s op...

Page 85: ...y patches and program updates that can improve your computing experience and help protect your computer against new viruses and attacks How do I know when my computer is at risk If the Action Center reports an alert or if your computer behaves erratically crashes unexpectedly or if some of your programs do not work correctly your computer may be infected by malicious software However do not blame ...

Page 86: ...o enter the region code DVDs are available for 6 regions Region code Country or region 1 USA Canada 2 Europe Middle East South Africa Japan 3 Southeast Asia Taiwan South Korea 4 Latin America Australia New Zealand 5 Former USSR parts of Africa India 6 People s Republic of China Note To change the region code insert a DVD movie of a different region into the DVD drive Once your DVD drive is set to ...

Reviews: