background image

System Startup

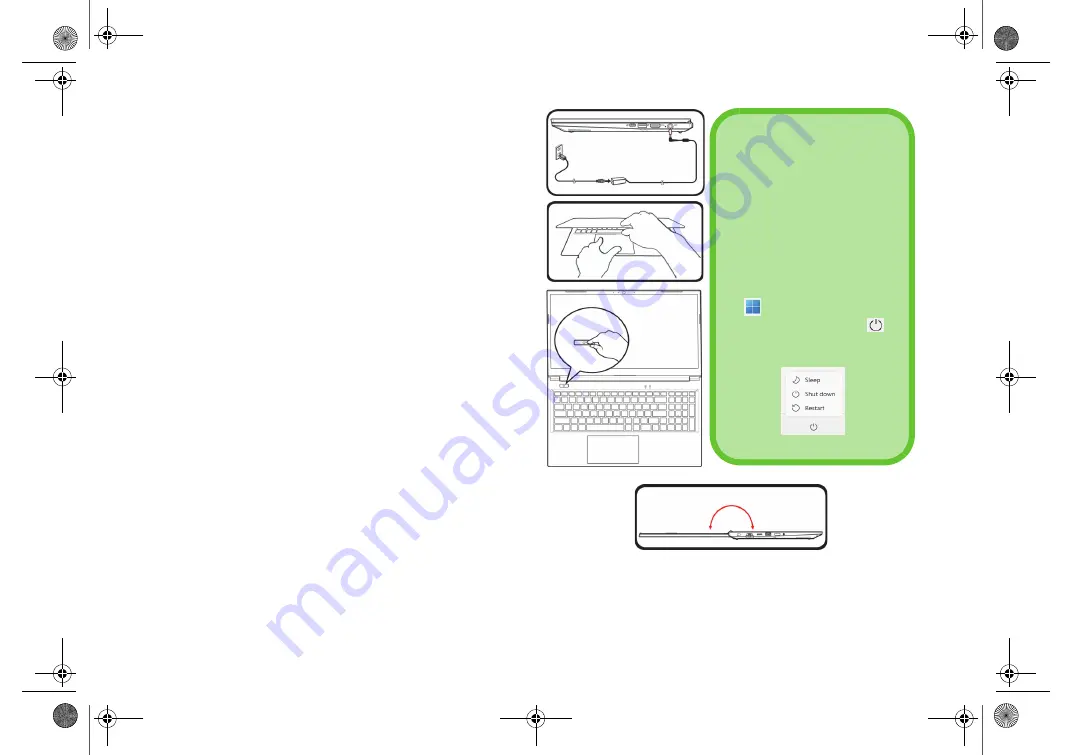
1. Remove all packing materials.
2. Place the computer on a stable surface.
3. Securely attach any peripherals you want to use with the 

computer (e.g. keyboard and mouse) to their ports.

4.

When first setting up the computer use the following 
procedure

 (as to safeguard the computer during shipping, the 

battery will be locked to not power the system until first connected 
to the AC/DC adapter and initially set up as below):
• Attach the AC/DC adapter cord to the DC-In jack on the right of 

the computer, then plug the AC power cord into an outlet, and 
connect the AC power cord to the AC/DC adapter. The battery 
will now be unlocked.

5. Use one hand to raise the lid to a comfortable viewing angle (do not 

exceed 180 degrees); use the other hand (as illustrated in 

Figure 

1

) to support the base of the computer (

Note:


Never

 lift the 

computer by the lid).

6. Press the power button to turn the computer “on”.

System Software

Your computer may already come with system software
pre-installed. Where this is not the case, or where you are
re-configuring your computer for a different system, you
will find this manual refers to 

Microsoft


Windows 11

.

Figure 1

 - Opening the Lid/Computer with AC/

DC Adapter Plugged-In

Shut Down

Note that you should always
shut your computer down by
choosing the 

Shut down

 com-

mand in 

Windows


(see be-

low). This will help prevent
hard disk or system problems.

1. Click the Start Menu icon 

.

2. Click the 

Power

 item


.

3. Choose 

Shut down

 from 

the menu.

180

NL50MU ACER.book  Page 4  Thursday, May 11, 2023  4:31 PM

Summary of Contents for Aspire Lite AL15-51

Page 1: ......

Page 2: ...NL50MU ACER book Page II Thursday May 11 2023 4 31 PM...

Page 3: ...all portions of the system refer to the expanded User s Manual The Device Drivers Utilities User s Manual disc does not contain an operating system Regulatory and Safety Information Please pay careful...

Page 4: ...eat or smoke coming from your com puter Safety Information Only use an AC DC adapter approved for use with this computer Use only the power cord and batteries indicated in this manual Do not dispose o...

Page 5: ...batteries for extended periods If you are working in areas of low temperature use the AC DC adapter to power the computer Battery Disposal Caution The product that you have purchased contains a recha...

Page 6: ...aise the lid to a comfortable viewing angle do not exceed 180 degrees use the other hand as illustrated in Figure 1 to support the base of the computer Note Never lift the computer by the lid 6 Press...

Page 7: ...isplay 5 Vent 6 Power Button 7 LED Indicators 8 Keyboard 9 Touchpad Buttons Note that the Touchpad and Buttons valid operational area is that indicated within the dotted lines above Overheating To pre...

Page 8: ...c Keypad Acti vated Orange The Battery is Charging Green The Battery is Fully Charged Blinking Orange The Battery Has Reached Critically Low Power Status Screen Rotation The computer s LCD can be open...

Page 9: ...erational features instantly Figure 4 Full size Keyboard Factory Option Multi Color LED Keyboard Refer to Multi Color LED Keyboard on page 13 Figure 5 Factory Option Full size Multi Color LED Keyboard...

Page 10: ...rams Fn Sleep Toggle Fn Touchpad Toggle Number Lock Toggle Fn Turn Display Backlight Off Press a key to or use Touchpad to turn on Fn Scroll Lock Toggle Fn Mute Toggle Caps Lock Toggle Fn Volume Decre...

Page 11: ...Lock Slot 2 RJ 45 LAN Jack 3 MicroSD Card Reader 4 USB 2 0 Ports 5 2 In 1 Audio Jack Headphone Microphone 6 Speakers 7 USB 3 2 Gen 2 Type C Port 8 USB 3 2 Gen 2 Type A Port 9 HDMI Out Port 10 Battery...

Page 12: ...olate the terms of your warranty If you need to replace remove the HDD SSD RAM etc for any reason please contact your distributor supplier for further information Overheating To prevent your computer...

Page 13: ...in the notification area of the taskbar to access the Control Center The Con trol Center provides quick access to Power Modes Fan settings and LED Keyboard configuration for the optional LED keyboard...

Page 14: ...Fn 3 key combination to quickly toggle through and select the Power Modes Fan Speed Control You can set the fan speed to Maximum full power or Automatic Slient The fan speed will adjust itself auto m...

Page 15: ...our keyboard backlight by clicking on the color required Click to select any color from the swatch to apply to the keyboard KB Sleep Timer Enable and then select the amount of time for which the syste...

Page 16: ...in the bottom right of the screen Some of the control panels and applications referred to throughout the course of this manual can be accessed from here Throughout this manual you will see an instruc...

Page 17: ...ted In Windows it is possible to quickly configure external displays from the Project menu press the Windows Logo Key and the P key or press the Fn F7 key combination Configuring the Displays in Windo...

Page 18: ...turn it them on 2 Right click the desktop and select Display settings from the menu 3 Click the Detect button 4 The computer will then detect any attached displays 5 You can configure up to 2 displays...

Page 19: ...ndows Power battery The Power battery control panel allows you to quickly adjust power options for Screen and sleep Power mode Battery saver and Battery usage etc Access the Power battery control pane...

Page 20: ...ore and click Downloads and updates Get updates to update all Apps etc Driver Installation Power When installing drivers make sure your computer is powered by the AC DC adapter connect ed to a working...

Page 21: ...button to turn the mode On or Off 10 Alternatively you can click the Wi Fi button to turn just the Wi Fi On or Off Bluetooth Module Option Make sure the Bluetooth module is turned on and not in Airpl...

Page 22: ......

Reviews: