background image

 2 Setting up your computer

12

Take note of the following when selecting a location for your computer:

Do not put your computer near any equipment that might cause 
electromagnetic or radio frequency interference, such as radio 
transmitters, televisions, copy machines or heating and air-conditioning 
equipment.

Avoid dusty areas and extremes of temperature and humidity.

You may place your computer beside your desk or under your table, as 
long as it does not block the space you need for working and moving.

Warning: Do not cover the top mesh to prevent overheating.

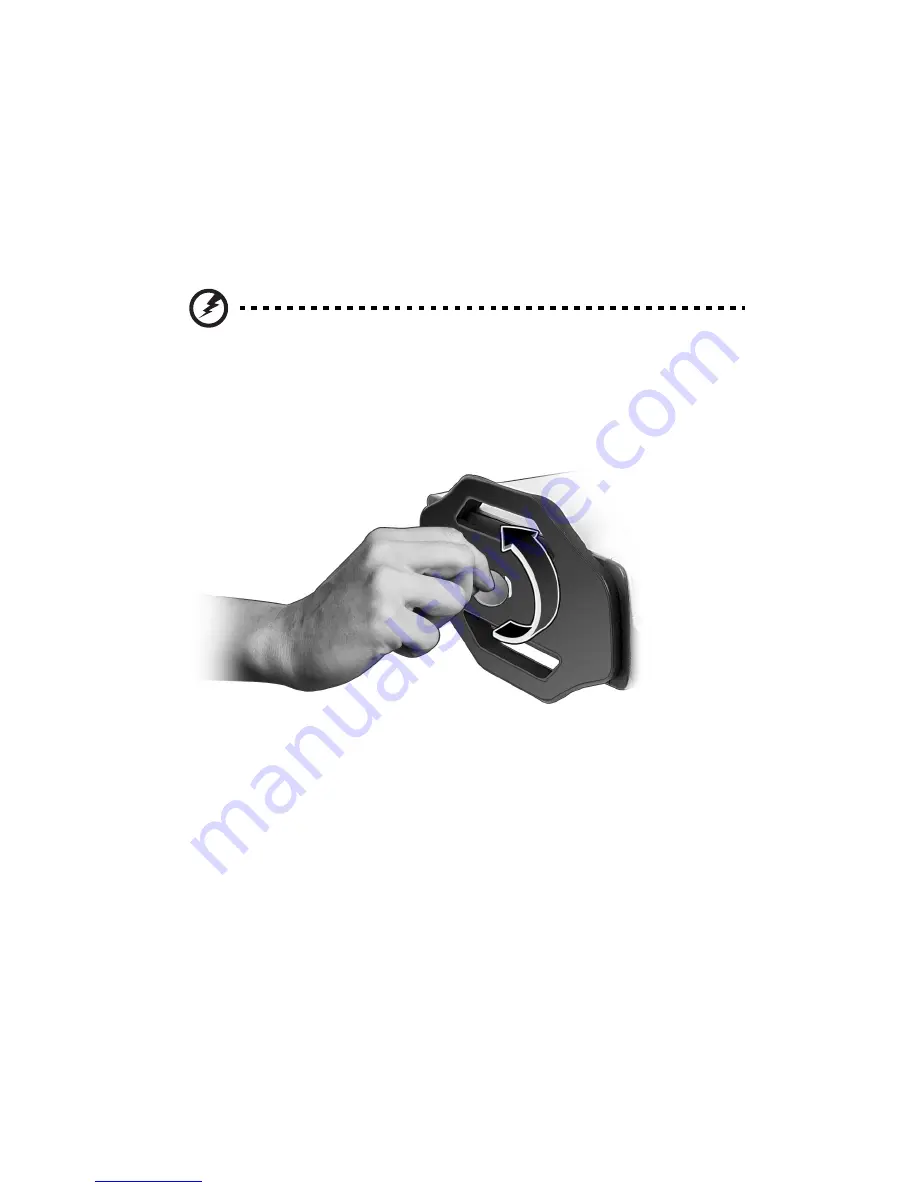
Your computer comes with a stand that can be easily installed or removed 
with a coin. Use the stand if you want to place your computer vertically.


Summary of Contents for Aspire L series

Page 1: ...Aspire L Series User s Guide ...

Page 2: ...your computer All correspondence concerning your unit should include the serial number model number and purchase information No part of this publication may be reproduced stored in a retrieval system or transmitted in any form or by any means electronically mechanically by photocopy recording or otherwise without the prior written permission of Acer Incorporated Model number ______________________...

Page 3: ...entilation is provided Never push objects of any kind into this product through cabinet slots as they may touch dangerous voltage points or short out parts that could result in a fire or electric shock Never spill liquid of any kind onto or into the product To avoid damage of internal components and to prevent battery leakage do not place the product on a vibrating surface Using electrical power T...

Page 4: ...ollowing requirements detachable type UL listed CSA certified type SPT 2 rated 7 A 125 V minimum VDE approved or its equivalent 4 6 meters 15 feet maximum length Product servicing Do not attempt to service this product yourself as opening or removing covers may expose you to dangerous voltage points or other risks Refer all servicing to qualified service personnel Unplug this product from the wall...

Page 5: ...o not connect the telephone line to this equipment during lightning or thunderstorms Disposal instructions Do not throw this electronic device into the trash when discarding To minimize pollution and ensure utmost protection of the global environment please recycle For more information on the Waste from Electrical and Electronics Equipment WEEE regulations visit http global acer com about sustaina...

Page 6: ...ur company s health and safety department The following section provides tips for more comfortable computer use Finding your comfort zone Find your comfort zone by adjusting the viewing angle of the monitor using a footrest or raising your sitting height to achieve maximum comfort Observe the following tips refrain from staying too long in one fixed posture avoid slouching forward and or leaning b...

Page 7: ...hanging the display s viewing angle using a glare reduction filter using a display visor such as a piece of cardboard extended from the display s top front edge Avoid adjusting your display to an awkward viewing angle Avoid looking at bright light sources such as open windows for extended periods of time Developing good work habits Develop the following work habits to make your computer use more r...

Page 8: ......

Page 9: ...tioning your monitor 13 Positioning your keyboard 13 Positioning your mouse 13 Connecting peripherals 14 Connecting your mouse and keyboard for selected models 14 Connecting a monitor 15 Connecting the power cable 16 Taking care of your AC adapter 16 Turning on your computer 17 Turning off your computer 18 Connecting options 19 Connecting to the network 19 Connecting multimedia devices 20 3 System...

Page 10: ... notice 36 Radio device regulatory notice 36 General 36 European Union EU 37 The FCC RF safety requirement 37 Canada Low power license exempt radio communication devices RSS 210 38 Federal Communications Comission Declaration of Conformity 39 Declaration of Conformity for CE marking 40 Index 41 ...

Page 11: ...1 1 System tour ...

Page 12: ...This chapter discusses the features and components of your computer ...

Page 13: ...remove the contents If any of the following items are missing or damaged contact your dealer immediately Aspire computer Items contained in the accessory box Keyboard USB Wireless Mouse USB Wireless User s guide for selected models warranty card and installation poster AC adapter and power cable Other user documentation and third party software ...

Page 14: ... User s Guide is also available on your computer as an Adobe Acrobat PDF file To access the User s Guide for Windows XP 1 On the Windows XP taskbar click on the start button then select All Programs AcerSystem 2 Click on Aspire L Series User s Guide ...

Page 15: ...er button CRT LCD monitor port Hard disk drive indicator OBR One Button Recovery button for selected models LAN indicator Network port Line out jack USB ports Microphone in jack Kensington lock Headphone Speaker out line out port DC in jack Line in jack IEEE 1394 port Media card reader FM FM radio input jack TV OUT TV antenna cable output jack TV TV antenna cable input jack SPDIF Coaxial digital a...

Page 16: ...r information on how to connect your keyboard see Connecting your mouse and keyboard for selected models on page 14 No Description No Description 1 Sleep button 2 Internet Email Search keys 3 Multimedia keys 4 Volume control mute keys 5 e key Scroll Lock 6 Num Lock key 7 Cursor keys 8 Application key 9 Windows logo key 10 Caps Lock key 11 Function keys ...

Page 17: ...eject the optical disk when the computer is turned on press the drive eject button Taking care of your CDs and DVDs Keep your disk in its case when not in use to avoid scratches or other damage Any kind of dirt or damage can affect the data on the disk impair the disk lens reader on the CD or DVD drive or stop the computer from successfully reading the disk When handling disks always hold them by ...

Page 18: ...1 System tour 8 ...

Page 19: ...2 Setting up your computer ...

Page 20: ...This chapter contains step by step instructions on how to set up your computer and connect additional peripherals ...

Page 21: ...not necessarily mean you ll be properly supported It is necessary to adjust your chair to fit your body Proper body posture will make you more comfortable and productive Avoid tilting your chair If you have a chair that tilts lock the tilt knobs so that your chair will not tilt forward or backward while you are using your computer Adjust your chair height in such a way that you can sit on it with ...

Page 22: ...opy machines or heating and air conditioning equipment Avoid dusty areas and extremes of temperature and humidity You may place your computer beside your desk or under your table as long as it does not block the space you need for working and moving Warning Do not cover the top mesh to prevent overheating Your computer comes with a stand that can be easily installed or removed with a coin Use the ...

Page 23: ...g the folding stands located under the keyboard Keep your lower arms parallel to the floor as you type Your upper arms and shoulders should be relaxed Then try typing with a light touch If you feel any shoulder or neck strain stop for a while and check your posture Position your keyboard in front of your monitor Putting your keyboard beside your monitor will make you turn your head while you type ...

Page 24: ...se the keyboard the monitor and the power cable Note The peripherals shown in the connections below are for your reference only Actual device models may vary in select countries Connecting your mouse and keyboard for selected models Plug your USB mouse or keyboard cable into any of the USB ports located on the front and rear panels of your computer ...

Page 25: ...nitor To connect a monitor simply plug the monitor cable into the monitor port blue port or DVI port located on the rear panel of your computer Note Refer to the monitor manual for additional instructions and information ...

Page 26: ...Here are some ways to take care of your AC adapter Do not connect the adapter to any other device Do not step on the power cable or place heavy objects on top of it Carefully route the power cable and any cables away from foot traffic When unplugging the power cable do not pull on the cord itself but pull on the plug The total ampere ratings of the equipment plugged in should not exceed the ampere...

Page 27: ... on your computer 1 Turn on all peripherals connected to your computer such as the monitor printer speakers etc 2 On the front panel of your computer press the Power button Important Make sure that the power cable is properly plugged into an electrical outlet If you are using a power strip or an AVR Auto Voltage Regulator make sure that it is plugged in and turned on ...

Page 28: ... the Windows XP taskbar click on the Start button and click Turn Off Computer then click Turn Off 2 Turn off all peripherals connected to your computer If you cannot shut down your computer normally press and hold the power button for at least four seconds Quickly pressing the button may put the computer in suspend mode only ...

Page 29: ...er to a Local Area Network LAN using a network cable To do so simply plug the network cable into the network port on the rear panel of your computer Note Consult your network system administrator or operating system manual for information on how to configure your network setup ...

Page 30: ...dvantage of your computer s multimedia features Note The multimedia devices shown below are for reference only Actual device models may vary in selected countries Plug the devices in as follows Microphone Connects to the Microphone in jacks pink jacks located on the front and rear panels of your computer Note For information on how to configure multimedia devices consult the documentation that cam...

Page 31: ... Note To adjust the headphone volume use the volume control buttons on the keyboard You can also adjust the volume by using the volume icon on the taskbar at the bottom of your screen External speakers Connect to the audio out line out jack lime green jack located on the rear panel of your computer ...

Page 32: ...2 Setting up your computer 22 Audio line in device Connects to the audio in line in jack light blue jack located on the rear panel of your computer ...

Page 33: ...3 System utilities ...

Page 34: ...This chapter describes applications that are preinstalled on your computer ...

Page 35: ...d monitor is connected then select Start Control Panel Display and click on Settings Select the secondary monitor 2 icon in the display box and then click the check box Extend my Windows desktop onto this monitor Finally click Apply to confirm the new settings and click OK to complete the process ...

Page 36: ...y during BIOS to enter hidden partition 3 This utility has same password protection with Acer eRecovery Follow all onscreen instructions Caution Running the Recovery operation will erase all files previously saved on the C drive so make sure to back up your important files before starting the recovery process Note This feature occupies 5GB in a hidden partition on your hard drive to store the defa...

Page 37: ...4 Frequently asked questions ...

Page 38: ...s chapter tells you what to do in case your computer is not working properly However if a more serious problem arises contact your dealer or the technical support center www acersupport com for assistance ...

Page 39: ...t work you can restart your computer If restarting your computer does not work contact your dealer or technical support center for assistance The printer does not work Do the following Make sure the printer is connected to a power outlet and that it is turned on Make sure the printer cable is connected securely to the USB port and the corresponding port on the printer For additional information co...

Page 40: ...D or DVD is clean and unscratched Check your drive by using a good undamaged disk If your drive can not read the information on the good disk there may be a problem with the drive Contact your dealer or technical support center for assistance System cannot write data on the hard disk DVD Dual or DVD Super multi Check the following Make sure the hard disk is not write protected Make sure you are us...

Page 41: ...Appendix A Regulationsand safety notices ...

Page 42: ...eception which can be determined by turning the device off and on the user is encouraged to try to correct the interference by one or more of the following measures Reorient or relocate the receiving antenna Increase the separation between the device and receiver Connect the device into an outlet on a circuit different from that to which the receiver is connected Consult the dealer or an experienc...

Page 43: ...ries is in compliance with the essential requirements and other relevant provisions of Directive 1999 5 EC Compliant with Russian regulatory certification Modem notices Notice for USA This equipment complies with Part 68 of the FCC rules Located on the modem is a label that contains among other information the FCC Registration Number and Ringer Equivalence Number REN for this equipment Upon reques...

Page 44: ...s between the individual PSTNs provided in different countries the approval does not of itself give an unconditional assurance of successful operation on every PSTN termination point In the event of problems you should contact your equipment supplier in the first instance List of applicable countries EU member states as of May 2004 are Belgium Denmark Germany Greece Spain France Ireland Italy Luxe...

Page 45: ...nt shall go on hook for a period of not less than 30 seconds between the end of one attempt and the beginning of the next call attempt 4 Some parameters required for compliance with Telecom s Telepermit requirements are dependent on the equipment PC associated with this device In order to operate within the limits for compliance with Telecom s specifications the associated equipment shall be set t...

Page 46: ...AVATTAESSA OLET ALTTINA LASERSÅTEILYLLE VARNING LASERSTRÅLNING NÅR DENNA DEL ÅR ÖPPNAD ÅLÅ TUIJOTA SÅTEESEENSTIRRA EJ IN I STRÅLEN VARNING LASERSTRÅLNING NAR DENNA DEL ÅR ÖPPNADSTIRRA EJ IN I STRÅLEN ADVARSEL LASERSTRÅLING NAR DEKSEL ÅPNESSTIRR IKKE INN I STRÅLEN Macrovision copyright protection notice This product incorporates copyright protection technology that is protected by U S patents and o...

Page 47: ...es EU member states as of May 2004 are Belgium Denmark Germany Greece Spain France Ireland Italy Luxembourg the Netherlands Austria Portugal Finland Sweden United Kingdom Estonia Latvia Lithuania Poland Hungary Czech Republic Slovak Republic Slovenia Cyprus and Malta Usage allowed in the countries of European Union as well as Norway Switzerland Iceland and Liechtenstein This device must be used in...

Page 48: ...ur warranty Canada Low power license exempt radio communication devices RSS 210 a Common information Operation is subject to the following two conditions 1 This device may not cause interference and 2 This device must accept any interference including interference that may cause undesired operation of the device b Operation in 2 4 GHz band To prevent radio interference to the licensed service this...

Page 49: ...This device must accept any interference received including interference that may cause undesired operation The following local manufacturer importer is responsible for this declaration Product name Personal computer Model Aspire L Series Name of responsible party Acer America Corporation Address of responsible party 2641 Orchard Parkway San Jose CA 95134 USA Contact person Mr Young Kim Tel 408 92...

Page 50: ...trical business equipment This equipment has been approved to Council Decision 98 482 EC CTR21 for pan European single terminal connection to the Public Switched Telephone Network PSTN We Acer Inc hereby declare that the equipment bearing the trade name and model number specified above was tested conforming to the applicable Rules under the most accurate measurement standards possible and that all...

Page 51: ...d questions 29 blank screen 29 no audio 29 no sound 29 printer not working 29 system cannot read disk 30 system cannot write to disk 30 system did not boot up 29 front panel 5 K keyboard 6 R recovering your system 26 S safety CD or DVD 36 FCC notice 32 modem notices 33 setting up computer 11 14 area 11 chair 11 connecting peripherals external monitor 15 power cable 16 keyboard 13 monitor 13 mouse ...

Reviews: