background image

84

Chapter 6

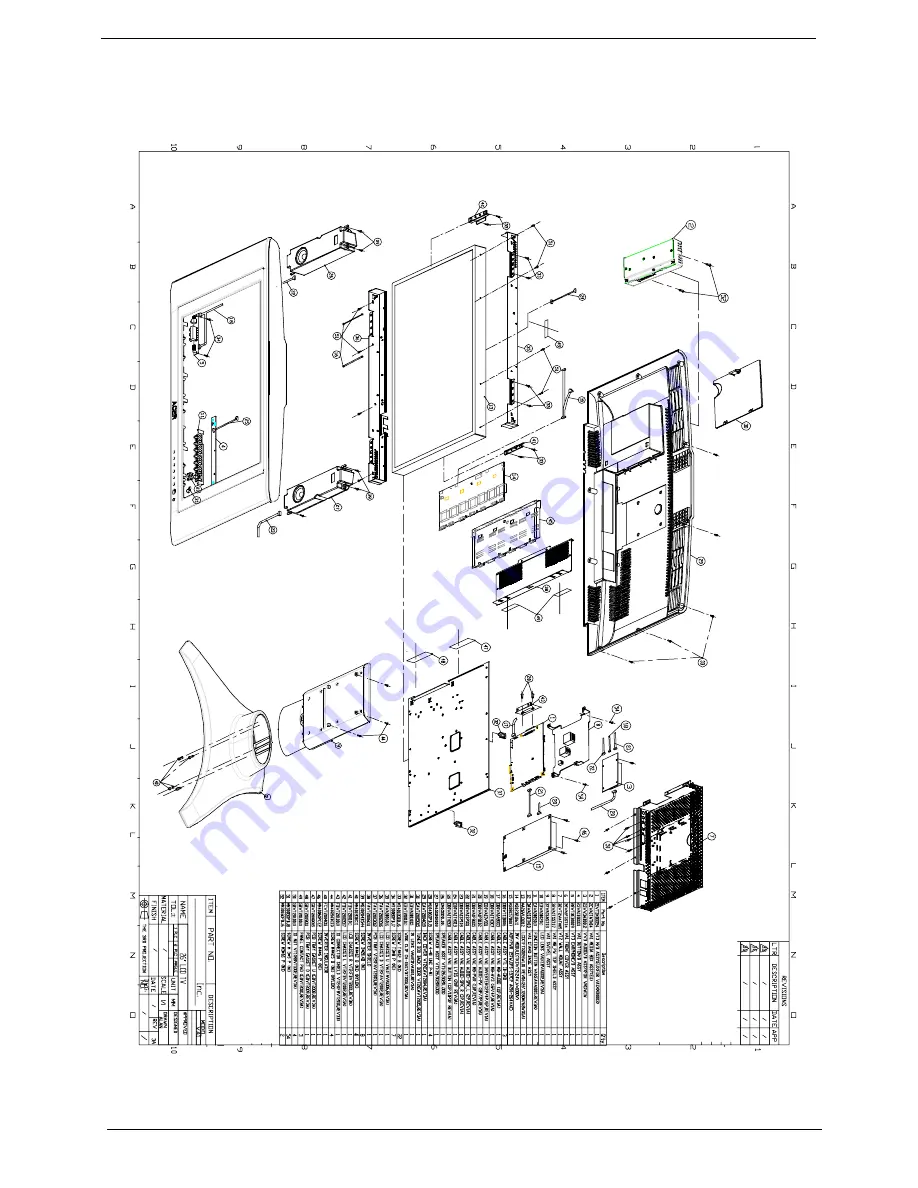
Exploded Diagram

Acer

Summary of Contents for AL2671W

Page 1: ... area 26 inches 660 5 mm diagonal T Display color 16 7 M colors T Input Signal 1 ch LVDS T Contrast ratio 600 1 Typical T Brightness 450 cd m2 Typical T Response Time 16 ms T Viewing angle 85 L 85 R 85 U 85 D Display I O Functions T Connector Type 1 21 pin Euro SCART RGB for Video S Video R G B and Audio 2 21 pin Euro SCART YUV RGB for Video S Video YPbPr YCbCr and Audio 3 RCA jack for Video and A...

Page 2: ...chanical T Swivel 40 R 20 L 20 T VESA mounting holesOne type II CardBus PC Card slot Multi Sound System T MICAM T FM Stereo A2 Power Source T Input voltage 90 264 V 47 63 Hz T Input current 1 5 A T Power consumption 150 Watts T Stand by 5 Watts Max Remote Controllers T MICAM T FM Stereo A2 Speaker T Internal speaker 5 W 2 stereo volume adjustable Others T On screen display adjustment function T IS...

Page 3: ...ctor 8pin panel 20pin connector 2pin connector 10pin connector 3pin SPEAKER L PANEL connector 62pin INVERTER Tuner connector 12pin POWER B SCART YUV KEY B MAIN B connector 12pin AUDIO B SPEAKER R IR Recever connector 4pin connector 8pin AV 3 connector 7pin connector 4pin connector 5pin ...

Page 4: ...4 Chapter 1 LCD Main Board Block Diagram Audio Board Block Diagram ...

Page 5: ...Chapter 1 5 Board Layout Board Layout is not ready as the service guide released ...

Page 6: ...n Down When OSD is on Also functions the sam eas Left directional arrow 4 Vol Up Volume Up When OSD is on Also functions the same as Right directional arrow 5 Channel Down Channel Down When OSD is on Also functins the sam as Down directional arrow 6 Channel Up Channel Up When OSD is on Also functions the same as Up directioal arrow 7 Menu Turn OSD menu ON OFF 8 Power Power ON OFF 9 Remote Control ...

Page 7: ...er Input Connects to the antenna or cable service 2 IAV1 SCART 1 In AV1 SCART Out Select source When OSD is on Press this button to confirm selection 3 AV2 SCART 2 In AV2 SCART 2 Out Volumn Down When OSD is on Also functions the sam eas Left directional arrow HO YLHZ ...

Page 8: ...dio Out Connects to another speaker 3a b AV3 Audio In R L AV3 Audio Out R L Connect to the audio output R L of your camera camcorder or video game In TV mode connect the audio R L input of your VCR or PVR to record TV programs Please set AV3 to Out in OSD 3c AV3 Video In AV3 Video Out Connect the composite output of your camera camcorder or video game In TV mode connect the composite input of your...

Page 9: ...ute the sound press again to restore TV Press to select TV mode AV Press to select AV3 mode SCART Press to select SCART1 SCART2 mode PC Press one for VGA mode press twice for DVI SLEEP Press to set a time period after which the TV shoud switch itself to standby Press repeatedly to select the number of minutes 3RZHU LUHFWLRQDO SDG 9ROXPH 3 3 3 3 323 NH V 6RXUFHV 1XPEHU NH V KDQQHO 7HOHWH W NH V ...

Page 10: ...y OK Navigate up down left and right in the OSD menu press OK to confirm MPX Press to select the sound system displayed at the top right hand corner VOL up down Press these buttons to increase and decrease the volume CH up down Press these buttons to select the TV channel in sequence e Acer Empowering key for Favorite Channels and Scenario Mode on page 19 PIP PBP POP Switch between Normal PIP PBP ...

Page 11: ... on the back of the set 2 Connect the male plug to the wall outlet as shown Connecting an antenna Connect the outdoor antenna cable lead in to the antenna terminal on the back of the TV set as shown Connecting VCR DVD AV equipment with a SCART SCART cable Connect SCART SCART cable as shown below ...

Page 12: ...RT component AV cable Connect SCART component AV cable to SCART2 port as shown below Connecting a camera camcorder or video game Connect your camera or camcorder to the Video Audio ports on the bottom of the TV set shown below RPSRQHQW 3E3U E U IRU 6 57 RQO ...

Page 13: ...Chapter 1 13 Connecting a headphone Connect headphone to the headphone input on the bottom of the TV set as shown below FDPHUD FDPFRGHU YLGHR JDPHV ...

Page 14: ...ct the channel immediately 2 You can also change the channels by pressing and holding the Channel Up Down button on the remote control Up will increase the number while down will decrease the number Adjusting the volume Adjust the volume using the VOL button on the remote control Up will increase the volume while down will decrease the volume NOTE You can also adjust these settings using the front...

Page 15: ...use the following method Menu Settings Channel settings Scan Yes The TV will auto detect available channels and store them in memory NOTE The first time you access the OSD a language setting subwindow will pop up and you will be asked to choose your language settings ...

Page 16: ...gating the OSD with Remote Control There are five main OSD menus These are Picture Audio Settings Options and Empowering Use the following method to easily navigate these menus 1 Press the Menu button on the remote control or the Menu button on the control panel 2 Select your desired menu by using the Left Right sides of the directional pad ot switch between the five menus 3 Use the directional pa...

Page 17: ...w Item Description INDEX Go to index page SUBTITLE Show subtitle on the screen TELETEXT Press to switch from TV AV to Teletext mode REVEAL Press to reveal hidden teletext information SIZE Press once to zoom teletext page to 2X press again to resume MIX Press to overlay teletext page on the TV image i e subtitle HOLD Press to pause the current teletext page in multi page viewing mode Color buttons ...

Page 18: ...on key to select the location of the subscreen from Upper Left Upper Right Lower Right Lower Left as shown in the image above PBP PIcture by Picture Press PIP PBP POP key twic to display picture as shown in the image above Press Activate to toggle the screen in focus and press TV SCART AV PC or channel selection to change the content of the sub screen POP Picture on Picture 1 Press Size Mode key t...

Page 19: ...trol feature in the Options menu Enter a four digit PIN number using the number keys on your remote control Use this number to adjust the Parental Control settings to prevent access to certain channels If you forget your PIN number please enter 6163 to rest Empowering Key Scenario Mode and Favorite Channels Use the OSD to define your e Empowering key setting Scenario mode and Favorite channel The ...

Page 20: ...favorite list There are five slots in which you can store TV programs Press e Empowering key for more than 2 seconds T When current program is not stored in favorite list pressing the e key for more than 2 seconds stores the TV program information at the bottom of the favorite list If there is no empty slot in the favorite list the first program will be wiped out and the new TV program is added at...

Page 21: ...gnal sources from TV AV1 RGB AV2 YUV AV3 VGA and DVI D automatically during power up which it is unnecessary to select inputs from OSD or hot keys The priority to catch signal sources shall be 1st User selected source from hot key or OSD 2nd Last source used 3rd TV input last power down channel 4th AV1 RGB input 5th AV1 S input 6th AV1 CVBS input 7th AV2 RGB input 8th AV2 S input 9th AV2 CVBS inpu...

Page 22: ...eo inputs are connected with cables the S video input take priority but signal quality has problems because you connect CVBS with S video at the same time The AV3 could be set either input or TV output from TV OSD menu While it is set to be output AV3 would carry CVBS signal and stereo audio out from TV tuner ...

Page 23: ...Dolby digital or other surround audio digital receiver sends this woofer signal to LCDTV main board for further processing 17 Audio_Rear_L_R_Gnd _of_R 3 Right signal of audio rear channels 18 YUV_1_Pr 6 Pr of YUV signal set 1 19 YUV_1_Pb 6 Pb of YUV signal set 1 20 YUV_1_Y 6 Y of YUV signal set 1 21 Audio_Front_L R_Gnd_of_R 3 Right channel of surround audio After decoding Dolby digital or other su...

Page 24: ...h of horizontal and vertical sync signals which are issued by LCDTV main board 45 TV_Out Video output for signal set AV3_OUT 46 TV_R Audio Right channel of signal set AV3_OUT 47 TV_L Audio Left channel of signal set AV3_OUT 48 Audio_Mute Disable all the analog audio signals from I O modules 49 12V_max_1A_a 2 Power pins which supply 12V to digital receiver 50 12V_max_1A_b 2 Power pins which supply ...

Page 25: ...h mm 0 4425 x 0 4425 Pixel Arrangement R G B Vertical Stripe Display mode Normally white Surface treatment Antiglare Hard coating 3H Weight grams 3500 Max Physical Size mm 261 0 W x 198 0 H x 5 0 D Typ Display Color 16 7M colors Input signal 1 ch LVDS Back light 14 CCFLS White Luminance cd m2 450 Contrast Ratio 600Typ Response time ms 25 Optical Rise Time Fall Time msec 20Typ 5 MAX Viewing Angle N...

Page 26: ...26 Chapter 1 ...

Page 27: ...at for preventing electrostatic discharge T small Philips screwdriver T flat head screwdriver T Philips screwdriver T tweezers NOTE The screws for the different components vary in size During the disassembly process group the screws with the corresponding components to avoid mismatch when putting back the components When you remove the stripe cover please be careful not to scrape the cover Chapter...

Page 28: ... Begin Before proceeding with the disassembly procedure make sure that you do the following 1 Turn off the power to the system and all peripherals 2 Unplug the AC adapter and all power and signal cables from the system 3 Remove the battery pack ...

Page 29: ...es you a graphic representation on the entire disassembly sequence and instructs you on the components that need to be removed during servicing For example if you want to remove the system board you must first remove the keyboard then disassemble the inside assembly frame in that order ...

Page 30: ...44 Chapter 3 ...

Page 31: ...nd module 3 Detach the TV stand module 4 Separate the base and the swivel assembly Removing the Tuner Box Module 1 Remove the two screws that secure the tunder box module 2 Then detach the tunder box module from the LCD TV carefully 3 Remove the three screws holding the tuner box cover 4 Remove the tuner box cover ...

Page 32: ...that secure the wall mount assembly 5 Remove four screw nuts holding the wall mount assembly as shown 6 Then remove the last screw that secure the wall mount assembly 7 Detach the wall mount assembly Removing the Power Board 1 Disconnect the cables audio to power board on the right main board to power board on the left 2 Remove the three screws that fasten the power board 3 Remove another three sc...

Page 33: ...move the four screws fastening the audio board 3 Then remove the audio board 4 Take out the cables from the cable clip as shown 5 Disconnect all cables connected to the main board 6 Remove the four screws holding the main board heatsink 7 Then detach the main board heatsink carefully 8 Remove one screw that secures the I O bracket 9 Detach the main board from the LCD TV ...

Page 34: ...TV Removing the Speakers 1 Tear off the tape that fastens the left speaker cable 2 Disconnect the left speaker cable 3 Remove the four screws holding the left speaker 4 Then remove the left speaker from the LCD TV 5 Tear off the tape that fastens the right speaker cable 6 Disconnect the right speaker cable ...

Page 35: ...d wire and the AV3 board 2 Turn over the AV3 board as shown 3 Disconnect the cables connected to the AV3 board then remove the AV3 board 4 Remove the two screws holding the AV3 cable 5 Take off the AV3 cable 6 Remove the four screws that fasten the button board and the ground wire 7 Turn over the button and disconnect the cables connected to the button board 8 Take the cable out of the cable clip ...

Page 36: ... tape on the inverter shielding 3 Remove the two screws holding the LCD right bracket 4 Remove the LCD right bracket 5 Remove the three screws holding the inverter shielding 6 Detach the inverter shielding carefully 7 Remove the eight screws that secure the PCB tray 8 Detach the PCB tray as shown 9 Then disconnect the cable main board to LCD ...

Page 37: ...hat secure the LCD left bracket 15 Detach the LCD left bracket 16 Remove the four screws that secure the LCD lower chassis 17 Remove the four screws that secure the LCD upper chassis 18 Detach the LCD module from the LCD front cover Note The LCD module is heavy please hold it with enough strength 19 Remove the four screws that secure the LCD upper chassis 20 Detach the LCD upper chassis 21 Remove ...

Page 38: ...tach the LCD lower chassis 23 Detach the LCD button kit as shown LCD button 24 Take the LCD button kit out off the front cover 25 Take the LCD button kit out off the front cover Note LCD button kit has three small parts ...

Page 39: ...e unit without any power sources 4 If any problem occurs you can perform visual inspection before you fellow this chapter s instructions You can check the following power cords are properly connected and secured there are no obvious shorts or opens there are no obviously burned or heated components all components appear normal 5 Use the following flow chart determine which part to be replaced NOTE...

Page 40: ...d Main Bard Audio Board END Replacement Replacement Replacement Replacement Replacement N G N G N G N G N G 1 1 Power Cord Power Cord Power Cable Power Board Main Bard Audio Board END Replacement Replacement Replacement Replacement Replacement N G N G N G N G N G ...

Page 41: ... LCD Panel Main Board LCD Cable Replacement Replacement Replacement Replacement N G N G N G N G N G N G N G 2 2 LCD No Back Light LCD No Display CCFT Cable Inverter Board LCD Panel Main Board END END LCD Panel Main Board LCD Cable Replacement Replacement Replacement Replacement N G N G N G N G N G N G N G ...

Page 42: ...d I O Board Main Board END Replacement Replacement Replacement N G N G N G 3 3 Button Board I O Board Main Board END Replacement Replacement Replacement N G N G N G 4 Main Board END Replacement N G 4 Main Board END Replacement N G ...

Page 43: ...D Replacement Replacement Replacement N G N G N G 5 5 IR Cable IR board Main Board END Replacement Replacement Replacement N G N G N G 6 IO Board Main Board END Replacement Replacement N G N G 6 IO Board Main Board END Replacement Replacement N G N G ...

Page 44: ...eplacement Replacement Replacement N G N G N G 7 7 Button Cable Button Board Main Board END Replacement Replacement Replacement N G N G N G 8 Power Board Main Board END Replacement Replacement N G N G 8 Power Board Main Board END Replacement Replacement N G N G ...

Page 45: ...3 Cable AV3 Board Audio Board Main Bard END Replacement Replacement Replacement Replacement N G N G N G N G 9 9 AV3 Cable AV3 Cable AV3 Board Audio Board Main Bard END Replacement Replacement Replacement Replacement N G N G N G N G ...

Page 46: ...ard Main Board IO Board END Replacement Replacement Replacement Replacement Replacement N G N G N G N G N G 10 10 Audio Cable Audio Cable Speaker Audio Board Main Board IO Board END Replacement Replacement Replacement Replacement Replacement N G N G N G N G N G ...

Page 47: ...n Cable Button Board IO Board Main Bard END Replacement Replacement Replacement Replacement N G N G N G N G 11 11 Button Cable Button Cable Button Board IO Board Main Bard END Replacement Replacement Replacement Replacement N G N G N G N G ...

Page 48: ...66 Chapter 4 ...

Page 49: ... made it will not be noted on the Service Guide For ACER AUTHORIZED SERVICE PROVIDERS your Acer office may have a DIFFERENT part number code from those given in the FRU list of this printed Service Guide You MUST use the local FRU list provided by your regional Acer office to order FRU parts for repair and service of customer machines NOTE To scrap or to return the defective parts you should follo...

Page 50: ...84 Chapter 6 Exploded Diagram Acer ...

Page 51: ... EU MB0003 55 M01V7 001 15 POWER BOARD ADP PWR 157W DPS 157CP A 90 264VAC 55 M01V7 002 3 AUDIO BOARD VV3 AUDIO B ASSY FOR VA1 WOW 55 M01V7 003 14 INVERTER BOARD INV MODULE TKI VT2 24V V 1000V 55 M01V7 004 5 AV3 BOARD VT3 EARPHONE B ASSY 55 M01V7 005 4 BUTTON BOARD VA1 BUTTON BOARD ASSY 55 M01V7 005 NS POWER CODE UK 3P 1 8M 27 M01V7 001 NS POWER CODE ITALY 3P 1 8M 27 M01V7 002 ...

Page 52: ...50 M01V7 001 22 CABLE SPEAKER L WHITE_BLACK COLOR 50 M01V7 002 20 CABLE ADUIO TO POWER BOARD 8P 7P 50 M01V7 003 21 CABLE MB TO POWER BOARD 10P 50 M01V7 004 19 INVERTER CABLE 3 CON 12P 4P 6P 50 M01V7 005 17 CABLE MB TO ADUIO BOARD 11P 50 M01V7 006 Picture Partname Description Part Number ...

Page 53: ... FUNCTION BUTTON 42 M01V7 002 9 STAND SWIVEL ASSY Please note that the image includes stand swivel assy and stand base assy 60 M01V7 001 12 STAND BASE ASSY Please note that the image includes stand swivel assy and stand base assy 60 M01V7 002 30 TUNER BOX COVER 42 M01V7 001 NS FRONT COVER 60 M01V7 003 29 BACK COVER 60 M01V7 004 Picture Partname Description Part Number ...

Page 54: ...3 M01V7 002 38 INVERTER SHIELDNG 33 M01V7 003 37 PCB TRAY 33 M01V7 004 45 INVERTER INSULATOR 47 M01V7 001 35 LCD CHASSIS UPPER 33 M01V7 005 36 LCD CHASSIS DOWN 33 M01V7 006 42 LCD BRACKET L 33 M01V7 007 41 LCD BRACKET R 33 M01V7 008 Picture Partname Description Part Number ...

Page 55: ...FOR PANEL STANDARD PACKING 4 PCS 47 M01V7 007 27 SPEAKER R 23 M01V7 001 26 SPEAKER L 23 M01V7 002 51 SCREW M3 5 P NI 86 M01V7 001 46 SCREW M4 6 P NI 86 M01V7 002 40 SCREW M4 12 B NI NYLOK 86 M01V7 003 44 SCREW M4 25 B NI 86 M01V7 004 39 SCREW 3 X 20 4 B NI 86 M01V7 006 34 SCREW T3 8 P NI 86 M01V7 007 33 SCREW T4 12 B NI 86 M01V7 008 28 SCREW 4 40 UNC P NI 86 M01V7 009 NS IO NUT 86 M01V7 010 52 SCR...

Page 56: ...90 Chapter 6 NS SCREW T3 12 P NI 86 M01V7 012 Picture Partname Description Part Number ...

Page 57: ...Chapter 6 91 ...

Reviews: