Accurex MPX-H14 Installation, Operation And Maintenance Manual Download Page 9

Electrical Information

The unit must be electrically grounded in accordance 
with the current National Electrical Code, ANSI/NFPA 
70. In Canada, use the current CSA Standard C22.1, 
Canadian Electrical Code, Part 1. In addition, the 
installer should be aware of any local ordinances or 
electrical company requirements that might apply. 
System power wiring must be properly fused and 
conform to the local and national electrical codes. 
System power wiring is to the unit main disconnect 
(door interlocking disconnect switch standard on most 
units) or distribution block and must be compatible 
with the ratings on the nameplate: supply power 
voltage, phase and amperage (Minimum Circuit 
Amps - MCA; Maximum Overcurrent  Protection - 
MOP). All wiring beyond this point has been done by 
the manufacturer and cannot be modified without 
affecting the unit’s agency / safety certification. If 
field installing an additional disconnect switch, it 
is recommended that there is at least four feet of 
service room between the switch and system access 
panels. When providing or replacing fuses in a fusible 
disconnect, use dual element time delay fuses and 
size according to the rating plate.

Field Power Connection

All power and control connections should be run 
through the floor or side panel of the unit.

If power supply is desired through bottom of unit, run 
the wiring through the curb, cut a hole in the cabinet 
bottom and run wires to the disconnect switch. Seal 
the penetration in cabinet bottom to prevent leakage.

The electric supply to the unit must meet stringent 
requirements for the system to operate properly. 
Voltage supply and voltage imbalance between 
phases should be within the following tolerances.

If the power is not within these voltage tolerances, 
contact the power company prior to operating the 
system.

Voltage Supply

See Voltage Use Range on the rating plate. Measure 
and record each supply leg voltage at all line 
disconnect switches. Readings must fall within the 
allowable range on the rating plate.

Voltage Imbalance

In a 3-phase system, excessive voltage imbalance 
between phases will cause motors to overheat and 
eventually fail. Maximum allowable imbalance is 2%. 
To determine voltage imbalance, use recorded voltage 
measurements in this formula.

Low Voltage Controller Circuitry

Manufacturer recommends that all low voltage 
wiring be run in conduit wherever it may be 
exposed to the weather.


Most factory-supplied electrical components are 
pre-wired. To determine what electrical accessories 
require additional field wiring, refer to the unit-specific 
wiring diagram located on the inside of the control 
center access door.

The low voltage control circuit is 24 VAC and control 
wiring should not exceed 0.75 ohms.

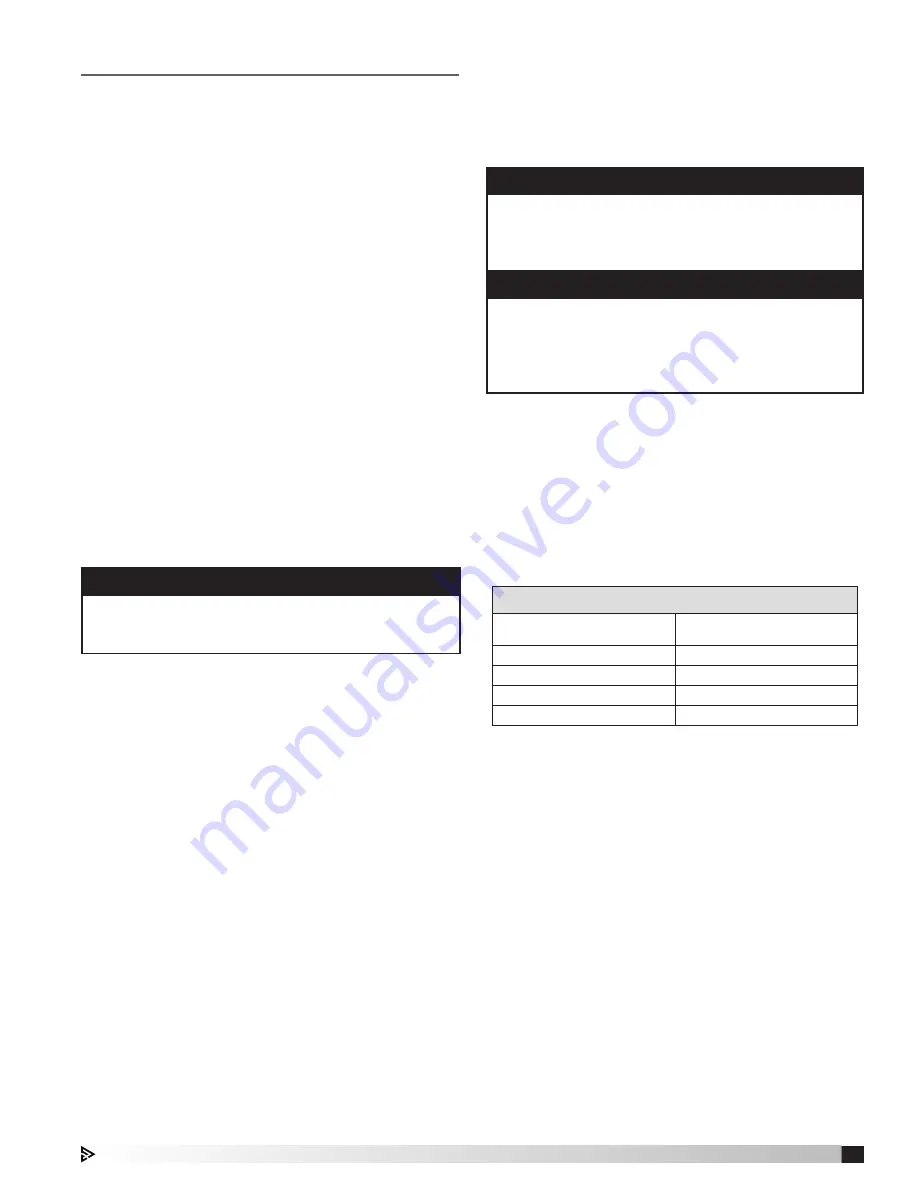
Refer to Field Control Wiring Length/Gauge table for 
wire length maximums for a given wire gauge.

Control wires should not be run inside the same 
conduit as that carrying the supply power. Make sure 
that field-supplied conduit does not interfere with 
access panel operation. All low voltage wiring should 
be run in conduit wherever it may be exposed to the 
weather.

If wire resistance exceeds 0.75 ohms, an industrial-
style, plug-in relay should be added to the unit 
control center and wired in place of the remote 
switch (typically between terminal blocks R and G 
on the terminal strip (refer to Typical Control Center 
Components). The relay must be rated for at least 5 
amps and have a 24 VAC coil. Failure to comply with 
these guidelines may cause motor starters to “chatter” 
or not pull in which can cause contactor failures and/
or motor failures.

WARNING

The roof lining contains high voltage wiring. To 
prevent electrocution, do not puncture the interior or 
exterior panels of the roof.

Key:


V1, V2, V3 = line voltages as measured


VA (average) = (V1 + V2 + V3) / 3


VD = Line voltage (V1, V2 or V3) that  


deviates farthest from average (VA)

Formula:

 % Voltage Imbalance = [100 x (VA-VD)] / VA

CAUTION

If any of the original wire as supplied with the unit 
must be replaced, it must be replaced with wiring 
material having a temperature rating of at least 
105ºC.

WARNING

To prevent injury or death due to electrocution or 
contact with moving parts, lock disconnect switch 
open.
For units with a gas furnace, if you turn off the 
power supply, turn off the gas.

Field Control Wiring Length/Gauge

Total 

Wire Length

Minimum 

Wire Gauge

125 ft.

18

200 ft.

16

300 ft.

14

450 ft.

12

9

Model MPX Make-Up Air Unit

Model XMPX Make-Up Air Unit

Summary of Contents for MPX-H14

Page 1: ...or seismic activity are present If more information is needed contact a licensed professional engineer before moving forward 1 Follow all local electrical and safety codes as well as the National Electrical Code NEC the National Fire Protection Agency NFPA where applicable Follow the Canadian Electric Code CEC in Canada 2 All moving parts must be free to rotate without striking or rubbing any stat...

Page 2: ...need to be taken to prevent deterioration of the unit during storage The user assumes responsibility of the unit and accessories during storage The manufacturer will not be responsible for damage during storage These suggestions are provided solely as a convenience to the user Inspection and Maintenance During Storage While in storage inspect units once per month Keep a record of inspection and ma...

Page 3: ... Center Components DDC Control Package 12 Digital Scroll Compressor Controller 12 Fan Proving Switch 12 Variable Frequency Drives VFD 13 Phase Monitor 13 Typical Wiring Diagram 14 15 Controller Sequence of Operation 16 17 Optional Controller Accessories 18 Refrigeration Schematic and System Components 19 20 Digital Scroll Compressor Refrigeration Modulation 21 Compressor Cycling 21 Configuration 21...

Page 4: ...peration and Maintenance manuals for additional information Plenum and Plug Indirect Gas Fired Furnace Model PVF PCO3 Controller MPX Subassemblies Blower Each unit has just one backward curved blower centrifugal fan For further information refer to the Plenum and Plug IOM Coils Every unit is supplied with a single DX evaporator coil If there is only one cooling circuit then the DX coil is not divi...

Page 5: ...EATER 4 INCH FILTERS I H MPX H34 Unit Size Dimensions MPX H14 MPX H24 MPX H34 MPX H34 Furnaces Single Furnace Double Furnace A 54 3 67 2 72 2 76 2 B 86 6 96 7 97 7 97 7 C 34 0 36 4 33 2 33 2 D 48 1 58 1 72 7 72 7 E 62 6 67 9 70 8 70 8 F 21 6 27 7 38 8 38 8 G 23 5 30 5 37 0 37 0 H 54 3 67 2 76 2 76 2 I 132 4 150 8 148 0 182 7 Nominal weight lbs 3194 3575 4831 5635 Actual weights will vary based on ...

Page 6: ...damage from occurring to the refrigerant system This unit contains a system that is pressurized with refrigerant and if it is damaged the refrigerant could leak into the atmosphere or cause bodily harm due to the extreme cold nature of expanding refrigerant Use protective equipment such as gloves and safety glasses to minimize or prevent injury in case of a system leak during installation IG FURNA...

Page 7: ...n be level Shim as required to level 3 Install Ductwork Installation of all ducts should be done in accordance with SMACNA and AMCA guidelines Duct adapter provided to support ducts prior to setting the unit 4 Set the Unit Lift unit to a point directly above the curb and duct openings Guide unit while lowering to align with duct openings Roof curbs fit inside the unit base Make sure the unit is pro...

Page 8: ...provided with the P trap If local and area building codes permit the condensate may be drained from the P trap onto the roof but a drip pad should be provided beneath the outlet If local and area codes require a permanent drain line it should be fabricated and installed in accordance with Best Practices and all codes In some climates it will be necessary to provide freeze protection for the P trap...

Page 9: ...o overheat and eventually fail Maximum allowable imbalance is 2 To determine voltage imbalance use recorded voltage measurements in this formula Low Voltage Controller Circuitry Manufacturer recommends that all low voltage wiring be run in conduit wherever it may be exposed to the weather Most factory supplied electrical components are pre wired To determine what electrical accessories require add...

Page 10: ...ge Air Temperature Sensor All units are supplied with a Discharge Air Temperature Sensor that is to be field installed prior to unit start up The sensor is to be installed at least three duct diameters downstream of the heat exchanger or where good mixed average temperature occurs The sensor must be connected directly to the DDC controller All other sensors and low voltage devices are to be connect...

Page 11: ... Fuse Blocks 10 Step Down Transformers number varies Low Voltage Side 11 DDC Controller 12 Relays 13 Fan Proving Switch Dirty Filter Switch on side wall 14 Low Voltage Terminal Strip 15 Hot Gas Reheat Controller optional NOT SHOWN Phase Monitor see page 13 In all cases refer to the unit specific wiring diagram located on the control center door Furnace Control Center Components component locations ...

Page 12: ... The unit uses a pressure switch to prove fan operation before operating any heating or cooling sequence It does this by verifying a difference in air pressure on both sides of the air supply fan While the operation of the switch is verified at the factory the pressure switch should be adjusted to meet field conditions To adjust the switch the supply fan must be running with all of the access doors ...

Page 13: ...led sensors and controlling devices such as CO2 sensors dehumidistats or pressure sensors Refer to the VFD manufacturer s information and unit specific wiring diagram supplied with the unit For additional downloadable documentation regarding the VFD installed in this unit visit the manufacturer s website Phase Monitor A phase monitor constantly checks for loss of a phase phase unbalance or phase re...

Page 14: ...ND R R7 21 24 12 FPS NO C 90 NO3 OAI OAD ACC W BL Y PK Y BL W PK BL R 111 112 SUPPLY FAN M MAIN POWER TO UNIT GROUND L1 L2 L3 DB1 DS1 Y Y PM T1 T2 T3 PM C OUT DL1 4 D1 S4 S6 Y 1 2 ST1 O L 95 96 ST1 A2 A1 LT BL ST1 OL PS1 NO C R R8 11 14 R21 A1 A2 R R R7 11 14 R20 A2 A1 Y1 BR BR 24 21 R8 BR NTC M NTC TS4 80 81 BL BL 66 Y RH A2 A1 W1 BR BR ST2 A2 A1 ST2 ST2 O L 95 96 Y Y 14 13 FACTORY WIRING TO IG F...

Page 15: ...MPRESSOR RELAY CIRCUIT B R7 COMPRESSOR INTERLOCK RELAY CIRCUIT A R8 COMPRESSOR INTERLOCK RELAY CIRCUIT B RBV REHEAT VALVE CONDENSER RH HEAT RELAY RHV REHEAT VALVE HOT GAS REHEAT S1 EXHAUST SWITCH S3 SUPPLY SWITCH S4 TEMPERING SWITCH ST EXHAUST FAN CONTACTOR ST1 SUPPLY FAN CONTACTOR TR TRANSFORMER TS4 ZONE TEMPERATURE SENSOR CAUTION UNIT SHALL BE GROUNDED IN ACCORDANCE WITH N E C POWER MUST BE OFF ...

Page 16: ...Dehumidification Sequence The cooling is controlled to maintain the cooling coil set point The dehumidification sequence will be locked out when the OA is less than 10 F above the cold coil set point The mechanical cooling will be locked out when the outside air is less than 55 2 F hysteresis adjustable Reheat Sequence While the unit is in dehumidification mode the outdoor air can be reheated for spa...

Page 17: ... the proving switch on the supply air blower and displays an alarm in case of blower failure DX Alarm The DDC monitors the refrigerant pressure and shuts off the refrigeration circuit in the case of high or low refrigerant pressure Temperature Sensor Alarm The DDC will send an alarm in the case of a failed air temperature sensor BMS Interfacing A BMS serial card is provided with the DDC controller...

Page 18: ... to enable or disable specific functions of the unit A unit specific wiring diagram is included with each panel If specified by the owner the remote panel may have a Remote Interface factory installed inside to allow remote adjustment or new settings on the DDC controller Typical Dehumidistat Typical Fire Stat Type III Typical Industrial Remote Panel Microprocessor DDC Remote Interface The optional r...

Page 19: ...r Coil M 1 2 3 4 13 5 12 9 11 13 10 8 13 14 7 15 6 Service Valve for Subcooling Gauge High Side Pressure Drop Circuit A Pressure Port for Troubleshooting Valve Service Valve for Superheat and Low Side Pressure Pressure Port for Troubleshooting Reheat Valves High Side Pressure Drop Check Valve reset which will close the circuit and allow the system to run when the pressure increases back to 90 psi ...

Page 20: ...le but excessive bubbles may indicate improper charge or a leak in the system A green dot means that moisture is below a safe operation level in the refrigerant while a yellow dot indicates moisture has been introduced into the system and needs to be dealt with For an Emerson brand sight glass the color purple indicates dry and the color pink indicates wet 12 Hot Gas Bypass Valve optional On units...

Page 21: ...on system is excessive cycling on and off The digital scroll compressor eliminates excessive cycling by allowing the compressor to continue to run but internal compression is eliminated in brief cycles Depending on the control signal received from the digital scroll controller each 15 second interval is assigned a varying load no load run time Figure 2 Unloader Solenoid Model Number Power Junction...

Page 22: ...ng Once the call for cooling exceeds 70 then the digital scroll will begin running again in conjunction with the fixed scroll compressor see below System Start Up During unit start up amperage draw readings are to be taken on all three electric supply phases when the unit is running Because the digital scroll can run without compressing the refrigerant this can lead to false amperage draw readings ...

Page 23: ...onal mode during start up Use necessary precautions to avoid injury All data must be collected while the unit is running In order to measure volts and amps the control center door must be open and the unit energized using an adjustable wrench to turn the disconnect handle After power has been applied for 24 hours verify that all crankcase heaters are heating properly Either check the amp draw on e...

Page 24: ...ible Yes No If bubbles are visible in sight glass stop the start up process Refrigerant charge may not be adequate Consult factory Color of Center Dot Green Yellow Hot Gas Bypass Operational Yes No Not present on digital scroll compressors NOTE Refrigeration System Start Up Checklist must be performed by a Qualified Refrigeration Technician If a digital scroll compressor is installed in the unit m...

Page 25: ...s which may cause personal injury or failure of the following components Fan Shaft Bearings Motor Fan Wheel Belt Tighten all fasteners and set screws securely and realign drive pulleys after adjustment Check pulleys and belts for proper alignment to avoid unnecessary belt wear noise vibration and power loss Motor and drive shafts must be parallel and pulleys in line see diagrams in this section Be...

Page 26: ...access doors open or without proper ductwork in place as the fan motors will overload Vibration Excessive vibration may be experienced during initial start up Left unchecked excessive vibration can cause a multitude of problems including structural and or component failure The most common sources of vibration are listed Many of these conditions can be discovered by careful observation Refer to the...

Page 27: ... low prior to contacting the factory please determine the following information Airflow problems can often be tied back to improper ductwork installation Be sure to install ductwork in accordance with SMACNA and AMCA guidelines Unit 1 Unit 2 Unit 3 Unit 4 Model Number Serial Number Nameplate Information Voltage Hertz Phase Outdoor Air Fan Amps Outdoor Air Fan Horsepower Design Airflow Outdoor Air M...

Page 28: ...FD to regulate fan speed in response to various optional sensors such as dehumidistats pressure sensors or CO2 sensors These may be factory installed or they may be provided and installed by the owner as part of a BMS See also the DDC Sequence of Operations in this manual The VFD is preset at the factory to respond to conditions specified by the owner There is a The following components may not be ...

Page 29: ...t Check motor wiring Check motor nameplate versus supplied voltage Motor horsepower too low See specifications and catalog for fan curves to determine if horsepower is sufficient Shorted windings in motor Replace motor Low airflow cfm Unit damper not fully open Adjust damper linkage or replace damper motor System static pressure too high Improve ductwork to eliminate losses using good duct practices ...

Page 30: ... a 1 64 inch deflection per foot of span between sheaves Worn belt Replace Motor base or blower loose Tighten mounting bolts Bearing and drive misaligned Realign Noise being transmitted by duct Make sure ductwork is supported properly Make sure ductwork metal thickness is sized for proper stiffness Check duct size at discharge to ensure that air velocities are not too high Intermediate shipping rai...

Page 31: ...ine voltage Check line voltage If more than 10 from compressor marking correcting is necessary Compressor motor protector open Motor thermal protector automatically resets Allow time 2 hours for compressor to cool down so protector will reset Restart and check for reason overheat occurred Compressor defective Check motor for open circuit short circuit grounded windings or burn out Compressor may b...

Page 32: ...verload If compressor is hot allow compressor to cool for two hours Recheck for open circuit Improper refrigerant charge Check subcooling Improperly wired Review wiring schematics Loose wiring Check all connections Defective start relay Replace relay Motor windings damaged Verify amp draw Compressor hums but will not start Improperly wired Review wiring schematics Low line voltage Check voltage Lo...

Page 33: ...ove non condensable from system Dirty condenser coil Clean condenser coil Condenser fan not running or running backwards Check electrical circuit and fuse Check fan cycling controls High load conditions Add more equipment or reduce load Low suction pressure Refrigerant undercharge loss of refrigerant charge Check pressures and subcooling Blower running backward Interchange any two wires from 3 pha...

Page 34: ...n oversized Contact factory Compressor loses oil Refrigerant leak Check system for leaks Repair leaks and add refrigerant Short cycling Check low pressure control settings Refrigerant flood back Check thermal expansion valve setting Check for refrigerant overcharge Check crankcase heaters Improper piping or traps Verify proper piping slopes Reheat flush cycle inadequate Contact factory Not enough co...

Page 35: ...airflow Check airflow check filters check drive for loose parts or belts Malfunctioning or defective expansion valve Check bulb of thermal expansion valve Frost on evaporator coil Hot gas bypass valve not functioning properly Check valve If defective replace Manual hot gas bypass valve closed Open valve Low load or airflow Increase airflow check filters Troubleshooting Refrigeration Circuit 35 Model MPX...

Page 36: ...cess panels and unit components can be heavy and serious injury may occur This unit requires minimal maintenance to operate properly To ensure proper operation and longevity the following items should be completed The items in this list assume a relatively clean air environment and may require attention more frequently in a dusty or dirty area If this unit contains an indirect gas fired heater refe...

Page 37: ...ted and require no further lubrication under normal use Normal use being considered 20 F to 120 F and in a relatively clean environment Some bearings are relubricatable and will need to be re greased depending on fan use Check your bearings for grease zerk fittings to find out what type of bearing you have If your fan is not being operated under normal use bearings should be checked monthly for lubr...

Page 38: ...r less may be used to clean coils with a fin thickness over 0 0095 inches thick TEST THE SPRAY PRESSURE over a small corner of the coil to determine if the fins will withstand the spray pressure For coils with fragile fins or high fin density foaming chemical sprays and washes are available Many coil cleaners use harsh chemicals so they must be used with caution by qualified personnel only Care must be...

Page 39: ..._____________________________ _________________________________________________ Date __________________ Time _____________ AM PM Notes ___________________________________________ _________________________________________________ _________________________________________________ _________________________________________________ _________________________________________________ Date ________________...

Page 40: ...y transportation prepaid Motors are warranted by the motor manufacturer for a period of one year Should motors furnished by Accurex prove defective during this period they should be returned to the nearest authorized motor service station Accurex will not be responsible for any removal or installation costs As a result of our commitment to continuous improvement Accurex reserves the right to chang...

Reviews: