Fitting the wall fixing “D”
Drill two holes in the wall, 110 mm apart verti-cally. Ensure that the wall fixing
is fitted close to a plug socket. Take care not to damage the mains supply cable
when drilling the holes in the wall. Now use two screws to fasten the wall fixing
to the wall.
Charging
Charge the torch for at least 12 hours before using for the first time. It is charged
in the wall fixing “D” with the aid of the wall plug trans-former “G”. The torch
is designed for continuous charging and is protected against overcharging.
We recommend returning the torch to the wall fixing when not in use to ensure
a fully-charged torch is available for use at all times. It is not possible to use
the torch while it is being charged. The charging status is indicated through the
LED (C): red = charging, green = ready to use.
Use
To use, remove the torch from the wall fixing “D”. To switch it on, push the switch
“B” forward. If necessary remove the portable spotlight from the wall mounting
“D”. The device is switched on by moving the switch either forwards (I) or back-
wards (II).
Important information
Only connect the wall plug transformer “E” to an indoor 100/240 Volt alternating
current supply. Do not expose the torch to wet weather and extreme temperatures.
Always use a damp cloth to clean the torch.
Emergency light function
Wall-mounted lamp, switch setting either I or II. If the current supply to the
charging station is interrupted, the light of the lamp switches itself on auto-
matically.
Emergency light function off: Wall-mounted lamp, switch setting 0. In the event of
a power failure the lamp remains off
Please note:
If stored or not used for a longer period of time, the rechargeable battery must be
recharged at least once every three months. Failure to do so may lead to a seri-
ous reduction in battery capacity. If regularly recharged, the batteries keep their
capacity and are ready to use for several years and thus extremely robust and
long-lived.
Disposal information
Do not throw defective Li-Ion cells or defective torches in the domestic waste. To re-
move the battery, undo the fixing hook of the cover on the underside of the torch
by turning in the direction of the arrow using a screwdriver and remove the cover.
Remove the battery and dispose of in a suitable place (battery collection point).
24 months warranty for defects
The manufacturer grants 24 months warranty for defects on faulty materials and
workmanship. Rechargeable batteries are excluded of this warranty for defects. War-
ranty for defect claims cannot be accepted in case of incorrect handling or repair.
Montage de la fixation murale « D »
Percez deux trous dans le mur avec un espace vertical de 110 mm. Assurez que la
fixation murale soit bien fixé en proximité d’une prise et que le cable d’alimentation
ne soit pas endomagé. Fixez la fixation murale au mur avec deux visses.
Chargement
Charger la torche au moins 12 heures avant le permier emploi. Le chargement
s’effectue dans la fixation murale «D» par le transformateur d’alimentation «G»
L’appareil à été conçu pour des chargements permanents et est fiable au surchar-
gement. Pour assurer la disposition d’un luminaire complètement chargé, nous re-
commandons de le laisser branché dans la fixation pour un chargement permanent
durant le temps de non utilisation. Le luminaire ne peut être allumé durant le char-
gement. L’état de charge est indiqué par la LED (C) : rouge = charger, verte = prêt
à l’usage
Emploi
Vous pouvez retirer la torche projecteur de la fixation murale «D» en cas de besoin.
Basculer l’interrupteur pour allumer l’appareil. En cas de besoin, retirez le pro-
jecteur portatif du support mural « D ». Lors du positionnement du commutateur
vers l’avant (I) ou vers l’arrière (II), l’appareil est mis en marche.
Avertissement
Le transformateur d’alimentation «E» doit être branché uniquement au courant al-
ternatif de 100/240 Volt. Ne pas exposer l’appareil à l’humidité ou à des tempéra-
tures extrêmes. Nettoyez la torche projecteur uniquement avec un tissu moite.
Fonction d’éclairage de secours
Lampe sur le support mural, position du commutateur sur I ou II au choix. Si
l’alimentation électrique de la base de chargement est interrompue par la tension
de charge, la lampe s’allume automatiquement.
Fonction d’éclairage de secours éteinte : lampe sur le support mural, position du
commutateur sur 0. En cas de panne d’électricité, la lampe reste éteinte.
Remarque :
La batterie doit être chargée au minimum une fois tous les 3 mois en cas de stocka-
ge ou de non-utilisation prolongée. En cas d‘omission, il existe un risque de perte
grave de capacité de la batterie. Si les consignes de chargement sont respectées,
la batterie conserve sa capacité, elle reste ainsi prête à l‘emploi pendant plusieurs
années et est donc très solide et résistante.
Elimination des déchets
Ne pas jeter des cellules Li-Ion usées ou des appareils défectueux avec les déchets
domesti-ques. Retirez la batterie rechargeable, en dévis-sant les crochets du cou-
vercle du bas de la coque en direction de la flèche avec un tournevis et soulevez le
couvercle. Retirez la batterie rechargeable et jetezla dans un récipient approprié.
Garantie légale de 24 mois
Le fabricant vous accorde une garantie légale de 24 mois sur les vices de matérial
et de montage. Les accumulateurs sont exclus de la garantie légale. En cas de
manipulation non adéquate, le droit à la garantie est supprimé.
GB
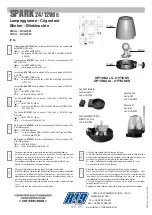
Device Description
UniLux PRO
A - Ring
E - Network charger
B - Strap fixing
F - Vehicle charger
C - On/off switch (2 levels)
G - USB charging cable
D - Wall mounting
H - Colour discs (blue, red, green)
Technical Information
Switching functions
Switch settings 1 – 0 – 2 (20% - off – 100%)
Lighting(s)
Cree High Power LED
Batteries
2x2200 mAh Li-ion (3.7 V / 4,400 mAh)
Charging time
12 h
Charging voltage
5 V | 12-24 V / 100-240 V with adaptor/power supply
Duration of illumination at level 1 / 2
approx. 35 h / 6 h
Light range
approx. 1.000 m
Switch setting 1 / Focus
approx. 30 lumens
Switch setting 1 / Wide angle
approx. 50 lumens
Switch setting 2 / Focus
approx. 160 lumens
Switch setting 2 / Wide angle
approx. 270 lumens
Weight
400 g
Dimensions in mm
256x93x93
F
Description de l’appareil
UniLux PRO
A - Anneau
E - Chargeur réseau
B - Fixation par courroie
F - Chargeur automobile
C - Interrupteur Marche/Arrêt
G - Câble de chargement USBl
D - Support mural
H - Disques de couleur (bleu, rouge, vert)
Données techniques
Position du commutateur 1 – 0 – 2 (20% - éteint – 100%)
Source d’éclairage
LED haute puissance Cree
Batterie / Piles
2 x 2200 mAh Li-Ion (3,7 V / 4400 mAh)
Temps de charge
12 heures
Tension de charge
5 V (12-24 V /100-240 V adaptateur/alimentation électr.)
Durée d’éclairage sur position 1/2
env. 35 h / 6 h
Portée d’éclairage
env. 1.000 m
Position du commutateur 1 / directionnel
env. 30 lumens
Position du commutateur 1 / grand angle
env. 50 lumens
Position du commutateur 2 / directionnel
env. 160 lumens
Position du commutateur 2 / grand angle
env. 270 lumens
Poids
400 g
Dimensions en mm
256x93x93
A
B
C
D
E
F
G
H
A
B
C
D
E
F
G
H