

8
Fig. 4-2
"Down"
("Up" or "Down"
the same below)
can select a item, press "OK"
to enter the selected
item.
In the menu settings, press to exit or return to the
previous menu. You can also press
longer to exit
setup and return to the measurement mode.
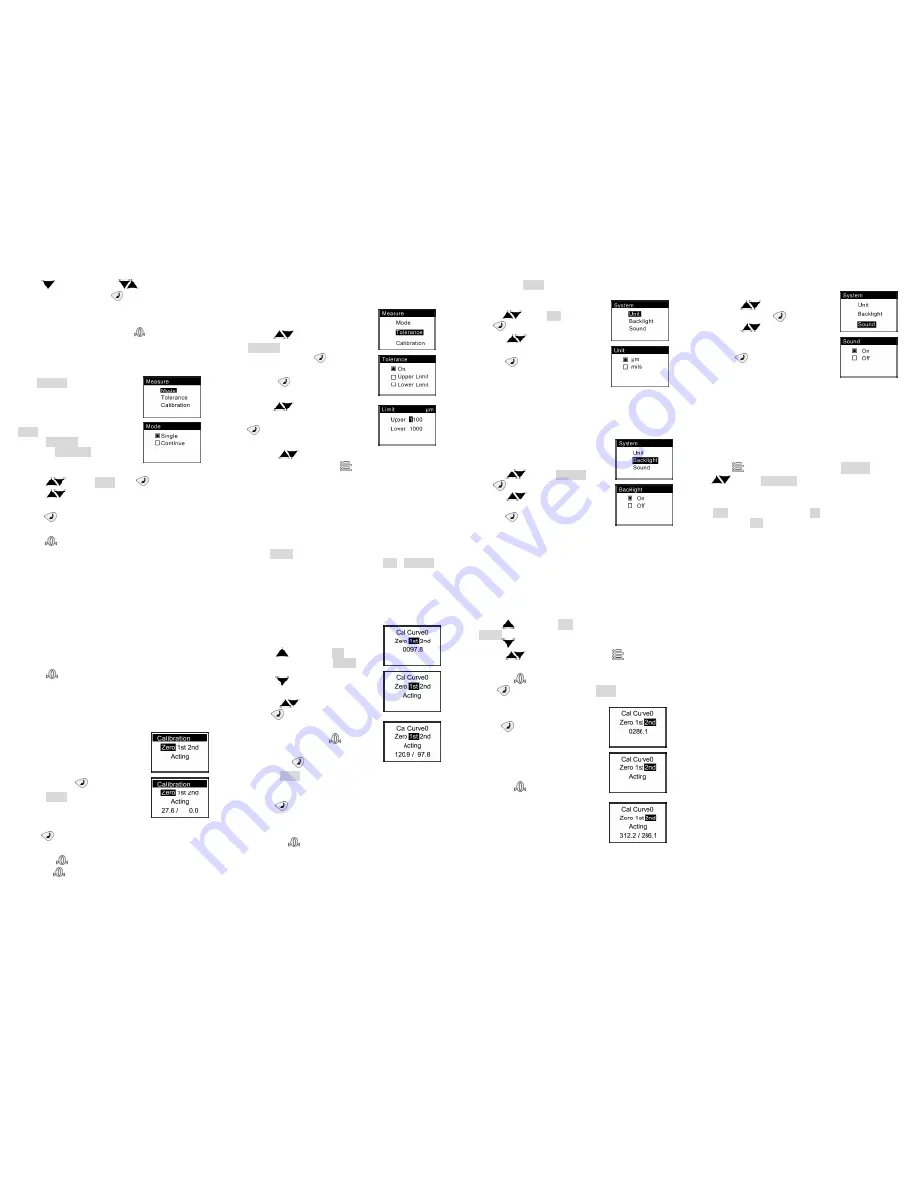
4.1 Measurement Settings
Select Measure to enter the
measurement parameter
settings.
Measurement parameters
include: measurement mode
(Mode), upper and lower limit
settings (Tolerance) and
calibration (Calibration).
4.1.1 Measuring mode
a) Press
to select Mode, press
;
b) Press
to select Single (Single Mode) or Continue
(Continuous Mode);
c) Press
to save and return to the measurement
mode;
d) Press
to return to the measurement mode and not
save. (Fig. 4-2)
9
Fig. 4-3
4.1.2 Upper and lower limit settings
If the limits are set up and turn on, when the measuring
value exceeds the limit, the
instrument will audible alarm.
(Fig. 4-3)
a) Press
to select
Tolerance (upper and lower
limit settings), press
to
enter;
b) Press
set to "On" or
"Off";
c) Press
to select Upper
limit or Lower limit, press
to enter to input the upper
and lower limits;
d) Press
to increase or
decrease the setting, press
to move to the next digit;
Note: The upper limit must be greater than the lower
limit, otherwise the setting is invalid.
4.1.3 Calibration
(Detailed calibration procedure See 5.1)
4.2 System Settings
Select System, can enter the system settings.
System setting parameters include: unit (Unit), backlight
10
Fig. 4-4
Fig. 4-5
and key tone (Sound).
4.2.1 Unit
a) Press
select Unit,
press
;
b) Press
to select "μm" or
"mils";
c) Press
to save the settings
and return to measurement
mode;(Fig. 4-4)
4.2.2 Backlight
Set backlight to "Off" will be no backlight, set to "On", the
backlight will be opened
constantly.
NOTE: Setting the backlight to "On" is
not recommended for saving battery
power. (Fig. 4-5)
a) Press
to select Backlight,
press
;
b) Press
to select "Off" or
"On";
c) Press
to save the settings
and return to measurement
mode;
11
Fig. 4-6
4.2.3 Key Tone
(Fig. 4-6)
a) Press
to select Sound
(touch-tone), press
;
b) Press
to select "On"
(Turn on key tones) or "Off"
(turn off the key tone);
c) Press
to save the
settings and return to
measurement mode.
5 Calibration and Maintenance
5.1 Calibration
For ensuring measurement accuracy, you may need
calibrate to correct the error caused by wear and tear or
changes in environment etc..
Press
to enter the menu and select Measure, press
to select Calibration, you can enter the instrument
calibration interface.
Three calibration methods are provided: Zero calibration
(Zero), One-point calibration (1st) and Two-point
calibration (2nd).
NOTE: Before One-point calibration zero calibration must be
carried out. Before the Two-point calibration, the
Zero-calibration and One-point calibration must be carried out.
12
Fig 5-1
5.1.1 Zero Calibration
Zero calibration may be in two ways: Zeroing and Menu
zero calibration.
1) Zeroing
a) In single mode, measure on the substrate directly,
display the results "xx μm";
b) Press
to clear display as "0.0 μm".
NOTE:
i) If "xx μm" is greater than 80μm, you cannot zero it directly,
Menu zero calibration is needed.
ii) Repeating the above a), b) as a few times may increase the
accuracy of the calibration.
2) Menu Zero Calibration
(Fig.
5-1)
a) Enter Menu and select
Calibration, then select Zero (zero
calibration), press
, wait for
showing Acting;
b) Measure on the substrate
directly, measuring 3 to 5 times or
more can ensure accuracy;
c) Press
to save the
calibration values and remain in the calibration interface.
Then press
can finish the Zero calibration and return;
d) If press
only, will be not save the calibration and
return
.
13
Fig. 5-2
5.1.2 One-point calibration
Before One-point calibration
perform, must first do
Zero-calibration.(Fig. 5-2)
a) Press
to select the 1st
(One-point calibration), "0000.0"
will be shown;
b) Press
to enter the standard
value of foil;
c) Press
to adjust the value,
press
to move to the next
digit, Input the standard thickness
value of the foil, (press
to
return to the initial setting value).
Then, press
and waiting for
showing Acting;
d) Measuring on the standard thickness foil for 3 to 5
times;
e) Press
to save the calibration values and remain in
the calibration interface, you can proceed to the next one
calibration;
f) Or press
to not save the calibration and return.
5.1.3 Two-point calibration
Before Two-point calibration, first the Zero-point
calibration and the Two-point calibration must be done.
And thickness of the standard foil must be greater than in
14
Fig 5-3
the One-point calibration.(Figure 5-3)
a) Press
to select the 2nd (Two-point calibration),
"0000.0" will be shown;
b) Press
to enter the standard value of foil;
c) Press
to adjust the value, press
to move to
the next digit, Input the standard thickness value of the
foil, (press
to return to the initial setting value). Then,
press
and waiting for showing Acting;
d) Measuring on the standard
thickness foil for 3 to 5 times;
e) Press
to save the
calibration values and remain in
the calibration interface, you can
proceed to the next one
calibration;
f) Or press
to not save the
calibration and return.
5.2 Maintenance
1) Avoid dirt, dust, humidity,
corrosive substances of chemical
environments. Prevent the
instrument has been dropped!
2) After use, place the instrument back into the protective
device.
15
3) Avoid strong sunlight and temperature fluctuations,
which would adversely affect the measurement results.
4) The instrument enclosure resistant to most chemical
cleaners, use a soft cloth to clean the instrument.
5) Only keep it clean probe to measure the accurate results,
so the probe regularly inspect and clean them paint, iron
and other residues.
6) Standard thickness foil is very important in the calibration.
So if the standard pieces appear worn, bent or damaged,
contact your dealer to replace.
7) If the gauge is not working, please do not disassemble it.
Should send it to the professionals or back to the factory for
repair.


