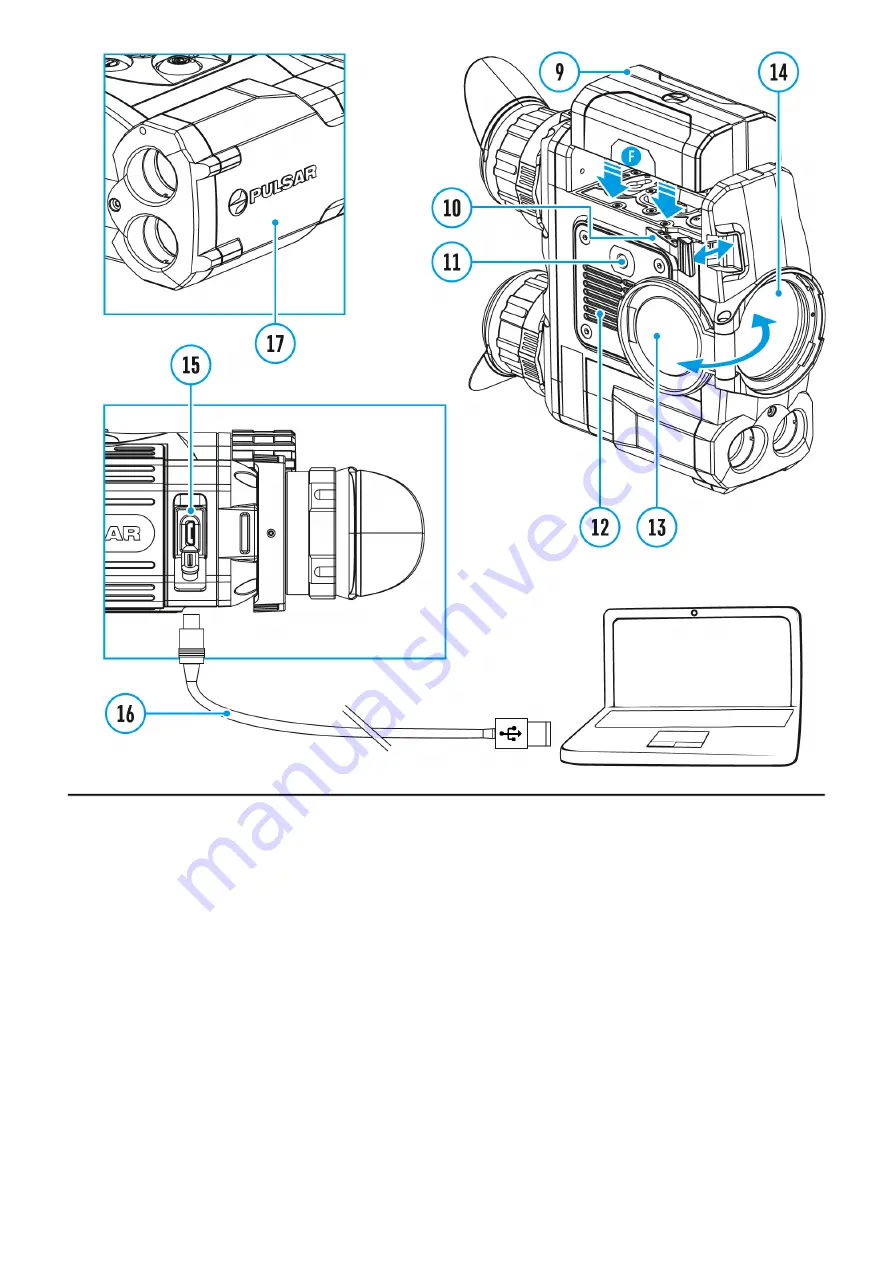
1. Open the lens cover (13).
2. Turn the device on with a short press of the ON/OFF (1) button.
3. Adjust the interpupillary distance with the rings (6) by moving the eyepieces farther or
closer to each other.
4. To obtain a crisp image of the icons on the display, rotate the diopter adjustment ring (7).
Once adjusted, there is no need to rotate the diopter adjustment ring for distance or any
other conditions.
5. To focus on the object being observed rotate the lens focusing ring (8).
6. Select the calibration mode: manual (M), semi-automatic (SA) orautomatic (A) in the
main menu (enter the menu by long pressing theMENU (3) button).
7. Calibrate the image with a short press of theON/OFF (1) button (when calibration mode
(SA) or (M) has been selected). Close the lens cap before manual calibration.
8. Select the desired observation mode (Forest, Rocks, Identification or User) by a long
press of the DOWN (5) button or in the main menu. User mode allows you to configure
and save custom
9. To set up display brightness and contrast and continuous zoom, please refer to the
Summary of Contents for 2 LRF Pro
Page 1: ...Accolade 2 LRF Pro Manual...
Page 3: ...Legal Compliances and Disclaimers Specifications...
Page 7: ...Components and Controls...
Page 9: ...16 MicroUSB cable 17 Integrated laser rangefinder...
Page 17: ...External Power Supply Show device diagram...
Page 19: ...Powering on and Image Setting Show device diagram...
Page 22: ...Microbolometer Calibration Show device diagram...
Page 25: ...Discrete Digital Zoom Show device diagram...
Page 28: ...Quick Menu Functions Show device diagram...
Page 31: ...Enter the Main Menu Show device diagram...
Page 33: ...Tab 2...
Page 34: ...Wi Fi Activation Show device diagram...
Page 36: ...Image Detail Boost https www youtube com embed GNezJKveMRc Show device diagram...
Page 38: ...Mode Show device diagram...
Page 41: ...Icon Brightness Show device diagram...
Page 43: ...Color Modes Show device diagram...
Page 44: ......
Page 46: ...Note to quickly change color modes press and hold the UP 2 button...
Page 47: ...Calibration Mode Show device diagram...
Page 49: ...PiP Mode Show device diagram...
Page 51: ...Wi Fi Settings Show device diagram...
Page 54: ...General Settings Show device diagram...
Page 58: ...Microphone Show device diagram...
Page 60: ...Rangefinder Show device diagram...
Page 63: ...Remote Control Show device diagram...
Page 66: ...Device Information Show device diagram...
Page 68: ...Video Recording and Photography Show device diagram...
Page 72: ...Built In Laser Rangefinder Show device diagram...
Page 73: ......
Page 76: ...Display Off Function Show device diagram...
Page 78: ...the countdown will power the device off completely...
Page 79: ...PiP Function Show device diagram...
Page 84: ...USB Connection Show device diagram...
Page 85: ......
Page 98: ......


