background image


19

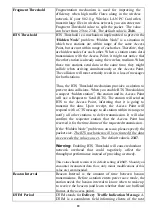
window for listening to broadcast and multicast messages. 
When the access point has buffered broadcast or multicast 
message for associated clients, it sends the next DTIM with 
a DTIM Period value. Access point clients hear and awaken 
to receive the broadcast and multicast messages. The default 
DTIM period is ‘3’.  

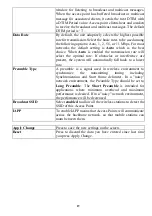
Data Rate 

By default, the unit adaptively selects the highest possible 
rate for transmission. Select the basic rates to be used among 
the following options: Auto, 1, 2, 5.5, or 11 Mbps. For most 
networks the default setting is 

Auto

 which is the best 

choice. When 

Auto

 is enabled the transmission rate will 

select the optimal rate. If obstacles or interference are 
present, the system will automatically fall back to a lower 
rate. 

Preamble Type 

A preamble is a signal used in wireless environment to 
synchronize the transmitting timing including 
Synchronization and Start frame delimiter. In a "noisy" 
network environment, the Preamble Type should be set to 

Long Preamble

. The 

Short Preamble

is intended for 

applications where minimum overhead and maximum 
performance is desired. If in a "noisy" network environment, 
the performance will be decreased. 

Broadcast SSID  

Select 

enabled

to allow all the wireless stations to detect the 

SSID of this Access Point.  

IAPP 

To enable IAPP means that Access Points will communicate 
across the backbone network, so that mobile stations can 
roam between them. 


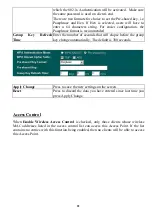
Apply Change 

Press to save the new settings on the screen.   

Reset 

Press to discard the data you have entered since last time 
you press Apply Change.  


Summary of Contents for AP700C

Page 1: ...802 11b Access Point User s Guide ...

Page 2: ...ed Consult the dealer or an experienced radio TV technician for help CAUTION Any changes or modifications not expressly approved by the grantee of this device could void the user s authority to operate the equipment This device complies with Part 15 of the FCC rules Operation is subject to the following two conditions 1 This device may not cause harmful interference and 2 This device must accept a...

Page 3: ... 6 BRIDGE MODE 7 CLIENT MODE INFRASTRUCTURE 8 CLIENT MODE AD HOC 9 Configuration 10 LOGIN 10 STATUS 11 System 11 System Log 12 Statistics 13 Active Clients 13 WIRELESS 15 Basic Settings 15 Advanced Settings 16 Security 20 Access Control 22 Site Survey 23 WDS Setting 24 TCP IP 26 Basic 26 Web Redirection 27 SNMP 28 OTHER 31 Upgrade Firmware 31 Reboot 31 Save Reload Settings 32 Password 34 ...

Page 4: ...our Wireless LAN Your network security is therefore double assured The web based management utility is provided for easy configuration that your wireless network connection is ensured to be always solid and hassle free Features Support WPA Support AP client mode Support WDS for bridge mode Support data rate automatic fallback Automatic channel selection Client access control Support 802 1x Radius ...

Page 5: ...s device is connected to a network equipment The green light will vanish once a wireless LAN card is connected to the device Flashing when this device is sending receiving data LAN 10M Turns yellow when the LAN port is connected with 10M Ethernet cable 100M Turns green when the LAN port is connected with 100M Ethernet cable Flashing when this device is sending receiving data Table 1 LED Indicators...

Page 6: ...s the power adapter plug LAN Connects to Ethernet ANTENNA 2 5dBi 1 4 λ dipole antenna with reverse SMA connector REBOOT Use a pin shape item for example a pin tip to press this button to re boot this device when the device stop working properly Table 2 Connection Ports ...

Page 7: ...4 Factory Default Settings Setting Wireless Access Point Device Name Wireless AP SSID Default value 802 11bAP Channel 11 WEP Default value Disabled IP Address 192 168 100 252 ...

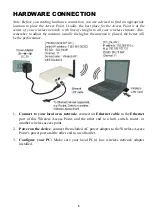
Page 8: ...ust the antenna usually the higher the antenna is placed the better will be the performance 1 Connect to your local area network connect an Ethernet cable to the Ethernet port of this Wireless Access Point and the other end to a hub switch router or another wireless access point 2 Power on the device connect the included AC power adapter to the Wireless Access Point s power port and the other end ...

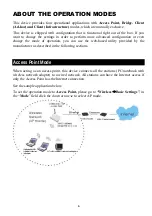
Page 9: ...ven change the mode of operation you can use the web based utility provided by the manufacturer as described in the following sections Access Point Mode When acting as an access point this device connects all the stations PC notebook with wireless network adapter to a wired network All stations can have the Internet access if only the Access Point has the Internet connection See the sample applica...

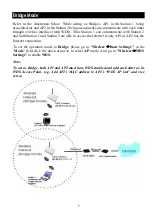
Page 10: ...n 2 and both Station 1 and Station 2 are able to access the Internet if only AP1 or AP2 has the Internet connection To set the operation mode to Bridge please go to Wireless JBasic Settings in the Mode field click the down arrow b to select AP mode And go to Wireless JWDS Settings to enable WDS Note To act as Bridge both AP1 and AP2 must have WDS enabled and add each other as its WDS Access Point ...

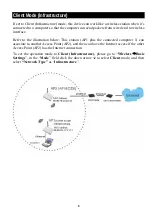
Page 11: ...ce Refer to the illustration below This station AP1 plus the connected computer 1 can associate to another Access Point AP2 and then can have the Internet access if the other Access Point AP2 has the Internet connection To set the operation mode to Client Infrastructure please go to Wireless JBasic Settings in the Mode field click the down arrow b to select Client mode and then select Network Type...

Page 12: ...ets from wired end to wireless interface You can share files and printers between wireless stations PC and laptop with wireless network adapter installed See the sample application below To set the operation mode to Client Ad hoc please go to Wireless JBasic Settings in the Mode field click the down arrow b to select Client mode and then select Network Type as Ad hoc ...

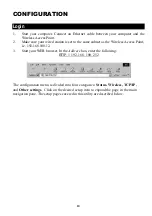
Page 13: ...subnet as the Wireless Access Point i e 192 168 100 12 3 Start your WEB browser In the Address box enter the following HTTP 192 168 100 252 The configuration menu is divided into four categories Status Wireless TCP IP and Other settings Click on the desired setup item to expand the page in the main navigation pane The setup pages covered in this utility are described below ...

Page 14: ...is applied in a network Uptime The time period since the device was up Firmware Version The current version of the firmware installed in this device Wireless Configuration Wireless Mode There are four modes supported Access Point Client Ad hoc and Infrastructure and Bridge The default mode is Access Point If you want to change to bridge mode please go to Wireless WDS Setting to enable the WDS func...

Page 15: ...be a significant degradation of the data throughput on the wireless link Associated Clients Displays the total number of clients associated to this AP You can have up to 64 clients to associate to this Access Point BSSID BSSID displays the ID of current BSS which uniquely identifies each BSS In AP mode this value is the MAC address of this Access Point TCP IP Configuration IP Protocol Display the ...

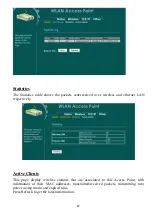
Page 16: ...d ethernet LAN respectively Active Clients This page display wireless stations that are associated to this Access Point with information of their MAC addresses transmitted received packets transmitting rate power saving mode and expired time Press Refresh to get the latest information ...

Page 17: ...14 ...

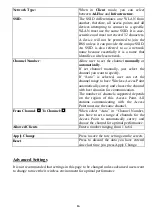
Page 18: ... Disable Wireless LAN Interface Check the box to disable the Wireless LAN Interface by so doing you won t be able to make wireless connection with this Access Point in the network you are located In other words this device will not be visible by any wireless station Mode This Wireless Access Point can support four modes AP Client Ad hoc Client Infrastructure and Bridge The default is set to AP mod...

Page 19: ...d user can set the channel range to have Wireless Access Point automatically survey and choose the channel with best situation for communication The number of channels supported depends on the region of this Access Point All stations communicating with the Access Point must use the same channel From Channel To Channel When select Auto in Channel Number you have to set a range of channels for the A...

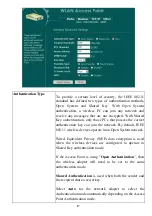
Page 20: ...n the network By default IEEE 802 11 wireless devices operate in an Open System network Wired Equivalent Privacy WEP data encryption is used when the wireless devices are configured to operate in Shared Key authentication mode If the Access Point is using Open Authentication then the wireless adapter will need to be set to the same authentication mode Shared Authentication is used when both the se...

Page 21: ...ion and its Access Point will use a Request to Send RTS The station will send an RTS to the Access Point informing that it is going to transmit the data Upon receipt the Access Point will respond with a CTS message to all station within its range to notify all other stations to defer transmission It will also confirm the requestor station that the Access Point has reserved it for the time frame of...

Page 22: ...re present the system will automatically fall back to a lower rate Preamble Type A preamble is a signal used in wireless environment to synchronize the transmitting timing including Synchronization and Start frame delimiter In a noisy network environment the Preamble Type should be set to Long Preamble The Short Preamble is intended for applications where minimum overhead and maximum performance i...

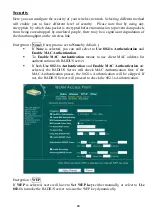
Page 23: ...ault If None is selected you can still select to Use 802 1x Authentication and Enable MAC Authentication To Enable MAC Authentication means to use client MAC address for authentication with RAIDUS server If both Use 802 1x Authentication and Enable MAC Authentication are selected the RADIUS Server will check MAC Authentication first if the MAC Authentication passes the 802 1x Authentication will b...

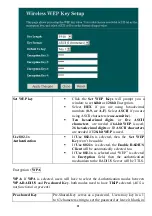
Page 24: ... 802 1x is selected then the Set WEP Key won t be usable If Use 802 1x is selected the Enable RADIUS Client will be automatically selected too If Use 802 1x is selected and WEP is selected in Encryption field then the authentication mechanism to the RADIUS Server will be TTLS Encryption WPA WPA If WPA is selected users will have to select the Authentication modes between WPA RADIUS and Pre shared ...

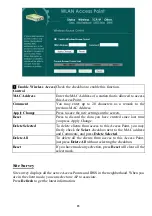
Page 25: ...he number of seconds that will elapse before the group key change automatically The default is 300 seconds Apply Change Press to save the new settings on the screen Reset Press to discard the data you have entered since last time you press Apply Change Access Control When Enable Wireless Access Control is checked only those clients whose wireless MAC addresses listed in the access control list can...

Page 26: ...ply Change Delete Selected To delete clients from access to this Access Point you may firstly check the Select checkbox next to the MAC address and Comments and press Delete Selected Delete All To delete all the clients from access to this Access Point just press Delete All without selecting the checkbox Reset If you have made any selection press Reset will clear all the select mark Site Survey Si...

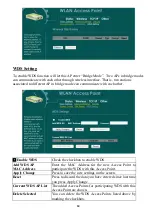
Page 27: ...checkbox to enable WDS Add WDS AP MAC Address Enter the MAC Address for the new Access Point to participate the WDS with this Access Point Apply Change Press to save the new settings on the screen Reset Press to discard the data you have entered since last time you press Apply Change Current WDS AP List The added Access Points for participating WDS with this Access Point are shown Delete Selected ...

Page 28: ...25 Delete All You can delete all of the WDS Access Points listed above Reset Press to discard the data you have entered since last time you press Apply Change ...

Page 29: ...d only when DHCP Client is disabled If your system manager assigned you static IP settings then you will have to enter the information provided Subnet Mask Enter the information provided by your system manager Default Gateway Enter the information provided by your system manager DHCP Client To enable the DHCP Client will let the Access Point obtain IP address automatically from DHCP Server in the ...

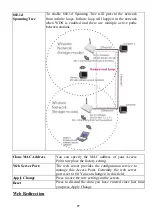
Page 30: ...C Address You can specify the MAC address of your Access Point to replace the factory setting Web Server Port The web server provides the configuration service to manage this Access Point Generally the web server port is set to 80 You can change it in this field Apply Change Press to save the new settings on the screen Reset Press to discard the data you have entered since last time you press Appl...

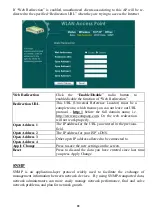
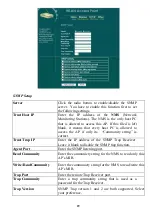
Page 31: ...redirection will not work properly Open Address 1 The IP address for the URL you entered in the previous field Open Address 2 The IP address for your ISP s DNS Open Address 3 Open Address 4 Other open IP address allowed to be connected to Apply Change Press to save the new settings on the screen Reset Press to discard the data you have entered since last time you press Apply Change SNMP SNMP is an...

Page 32: ...y its Community string is correct Trust Trap IP Enter the IP address of the SNMP Trap Receiver Leave it blank to disable the SNMP trap function Agent Port Enter the SNMP listening port Read Community Enter the communicty string for the NMS to read only this AP s MIB Write ReadCommunity Enter the communicty string for the NMS to read write this AP s MIB Trap Port Enter the remote Trap Receiver port...

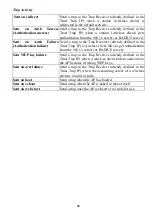
Page 33: ...p Receiver already defined in the Trust Trap IP a wireless client fails to get authorization from the 802 1x server or RADIUS server Sent WEP key failure Send a trap to the Trap Receiver already defined in the Trust Trap IP when a wireless client fails to associate to the AP because of wrong WEP keys Sent on acct failure Send a trap to the Trap Receiver already defined in the Trust Trap IP when th...

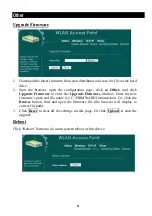
Page 34: ... Upgrade Firmware to enter the Upgrade Firmware window Enter the new firmware s path and file name i e C FIRMWARE firmware bin Or click the Browse button find and open the firmware file the browser will display to correct file path 3 Click Reset to clear all the settings on this page Or click Upload to start the upgrade Reboot Click Reboot button to do warm system reboot of this device ...

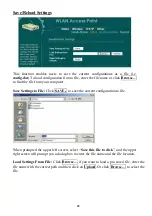
Page 35: ... Save Settings to File Click SAVE to save the current configuration to file When prompted the upper left screen select Save this file to disk and the upper right screen will prompt you a dialog box to enter the file name and the file location Load Settings From File Click Browse if you want to load a pre saved file enter the file name with the correct path and then click on Upload Or click Browse ...

Page 36: ...33 Reset Click to restore the default configuration ...

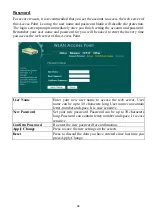
Page 37: ...u access the web server of this Access Point User Name Enter your new user name to access the web server User name can be up to 30 characters long User name can contain letter number and space It is case sensitive New Password Set your new password Password can be up to 30 characters long Password can contain letter number and space It is case sensitive Confirm Password Re enter the new password f...

Reviews: