ABM International 1081 Series User Manual Download Page 14

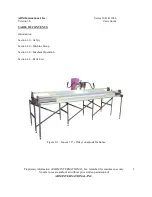
ABM International, Inc.                                                          Series: 1018 & 1026: V4.0 
Model: Innova                                                                           Users Guide 
 

Proprietary information of ABM INTERNATIONAL, Inc. furnished for customer use only. 

No other uses are authorized without the prior written permission of 

ABM INTERNATIONAL, INC.


14 


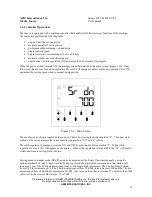
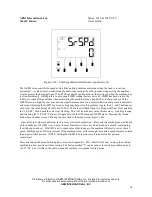
Figure 3.62 – Stitch regulation minimum sew speed screen 

 
The SrSPD value controls the speed at which the quilting machine motor runs when the head is at rest (no 
movement).  A value of zero would mean the head stops sewing when the operator stops moving the machine.  
A value greater than zero, between 75 and 500, means the sewhead runs at that set speed when the machine is at 
rest (no movement).  ABM prefers to not use an SrSPD setting (factory set to 0).  SrSPD has been used in the 
industry to combat large stitches when accelerating the machine from a stand still or in sharp corners.  If the 
SrSPD is set too high, the user may notice a significant amount of very small stitches in sharp corners and starts 
and stops. Adjusting the SrSPD to a lower setting may help solve this problem. Again, the 0,1, and 2 buttons are 
used to set the value between 0 (off) and 75-500.  The value will flash when it is being modified.  Press and hold 
the “1/2/SET” button until the vale stops flashing.  This will lock the new value into memory.  Quickly pressing 
and releasing the “1/2/SET” button will toggle between the SPI menu and SrSPD menu.  Pressing the “mode” 
button once in either screen will bring the user back to the main screen (Figure 3.60). 


  Once all of the values are adjusted, the user may start stitch regulation.   Press and release the green start button 
on the handle bar. If SrSPD is set to zero, the machine starts to sew only when the head is moved, maintaining 
the stitches per inch set.  If SrSPD is set to some value other than zero, the machine will start to sew at the set 
speed. Stitching speed will only increase if the machine is moved fast enough to require a speed increase to hold 
the proper stitches per inch. (NOTE: Setting the SrSPD too high may result in poor stitches per inch 
consistency).  
 
Press and release the green button again to stop stitch regulation.  This will allow the user to move the quilting 
machine to a new position without sewing. The button marked “5” can be used to turn stitch regulation on and 
off.  If “Sr” is not visible on the main screen, the machine is in manual sewing mode. 


Summary of Contents for 1081 Series

Page 1: ...o other uses are authorized without prior written permission of ABM INTERNATIONAL INC 1 Folder Contents 1 Users Guide 2 Service Manual 3 18 Pro frame Assembly 4 26 Pro frame Assembly 5 Leader Installa...

Page 2: ...NAL Inc furnished for customer use only No other uses are authorized without prior written permission of ABM INTERNATIONAL INC 2 TABLE OF CONTENTS Introduction Section 1 0 Safety Section 2 0 Machine S...

Page 3: ...wing Machine ABM is confident that this machine will meet or exceed your expectations If at anytime you experience problems with your ABM machine we ask that you contact us 24 hours a day by calling o...

Page 4: ...ervation program will eliminate human suffering and effectively lower the direct and indirect costs resulting from employee injury It will substantially reduce the exposure and probability of damage a...

Page 5: ...t into your 110 volt receptacle coil any excess cable and wire tie it to the table of the machine which will reduce the risk of a tripping hazard The machine comes equipped with a 110V plug and should...

Page 6: ...Step 1 Press and release the Red left hand button and the needle will move to the up position Step 2 Press and release the Red left hand button again and the needle will move to the down position Ste...

Page 7: ...fill all of your quilting needs 3 1 Rotating the Sewing Head ABM s has equipped the Innova with an industry exclusive rotating sewhead for ease of material head and roller removal as well as ease of s...

Page 8: ...horized without prior written permission of ABM INTERNATIONAL INC 8 3 2 Rotating the Sewing Head Back Figure 3 20 Depress Locking Lever Figure 3 21 Continue holding lever and rotate until the head loc...

Page 9: ...mer use only No other uses are authorized without prior written permission of ABM INTERNATIONAL INC 9 3 3 Installing the Extension Plate Figure 3 30 Rotate the head Figure 3 31 Position plate over lat...

Page 10: ...ole of the pre tension NOTE DO NOTE WRAP THE THREAD COMPLETELY AROUND THE DISC THE THREAD SHOULD TRAVEL FROM THE TOP HOLE TO THE BOTTOM HOLE AND PASS THROUGH THE DISCS ON THE RIGHT SIDE ONLY 7 Pass th...

Page 11: ...ch Pull the release Latch and remove the bobbin case Remove the old bobbin and press in the new bobbin Inset the bobbin making sure it turns clockwise when the thread is pulled viewed from the bobbin...

Page 12: ...osition UP or DN and adjust the sewing speed when in manual sewing mode Figure 3 60 Main Screen The needle stop position is toggled between up and down by pressing the button marked 4 The upper right...

Page 13: ...curs when the encoders mounted on the tracks send digital pulses to the controller which in turn increases and decreases the voltage to the motor running the sewhead The number of stitches per inch is...

Page 14: ...to set the value between 0 off and 75 500 The value will flash when it is being modified Press and hold the 1 2 SET button until the vale stops flashing This will lock the new value into memory Quickl...

Page 15: ...he Red left hand button and the sewhead will decrease sewing speed Step 5 Press and release the Green right hand button again and the sewhead will stop Operating in stitch regulated mode Step 1 Quickl...

Page 16: ...a 1018 and 1026 The section is divided into four drawings with the item description and ABM part number for all the components needed to completely rebuild a machine ABM carries all of the components...

Page 17: ...A04 Backing Plate 1 23 1018 A23 Shaft 1 5 1018 A05 Backing Plate 1 24 1018 A24 Spring 1 6 1018 A06 Sewhead Casting Lwr 1 25 SR 4374006 Screw 1 7 1 1018 A071 Corner Casting Upr 1 26 1018 A26 Bushing 1...

Page 18: ...er Drive Shaft 1 16 WP 1271910 Spacer 1 2 1018 B02 Lower Drive Shaft 1 17 1018 B17 Hand Wheel Plate 1 3 1018 B03 Timing belt 1 18 1018 B18 Pin 1 4 1018 B04 Lower Pulley 4 19 1018 B19 Spring 1 5 SD 476...

Page 19: ...w M6X0 75 2 18 SC 40712 Screw M4X0 7X12L 1 4 1018 C04 Crank Rod 1 19 1018 C19 Presser Bar Bracket 1 4 1 BB 6805ZZ Bearing 1 20 1018 C20A Presser bar 1 4 2 BB FR4ZZ Bearing 2 21 1018 C21 Screw 1 4 3 CS...

Page 20: ...n Description Description Description Amt Amt Amt Amt 1 1018 D01A Hook Assembly 1 10 1018 D10 Screw 2 1 1 1018 D011 Rotating Hook 18033C 1 11 1018 D11 Hook Drive Gear 1 1 2 1018 D012 Screw 1 12 SD 437...

Page 21: ...1 6 1018 E06 R2 Handle Bar green 1 29 HN 79418 Nut 5 16 18UNC 1 7 SC 061020 SCREW M6X1X20 20 30 SJ 3564007 Screw SM9 64X40X7L 3 8 1018 E08 PLC Support Bracket 1 31 1018 E31 Thread Guide 1 9 1018 E09...

Page 22: ...018 1026 V4 0 Model Innova Users Guide Proprietary information of ABM INTERNATIONAL Inc furnished for customer use only No other uses are authorized without the prior written permission of ABM INTERNA...

Reviews: