Hardware Setup
2-1
Chapter 2. Hardware Setup
It is required to adopt an ATX12V power supply to meet the power requirement of Pentium
®
4
This motherboard provides all standard equipment for classic personal computers with great flexibility for
meeting future upgrade demands. This chapter will introduce step-by-step all of the standard equipment
and will also present, as completely as possible, future upgrade capabilities.
This chapter is organized with the following features:
2-1
Install The Motherboard
2-2
Install Pentium
®
4 CPU and Heatsink Supporting-Base
2-3
Install System Memory
2-4
Connectors, Headers and Switches
Before Proceeding with the Installation:
Please be reminded to turn the ATX12V power supply switch
off (fully turn the +5V standby power off), or disconnect the power cord before you install or unplug any
connectors or add-on cards. Failing to do so may cause the motherboard components or add-on cards to
malfunction or damaged.
2-1. Install The Motherboard
Most computer chassis have a base with many mounting holes to allow motherboard to be securely
attached on and at the same time, prevented from short circuits. There are two ways to attach the
motherboard to the chassis base:
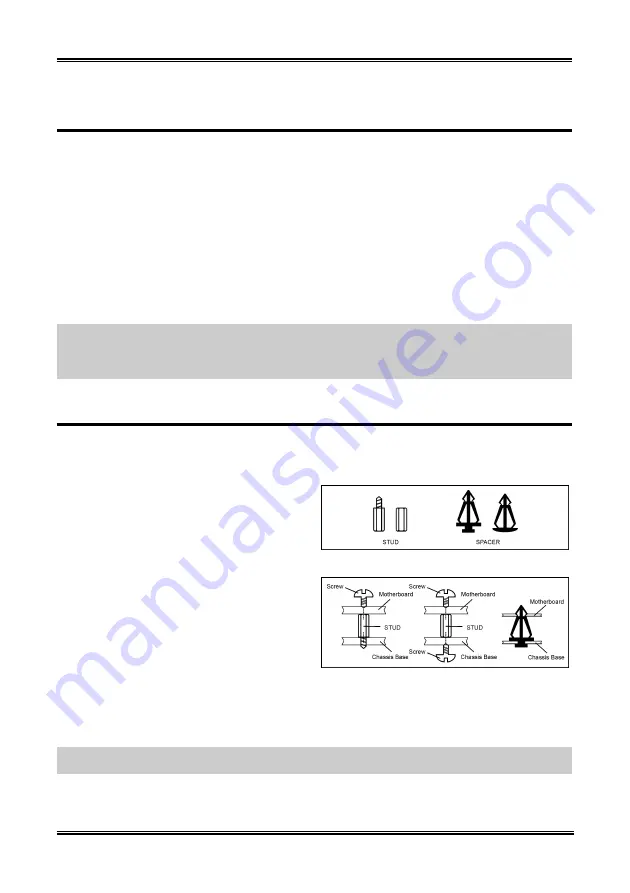
use with studs
or use with spacers
Figure 2-1 shows the shape of studs and spacers.
There may be several types, but all look similar.
In principle, the best way to attach the board is
to use with studs. Only if you are unable to do
this should you attach the board with spacers.
Line up the holes on the board with the
mounting holes on the chassis. If the holes line
up and there are screw holes, you can attach the
board with studs. If the holes line up and there
are only slots, you can only attach with spacers.
Take the tip of the spacers and insert them into
the slots. After doing this to all the slots, you
can slide the board into position aligned with
slots. After the board has been positioned, check to make sure everything is OK before putting the chassis
back on. Figure 2-2 shows the ways to fix the board to chassis by studs or spacers.
Figure 2-1. The outline of stud and spacer.
Figure 2-2. The way we fixed the motherboard.
ATTENTION:
To prevent shorting the PCB circuit, please REMOVE the metal studs or spacers if they
are already fastened on the chassis base and are without mounting-holes on the motherboard to align with.
User’s Manual
Summary of Contents for BE7
Page 19: ...Introduction 1 3 1 2 Layout Diagram BE7 G User s Manual ...
Page 20: ...1 4 Chapter 1 1 3 Layout Diagram BE7 S BE7 Series ...
Page 21: ...Introduction 1 5 1 4 Layout Diagram BE7 RAID User s Manual ...
Page 22: ...1 6 Chapter 1 1 5 Layout Diagram BE7 B BE7 Series ...
Page 23: ...Introduction 1 7 1 6 Layout Diagram BE7 User s Manual ...
Page 24: ...1 8 Chapter 1 1 8 Chapter 1 BE7 Series BE7 Series ...
Page 39: ...Hardware Setup 2 15 13 IDE1 IDE2 and IDE3 IDE4 Connectors User s Manual ...
Page 72: ...A 2 Appendix A A 2 Appendix A BE7 Series BE7 Series ...
Page 84: ...E 2 Appendix E BE7 Series ...
Page 86: ...F 2 Appendix F F 2 Appendix F BE7 Series BE7 Series ...
Page 112: ...L 6 Appendix L Thank You ABIT Computer Corporation http www abit com tw BE7 Series ...


