User Operations Guide—Mira Instant Replay Server
58
Copyright ©2014, Abekas Incorporated
Revised: 5 September 2014
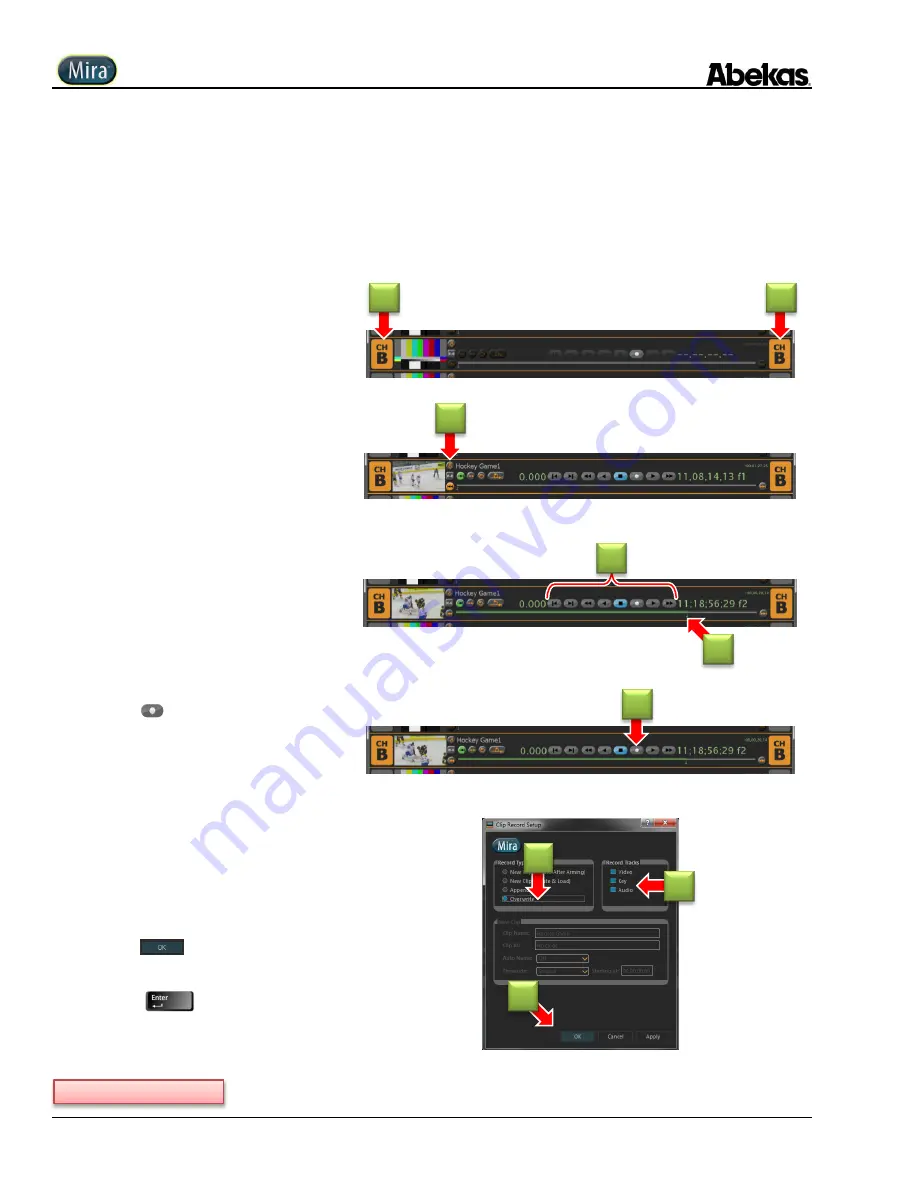
Overwrite Record
The “
Overwrite
” recording function is used to insert new audio/video material into an already-existing clip in the Clip Library, using the
digital video and audio inputs on the currently active video channel as the source for the append recording.
Overwrite recording can be “destructive” to the content already in the clip, so be aware of the current position within the clip when using
this record function: the Overwrite recording begins at the current position within the clip!
NOTE:
If the video channel you wish to record with is already
selected, then skip ahead to step 2 below.
1.
Click anywhere in horizontal transport
control area for desired channel.
ChB
is selected in this illustration, as indicated
by the orange highlight on
ChB.
2.
Load clip into selected video channel into
which you want to Overwrite.
If you don’t know how to load a clip into the
selected video channel, please refer to
Selecting Video Channels & Loading Clips
3.
Use clip slider
(or any transport control)
to
position clip where insert recording will
begin.
Use video window to view clip, along with the
timecode display to correctly position the clip.
You may also use the other transport controls
(Play, Jog, FFD, REW, etc.) to locate the desired
position inside the clip.
4.
Click
(Record) button.
This presents “
Clip Record Setup
” dialog
window, shown in next step below.
5.
Click “
Overwrite
” radio button.
The “New Clip” data fields become grayed
-out
and inactive.
6.
OPTIONAL: Select desired tracks within
clip to record into (Video; Key; or Audio):
overwrite recording will take place only on
selected (blue box) tracks.
7.
Click
to finish.
— or —
Press
on QWERTY keyboard.
The “Clip Record Setup” dialog window clos
es.
Continued on next page…
1
1
2
3
3
4
5
6
7
Summary of Contents for Mira
Page 382: ......


