


16
PROCEDURA D’INSTALLAZIONE
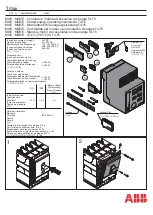
- Per XT2-XT4-XT5 verificare il corretto collegamento tra Ekip Cartridge e CB
- Verificare che l’interruttore sia in posizione di aperto
- Fornire alimentazione all’Ekip Supply (verificare compatibilità con tensione nominale)
- Verificare l’accensione dei LED sul modulo (1) e sullo sganciatore (2)
- Per tutti i dettagli di funzionamento di led e modulo consultare il manuale d’uso per Ekip Touch (1SDH001821A1001 XT7, 1SDH002031A1001
XT2-XT4, 1SDH001316R0001 Emax 2)
INSTALLATION PROCEDURE
- For XT2-XT4-XT5 verify the correct connection between Ekip Cartridge and CB
- Make sure that the switch is in the open position
- Supply power to the Ekip Supply (verify compatibility with rated voltage)
- Check that the leds are lit on the module (1), and on the release (2)
For full details on the operation of led and module consult Ekip Touch user manual (1SDH001821A1002 XT7, 1SDH002031A1002 XT2-XT4,
-
1SDH001316R0002 Emax 2)
INSTALLATIONSVERFAHREN
Bei XT2-XT4-XT5 überprüfen Sie die korrekte Verbindung zwischen Ekip Cartridge und CB
-
- Stellen Sie sicher, dass der Schalter in der offenen Position ist
- Ekip Supply mit Speisung versorgen (überprüfen die Kompatibilität mit Nennspannung)
- Prüfen, ob die led auf dem Modul (1), und dem Auslöser (2) an sind.
- Umfassende Informationen zur Bedienung von LED und Modul finden Sie in der Ekip Touch Bedienungsanleitung (1SDH001821A1002 XT7,
1SDH002031A1002 XT2-XT4, 1SDH001316R0002 Emax 2)
PROCÉDURE D'INSTALLATION
- Pour XT2-XT4-XT5, vérifiez la connexion correcte entre Ekip Cartridge et CB
- Vérifier que le commutateur est en position ouverte
- Fournir l'alimentation à l’Ekip Supply (vérifier la compatibilité avec la tension nominale)
- Vérifier l'allumage des voyants sur le module (1), et sur le déclencheur (2)
- Pour tous les détails de fonctionnement des LED et des modules le manuel d'utilisation d'Ekip Touch (1SDH001821A1002 XT7,
1SDH002031A1002 XT2-XT4, 1SDH001316R0002 Emax 2)
PROCEDIMIENTO DE INSTALACIÓN
Para XT2-XT4-XT5, comprobar la conexión correcta entre Ekip Cartridge y CB
-
- Verificar que el interruptor está en la posición abierta
- Dar alimentación al Ekip Supply (verificar la compatibilidad con tensión nominal)
- Verificar el encendido de los led en el módulo (1), y en el relé (2)
- Para todos los detalles de funcionamiento des led y modulos consultar el manual de usuario para Ekip Touch (1SDH001821A1002 XT7,
1SDH002031A1002 XT2-XT4, 1SDH001316R0002 Emax 2)
1
2
ABB
安装程序
-
-XT5
对于
XT2-XT4
请检验
Ekip Cartridge
和断路器的正确连接方式
-
检查开关是否断开
-
给
Ekip Supply
通电
(
检查是否符合额定电压
)
-
检查模块
(1)
和脱扣器
(2)
上的
Led
灯是否点亮
-
有关发光二极管与模块的详细操作请参考
Ekip Touch
用户说明书
(1SDH001821A1002 XT7, 1SDH002031A1002 XT2-XT4, 1SDH001316R0002
Emax 2)