


1SFC132081M0201 | Installation and commissioning manual |
Communication
147
8.3
ABB Fieldbus plug interface
(option)
The PSTX Softstarter has an interface, com 2, on the
front for connecting the ABB Fieldbus Plug Adapter
(FBPA) used for Fieldbus communication.
You can use this interface to control the Softstarter, get
status information, and for the upload and download of
parameters.
The interface between the Softstarter and the FieldBus
Plug is independent of the Fieldbus protocol used.
Independent of Softstarter type or delivery date, you can
connect 1 of the available Fieldbus protocols, because
this is specified in the FieldBus Plug itself.
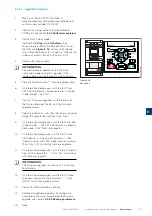
Connect the Fieldbus communication plug to the ABB
Fieldbus Plug Adapter (FBPA).
Make sure that the plug is in the correct position and
tighten the screw with 0,8 Nm (7,1 lb in) and additional
1/4 turn.
These Fieldbus protocols are available:
• DeviceNet
• Profibus
(DPV0/DPV1)
• Modbus
RTU
8.3.1 Instructions
Instructions for the set-up of input and output telegrams,
parameter settings, instructions, etc. are available at:
www.abb.com/lowvoltage
:
• DeviceNet
1SFC132090M0201
• Profibus
(DPV0/DPV1)
1SFC132091M0201
• Modbus
RTU
1SFC132092M0201
8.3.2 Necesssary
components
To connect the PSTX Softstarter to a Fieldbus system,
these components are necesssary:
• ABB Fieldbus Plug Adapter, for presenting Fieldbus
protocol (make sure that the cable length is sufficient).
• Connectors for bus connection.
• End plug (some protocols).
• Software for PLC set-up.
8.4
MINI USB interface
The PSTX Softstarter has an USB interface for
communication with PC. The USB interface is on the front
of the movable HMI.
You can use this interface to get status information, and
for the upload and download of parameters.
8
Summary of Contents for PSTX Series
Page 1: ...1SFC132081M0201 Softstarters Type PSTX30 PSTX1250 Installation and commissioning manual...
Page 4: ......
Page 6: ......
Page 10: ...10 Introduction Installation and commissioning manual 1SFC132081M0201 1...
Page 16: ...16 Quick start Installation and commissioning manual 1SFC132081M0201 2...
Page 29: ...1SFC132081M0201 Installation and commissioning manual Description 29 3...
Page 30: ...30 Description Installation and commissioning manual 1SFC132081M0201 3...
Page 36: ...36 Installation Installation and commissioning manual 1SFC132081M0201 4...
Page 50: ...50 Connection Installation and commissioning manual 1SFC132081M0201 6...
Page 72: ...72 Human machine interface HMI Installation and commissioning manual 1SFC132081M0201 6...
Page 143: ...1SFC132081M0201 Installation and commissioning manual Functions 143 7...
Page 144: ...144 Functions Installation and commissioning manual 1SFC132081M0201 7...
Page 148: ...148 Communication Installation and commissioning manual 1SFC132081M0201 8...
Page 156: ...156 Maintenance Installation and commissioning manual 1SFC132081M0201 9...
Page 168: ...168 Troubleshooting Installation and commissioning manual 1SFC132081M0201 10...
Page 176: ...176 Wiring and application diagrams Installation and commissioning manual 1SFC132081M0201 11...
Page 181: ...1SFC132081M0201 Installation and commissioning manual Third party licenses 181 12...
Page 183: ...1SFC132081M0201 Installation and commissioning manual Revision 183 13...
Page 187: ...1SFC132081M0201 Installation and commissioning manual Index 187 14...