background image


...

29

4 .6 .7 

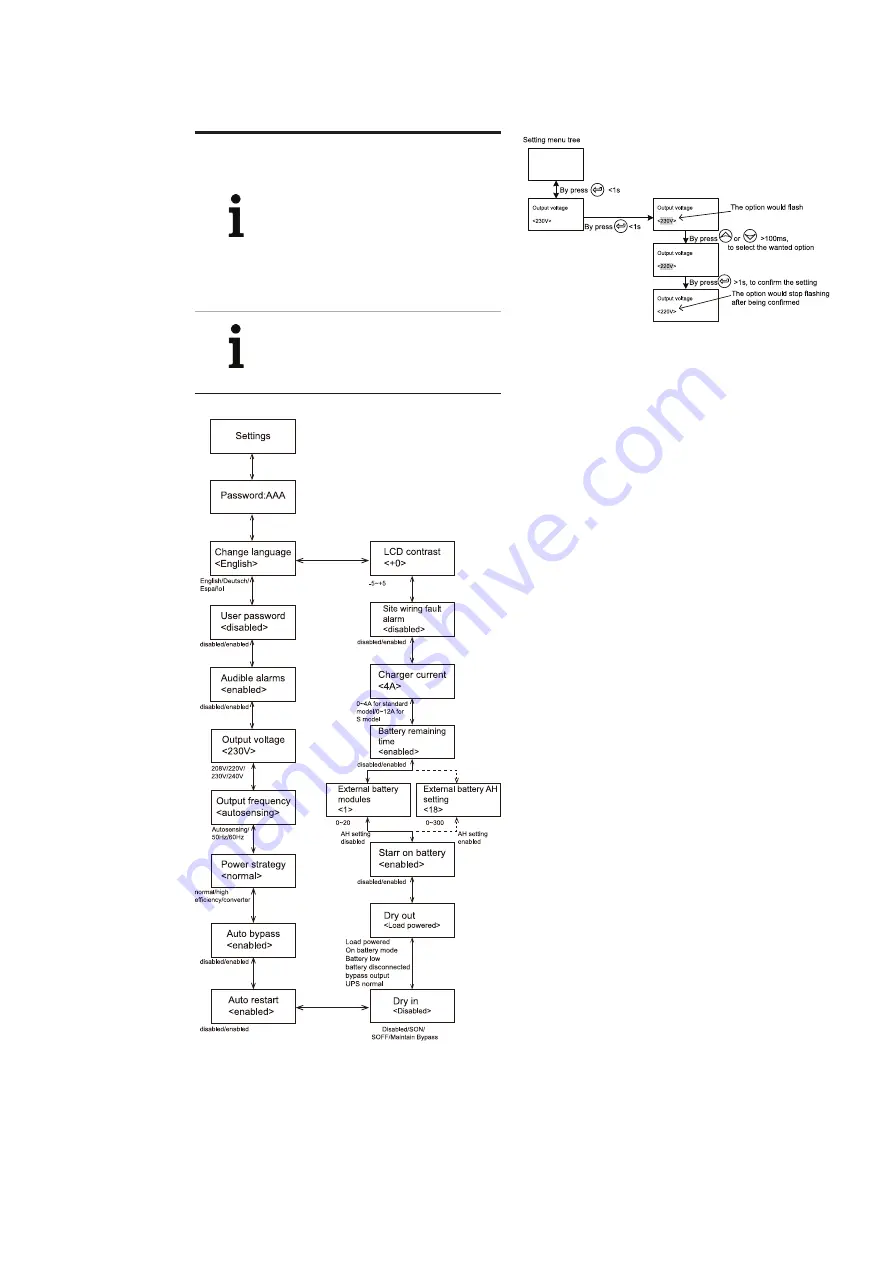
Setting menu

NOTE

PLEASE CONTACT YOUR LOCAL 
DISTRIBUTOR FOR FURTHER 
INFORMATION BEFORE CHANGING 
SETTINGS. SOME SETTINGS CHANGE THE 
SPECIFICATION OF THE UPS AND SOME 
SETTINGS ENABLE OR DISABLE SOME 
IMPORTANT FUNCTIONS. UNSUITABLE 
SETTINGS ENTERED BY A USER MAY 
RESULT IN POTENTIAL FAILURES OR 
PROTECTION FUNCTION LOSS, OR EVEN 
DIRECTLY DAMAGE THE LOAD, 
BATTERY OR UPS.

NOTE

MOST SETTINGS CAN ONLY BE CHANGED 
WHILE THE UPS IS IN BYPASS MODE


28


28   Setting menu

29   Example (set-up)

Example: set rated output voltage value.


29

4    O P ER AT I O N

Summary of Contents for 8408608

Page 1: ... PowerValue 11 RT G2 6 10 kVA USER MANUAL PowerValue 11 RT G2 6 10 kVA ...

Page 2: ...an imminent electrical hazard Failure to observe the related safety note may cause injury death or equipment damage This symbol in conjunction with the signal word WARNING indicates a potentially dangerous situation Failure to observe may cause injury death or equipment damage This symbol in conjunction with the signal word NOTE indicates operator tips or particularly useful or important informati...

Page 3: ...ation 11 3 3 General characteristics 13 3 3 1 UPS front panel 13 3 3 2 UPS rear panel 13 3 4 Electrical installation 15 3 4 1 Commissioning 15 3 4 2 Recommended cable sections and fuse ratings 15 3 4 3 Connections 16 3 4 4 PDU terminal block access optional 16 3 4 5 Parallel installation operation 17 4 Operation 20 4 1 Control panel 20 4 1 1 Selection keys 20 4 1 2 LED s status indicators 20 4 1 3...

Page 4: ...31 5 3 1 Dry IN 31 5 3 2 Dry OUT 31 5 4 Network management card optional 32 5 4 1 Installing a serial network management card optional 32 5 4 2 Monitoring software 32 6 Troubleshooting 33 6 1 Fault identification and rectification 33 6 2 Accessing alarms 33 6 3 Silencing the alarm 36 Appendix A 37 Appendix B 38 ...

Page 5: ...derations DANGER DO NOT REMOVE ANY SCREWS FROM THE UPS SYSTEM OR FROM THE BATTERY CABINET DANGER OF ELECTRICAL SHOCK DANGER HIGH FAULT CURRENTS LEAKAGE CURRENTS BEFORE CONNECTING THE MAINS ENSURE THAT THE UPS IS EARTHED DANGER DISPLAY A WARNING LABEL ON ALL PRIMARY POWER ISOLATORS INSTALLED AWAY FROM THE UPS AREA TO WARN ELECTRICAL MAINTENANCE PERSONNEL THAT THE CIRCUIT FEEDS A UPS MAKE SURE THAT ...

Page 6: ...D ALL CONNECTED LOADS NOTE PRESS THE OFF BUTTON TO FULLY DISCONNECT THE UPS ENSURE THE UPS IS ON BYPASS OR ON STANDBY MODE BEFORE DISCONNECTING IT FROM THE MAINS NOTE TO REDUCE THE RISK OF FIRE CONNECT THE UPS TO A CIRCUIT PROVIDED WITH BRANCH CIRCUIT OVERCURRENT PROTECTION WITH AN AMPERE RATING IN ACCORDANCE WITH THE IEC EN 60934 STANDARD OR YOUR LOCAL ELECTRICAL CODE SEE TECHNICAL SPECIFICATIONS...

Page 7: ... MAINS POWER SUPPLY DANGER DISCONNECT THE BATTERIES BEFORE CARRYING OUT ANY KIND OF SERVICE AND OR MAINTENANCE VERIFY THAT NO CURRENT IS PRESENT AND NO HAZARDOUS VOLTAGE EXISTS IN THE CAPACITOR OR BUS CAPACITOR TERMINALS DANGER THE BATTERY CIRCUIT IS NOT ISOLATED FROM THE INPUT VOLTAGE HAZARDOUS VOLTAGES MAY OCCUR BETWEEN THE BATTERY TERMINALS AND THE GROUND VERIFY THAT NO VOLTAGE IS PRESENT BEFOR...

Page 8: ...ANY POTENTIAL NEGATIVE EFFECTS ON HUMAN HEALTH AND THE ENVIRONMENT WHICH COULD OTHERWISE ARISE FROM INAPPROPRIATE WASTE HANDLING 2 1 2 For disposal in countries outside of the European Union THE CROSSED OUT WHEELED BIN SYMBOL IS ONLY VALID IN THE EUROPEAN UNION EU AND MEANS THAT USED ELECTRICAL AND ELECTRONIC EQUIPMENT WEEE SHOULD NOT BE MIXED WITH GENERAL HOUSEHOLD WASTE IF YOU WISH TO DISCARD TH...

Page 9: ... C13 C14 cable 1 x monitoring software CD 1 x 15 pin communication cable for parallel systems RS232 cable 1 x USB cable Rack mounting accessories full rack mounting kit can be purchased separately 2 x 90 rack mounting brackets 4 x M6 clip nuts 12 x M6 screws 4 x M4 screws Examine the UPS for any signs of damage and ensure that the received UPS corresponds to the material indicated in the delivery ...

Page 10: ...HE UPS IS UNPACKED IN A VERY LOW TEMPERATURE TO AVOID HAZARDS AND RISK OF ELECTRIC SHOCK WAIT UNTIL THE UPS IS FULLY DRY BOTH INSIDE AND OUTSIDE BEFORE INSTALLING USING THE UPS 3 2 3 Rack mount installation 3 2 3 1 UPS Note that you need a rack mounting kit purchased separately for this operation This procedure is suitable for 19 inch rack cabinet installation with a minimum depth of 800 mm Identi...

Page 11: ...e figure 4 NOTE UP TO FOUR EXTERNAL BATTERY ENCLOSURES CAN BE CONNECTED TO THE UPS IN THE SAME WAY AS SHOWN ABOVE NOTE AFTER CONNECTING THE BATTERY ENCLOSURES CONFIGURE THE NUMBER OF BATTERY MODULES IN THE CONTROL PANEL FOR MORE INFORMATION SEE CHAPTER 4 6 7 SEE APPENDIX C FOR FURTHER DETAILS 05 06 04 04 Battery module connection 05 Display rotation 06 Stabilizer bracket for external batter module...

Page 12: ...below and install it on the UPS stabilizer bracket 2 Install the UPS and EBM individually into the stabilizer bracket 3 Connect to the UPS with the battery power cable refer to rack position installation Note It is recommended that this unit be installed to UPS s righthand side If installing an additional unit place it next to the previous unit 07 ...

Page 13: ...2 and Figures 9 and Table 3 and Figure 10 show the connectors and ports in the UPS and external battery module rear panel 3 3 General characteristics 09 08 Table 2 UPS rear panel connectors and ports 1 Dry IN OUT 2 SNMP AS400 slot 3 RJ11 PDU connection 4 Parallel card 5 Output breaker 6 Output socket 7 Input Output terminals 8 Input breaker 9 EBM connector 10 USB 11 RS232 12 EPO 3 INSTALL ATION ...

Page 14: ...3 14 ABB UPS PRODUCTS AND SOLUTIONS 10 10 External battery module rear view Table 3 External battery module rear panel connectors and ports 13 EBM terminal 14 Fuse board cover to replace EBM fuse 15 EBM connector ...

Page 15: ...and testing of the UPS and customer training WARNING DO NOT OPERATE IN CASE OF PRESENCE OF WATER OR MOISTURE DANGER WHEN OPENING OR REMOVING THE UPS COVERS YOU ARE EXPOSED TO DANGEROUS VOLTAGES 3 4 2 Recommended cable sections and fuse ratings When selecting the cable cross sections and the protective devices follow the recommendations in the technical specifications document or follow local stand...

Page 16: ... PRINTERS HAVE A VERY HIGH POWER CONSUMPTION AT START UP IF CONNECTED TO THE UPS THE START UP POWER OF SUCH LOADS MUST BE TAKEN INTO CONSIDERATION WHEN CALCULATING THE CAPACITY OF THE UPS TO PREVENT THE UPS FROM BEING OVERLOADED AND TURNED OFF 3 4 4 PDU terminal block access optional If you ordered the PDU model please connect the UPS s terminal blocks from PDU s source For detailed operation plea...

Page 17: ...llel O P Breaker O P Breaker UPS 3 O P Breaker Main O P Breaker To Load Mains Mechanical or static switch 17 16 3 4 5 Parallel installation operation Up to three UPSs can be connected in parallel to configure a sharing and redundant output power 16 Parallel system installation diagram 3 INSTALL ATION ...

Page 18: ...e input output wires breakers and a main maintenance mechanical switch or static switch 2 Independent battery packs for each UPS 3 Remove the cover plate from the parallel connection port on the UPS connect each UPS one by one with a parallel connection cable and make sure the cable is screwed in tightly 4 Install the cable locker to protect the parallel cable for each UPS 17 Parallel cable connec...

Page 19: ...r The UPS will then shut down 5 Connect the cable and wire for the new UPS 6 Switch on the input breakers and mains breaker and make sure that every UPS is in bypass mode 7 Switch on the output breakers and main output breaker transfer the main maintenance switch or static switch from BPS to UPS 8 Press the button on one UPS all the UPSs will turn on The system will work in line mode How to remove...

Page 20: ...P adapters and their software 20 Control panel 4 1 1 Selection keys Table 5 UPS selection keys Button Function Illustration Power ON OFF Turn the UPS on and off or change operating mode Scroll UP Scroll up through the menu Scroll DOWN Scroll down through the menu Select Edit Select and confirm settings Exit Mute Exit menus and mute the buzzer 4 1 2 LED s status indicators Table 6 UPS selection key...

Page 21: ...status Active fault Continuous Active warning Beep every second Battery UPS on battery Beep every 4 seconds Low battery Buzzer beeps every second Bypass Beep every two minutes Overload Beep twice every second When powering on the LCD shows the UPS status The UPS will also return to this default screen when no buttons hav been pressed for 15 minutes The status screen shows the following information...

Page 22: ...plied continuously Note ECO mode can be enabled through the LCD settings or the monitoring software Warning The transfer time of the UPS output from ECO mode to battery mode is 10 ms and is not recommended for sensitive loads Converter mode In converter mode the UPS runs with fixed output frequency 50 Hz or 60 Hz On mains failure the UPS transfers to battery mode and the load is supplied continuou...

Page 23: ... BY ONE AFTER THE UPS IS TURNED ON SWITCH OFF ALL OF THE CONNECTED LOADS BEFORE TURNING OFF THE UPS NOTE THE FIRST TIME THE UPS IS STARTED UP IT MUST BE CONNECTED TO THE UTILITY 4 3 1 UPS start up To start up the UPS with mains supply 1 Check that all cables are securely and correctly connected 2 Keep the power button pressed for longer than 1 second The fans will activate and the UPS will load fo...

Page 24: ...el remaining time Mode Para Num Running time Measurements Load W VA Output Current A Output Voltage V Hz Input Voltage V Hz Battery V DC bus V V Temperature C Battery remaining time Min Control Single UPS battery test Starts a manual battery test for single UPS Parallel UPS battery test Starts a manual battery test for parallel UPS Single UPS turn off Turn off one UPS in parallel UPS system Reset ...

Page 25: ...al Auto bypass enabled disabled enabled Auto restart enabled disabled Authorize the product to restart automatically when mains recovers after a complete battery discharge enabled Dry in Disabled SON SOFF Maintain bypass Disabled Dry out Load powered On battery mode Battery low Battery disconnected Bypass output UPS normal Load powered Start on battery enabled disabled enabled External battery mod...

Page 26: ... displayed 22 Main menu 23 UPS status menu In addition to the default UPS status summary screen the user has access to useful information about the UPS status including various detailed measurements previous event records and the UPS identification The settings can be changed to optimize the UPS for and by the user 4 6 1 Main menu In the default UPS status summary screen when pressing or for more ...

Page 27: ...nd frequency the output current the load capacity the input voltage and frequency etc can be accessed here Pressing ESC for more than 3 seconds returns to the last main menu tree 4 6 4 Event log menu By pressing on the Event log menu the next event menu tree is displayed All previous events alarms and faults are recorded here Data includes the explanation the event code and the precise time in the...

Page 28: ...tatus then the UPS stops the alarm and recovers to bypass mode The cause of the fault should be checked and corrected before the UPS is reset manually Restore factory settings all the settings are reset to default factory settings Can only be done in bypass mode 26 Control menu 27 Identification menu 4 6 6 Identification menu By pressing on the Identification menu the next identification menu tree...

Page 29: ...D SOME SETTINGS ENABLE OR DISABLE SOME IMPORTANT FUNCTIONS UNSUITABLE SETTINGS ENTERED BY A USER MAY RESULT IN POTENTIAL FAILURES OR PROTECTION FUNCTION LOSS OR EVEN DIRECTLY DAMAGE THE LOAD BATTERY OR UPS NOTE MOST SETTINGS CAN ONLY BE CHANGED WHILE THE UPS IS IN BYPASS MODE 28 28 Setting menu 29 Example set up Example set rated output voltage value 29 4 OPER ATION ...

Page 30: ...data and initiate shutdown of the equipment connected to the UPS 5 Communication The UPS has an RS 232 port for UPS monitoring control and firmware updates To establish communication between the UPS and a computer connect one end of the serial communication cable to the RS 232 port on the UPS and the other end to the RS 232 port of a computer The cable pins for the RS 232 communication port are de...

Page 31: ...onnect the USB cable to the USB port on the UPS Connect the other end of the cable to the USB port on a computer The EPO connector can be used to block the output of the UPS in case of an emergency The EPO connector can be configured as Normally Closed NC or Normally Opened NO through the USB or RS232 port By default the EPO connector is Normally Closed NC by a jumper in the rear panel If the jump...

Page 32: ...se of absence of power at the UPS output Instructions on how to install the software are provided with the network management cards For more information contact your local supplier The PowerValue 11 RT G2 6 10 kVA is equipped with an intelligent slot for optional cards for remote management of the UPS through the Internet intranet Either of the following accessories can be installed in the intelli...

Page 33: ...log menu using 2 Press to enter the Event log list 3 Scroll through the listed events notices and alarms using or NOTE THE MOST RECENT EVENTS ARE DISPLAYED ON TOP OF THE LIST FOR EXAMPLE 1 50 The control panel provides troubleshooting information from two main menus UPS status menu access to all active alarms Event log menu access to the most recent 50 events which may include active and closed al...

Page 34: ...ct your service representative ON Maintenance Bypass Bypass Orange LED is on Code A072 UPS was manually commanded to switch to bypass and will remain in bypass until commanded out of bypass Check the maintenance bypass switch status In HE Mode Line green LED is on Code E063 The UPS is on bypass while operating on the high efficiency setting The equipment transferred to bypass utility power as a no...

Page 35: ...rmed the charger has failed The UPS turns off the charger until the next power recycle Contact your service representative Battery Over Voltage Fault Red LED is On Beep continuous Code F016 Indicates that the battery voltage is too high The UPS will turn off the charger until the battery voltage is normal Negative power Fault Fault Red LED is On Beep continuous Code F0E1 In a parallel system power...

Page 36: ...on load type and capacity environment temperature and ventilation condition 5 Information on external battery pack battery capacity quantity Press the ESC Escape button on the front panel display for 3 seconds to silence the alarm Check the alarm condition and perform the relevant action to resolve the condition If the alarm status changes or the ESC button is pressed for 3 seconds again the alarm...

Page 37: ...put Load Percentage Output Webserver Modbus 100 Battery Voltage V Battery Webserver Modbus 110 Battery Capacity Battery Webserver Modbus 103 Temperature C Environmental Webserver Modbus 107 UPS Status Information On shutdown Webserver Modbus 109 On inverter Webserver Modbus 109 On battery Webserver Modbus 109 UPS Alarms Battery Low Webserver Modbus 117 Input Bad Webserver Modbus 120 On Bypass Webs...

Page 38: ...ring UPS Status Battery Status Battery status UPS Monitoring UPS Status Capacity Battery measurement UPS Monitoring UPS Status Voltage Battery measurement UPS Monitoring UPS Status Time on Battery Battery measurement UPS Monitoring UPS Status Output Rating Voltage Output Rating UPS Monitoring UPS Parameters Output Frequency Rating Output Rating UPS Monitoring UPS Parameters Output Rating VA Output...

Page 39: ...39 APPENDIX B ...

Page 40: ...PowerValue 11 RT G2 6 10kVA www abb com ups ups sales ch abb com Copyright 2018 ABB All rights reserved Specifications subject to change without notice ...

Reviews: