ABAC PRO A39B 90 CT4 Instructions For Use Manual Download Page 19

+7 (800) 777-83-75(звонок бесплатный) 

www.v-p-k.ru

                                                                                                                                                  PRO A39B 90 CТ4 


  1 

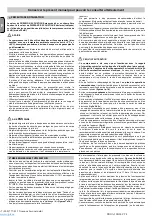
PRECAUTIONS 


The  ACOUSTIC 

PRESSURE’s  value  measured  at  4  m  in  free  field 

corresponds to the ACOUSTIC POWER’s value stated on the yellow label 
located on the compressor, minus 20 dB. 


THINGS TO DO 

• 

The  compressor  must  be  used  in  a  suitable  environment  (well 
ventilated with an ambient temperature of b5°C and +40°C) 
and  never  in  places  affected  by  dust,  acids,  vapors,  explosive  or 
flammable gases

•  Always  maintain  a  safety  distance  of  at  least  4  meters  between  the 

compressor and the work area. 

•  Any coloring of the belt guards of the compressor during painting operations 

indicates that the distance is too short. 

•  Insert the plug of the electric cable in a socket of suitable shape, voltage 

and frequency complying with current regulations. 

•  For  3-phase  versions,  have  the  plug  fitted  by  a  qualified  electrician 

according to local regulations. When starting the compressor for the first 
time,  check  the  correct  direction  of  rotation  and  that  this  matches  the 
direction  indicated  by  the  arrow  on  the  belt  guard  (versions  with  plastic 
protection) or on the motor (versions with metal protection). 

•  Use extension cables with a maximum length of 5 meters and of suitable 

cross-section. 

•  The use of extension cables of different length and also of adapters and 

multiple sockets should be avoided. 

•  Always use the switch of the pressure switch to switch off the compressor 

or use the switch of the electric panel for models equipped with this. Never 
switch off the compressor by pulling out the plug in order to avoid restart 
with pressure in the head. 

• Always use the handle to move the compressor. 
•  When operating, the  compressor must  be  placed  on  a stable, horizontal 

surface to guarantee correct lubrication. 

•  Position  the  compressor  at  least  50  cm  from  the  wall  to  permit  optimal 

circulation of fresh air and to guarantee correct cooling. 


THINGS 

NOT 

TO DO 

•  Never direct the jet of air towards persons, animals or your body. (Always 

wear safety goggles to protect your eyes from flying objects that may be 
lifted by the jet). 

•  Never direct the jet of liquids sprayed by tools connected to the compressor 

towards the compressor. 

• Never use the appliance in your bare feet or with wet hands or feet. 
•  Never pull the power cable to pull the plug out of the socket or to move the 

compressor. 

•  Never  leave  the appliance exposed  to  adverse weather  conditions  (rain, 

sun, fog, snow). 

•  Never transport the compressor with the reservoir pressurized 


  2 

START-UP AND USE 


•  Fit the wheels and foot (or the caster wheel for models that are fitted with 

this) according to the instructions provided in the packaging. For versions 
with  fixed  feet, assemble the  front bracket  kit  or the  vibration-dampers  if 
furnished. Check that the rating data match the effective characteristics of 
the system (voltage and power). 

•  Check  for  correspondence  between  the  compressor  plate  data  with  the 

actual  specifications  of  the  electrical  system.  A  variation  of  ±  10%  with 
respect of the rated value is allowed. 

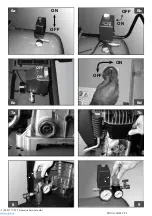
•  Insert the power plug in a suitable socket checking that the button of the 

pressure  s

witch  located  on  the  compressor  is  in  the  “O”  (OFF)  position 

(

figures 6a-6b-6c-6d

). 

•  For the 3-phase versions, connect the plug to a panel protected by suitable 

fuses. 

•  For  the  versions  fitted  with  electric  panel  (“Tandem”  control  units  or 

delta/star starters) have installation and connections (to the motor, to the 
pressure  switch  and  to  the  electrovalve  if  any)  carried  out  by  qualified 
personnel. 

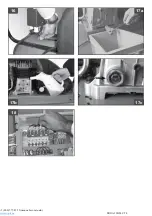
•  Check the oil level using the sight glass and if necessary unscrew the vent 

plug and top up. (

figures 7a-7b

). 

•  At this point, the compressor is ready for use. 
•  Operating on the switch of the pressure switch (or the selector for versions 

with electric panel, (

figures 6a-6b-6c-6d

), the compressor starts, pumping 

air in the reservoir through the delivery hose. On  2-stage versions, air is 
sucked in to the so-called low pressure cylinder liner and precompressed. 
It  is  then  routed,  through  the  recirculation  hose,  into  the  so-called  high 

•  Never  weld  or  machine  the  reservoir.  In  the  case  of  faults  or  corrosion,     

G


replace it completely. 

•  Never  allow  inexpert  persons  to  use  the  compressor.  Keep  children  and 

animals away from the work area. 

•  Never position flammable or nylon or fabric articles close to and/or on the 

compressor. 

•  Never  clean  the  compressor  with  flammable  liquids  or  solvents.  Clean 

with  a  damp  cloth  only,  after  making  sure  that  you  have  unplugged  the 
compressor. 

• The compressor is designed only to compress air and must not be used for 

any other type of gas. 

•  The  compressed  air  produced  by  the  compressor  cannot  not  be  used 

for  pharmaceutical,  food  or  hospital  purposes  except  after  particular 
treatments. It is not suitable for filling the air bottles of scuba divers. 

•  Never  use  the  compressor  without  guards  (belt  guard)  and  never  touch 

moving parts. 


THINGS YOU SHOULD KNOW 

• 

To  avoid  overheating  of  the  electric  motor,  this  compressor  is 
designed for intermittent operation as indicated on the dataplate 

(for 

example, S3-50 means 5 minutes ON and 5 minutes OFF). In the case of 
overheating, the thermal cutout of the motor trips, automatically cutting off 
the power when the temperature is too high due to excess current take- off. 

• 

To facilitate machine restart, it is important not only to carry out the 
operations indicated but also to set the button of the pressure switch, 
returning this to the OFF position and then ON again (figures 1a-1b). 

•  On single-phase versions, press the reset button on the terminal box of the 

motor (

fig. 2

). 

•  On  3-phase  versions,  operate  manually  on  the  button  of  the  pressure 

switch, returning this to the ON position, or press the button of the thermal 
cutout inside the box of the electric panel (

figures 3a-3b-3c

). 

•  The single-phase versions are fitted with a pressure switch equipped with 

a delayed closing air vent valve (or with a valve located on the check valve) 
that  facilitates motor  start-up;  therefore  a  few-second  jet  of  air  from  this, 
with the reservoir empty, is to be considered normal. 

•  To guarantee machine safety, all the compressors are fitted with a safety 

valve that is activated in the case of failure of the pressure switch (

fig. 4

). 

•  All  two-stage  compressors  are  equipped  with  safety  valves  on  the  air 

delivery manifold to the reservoir and on the connection hose between the 
low and high pressure located on the head. These are activated in the case 
of malfunctioning (

fig. 5

). 

• When connecting an air-powered tool to a hose of compressed air supplied 

by  the  compressor,  interruption  of  the  flow  of  air  from  the  hose  is 
compulsory. 

•  Use of the  compressed air  for  the  various  purposes envisaged  (inflation, 

air-powered  tools,  painting,  washing  with  water-based  detergents  only, 
etc.) requires knowledge of and compliance with the rules established for 
each individual use. 


pressure liner and then into the reservoir. With this work cycle, it is possible 
to reach higher pressure, with availability of air at 11 bar (15 bar for special 
machines). 

•  On reaching maximum operating pressure (factory-set during testing), the 

compressor  stops,  venting  the  excess  air present  in  the  head  and  in  the 
delivery hose through a valve located under the pressure switch (in delta/ 
star  versions,  through  an  electrovalve  that  is  activated  when  the  motor 
stops). 

•The absence of pressure in the  head  facilitates  subsequent  restart. When 

air  is  used,  the  compressor  restarts  automatically  when  the  lower 
calibration  value  is  reached  (approx.  2  bar  between  upper  and  lower). 
The pressure inside the reservoir can be checked on the gauge provided 
(

fig. 4

). 

•  The  compressor  continues  to  operate  automatically  with  this  work  cycle 

until the position of the switch of the pressure switch (or of the selector of 
the electric panel) figures 

6a-6b-6c-6d

) is modified. To use the compressor 

again,  wait  at  least  10  seconds  after  this  has  been  switched  off  before 
restarting. 

• In  the  versions  with  electric  panel,  the  pressure  switch  must  always  be 

aligned with the 

(

ON

) position. 

• In  tandem  versions,  the  control  unit  provided  permits  use  of  only  one  of 

the  two  compressor  groups  (if  necessary  alternatively)  or  of  both  at  the 
same time according to requirements. In this second case, start-up will be 
differentiated slightly to avoid excessively high current take-off at start-up 
(timed starting). 

•  Only  the  wheel-mounted  compressors  are  fitted  with  a  pressure  reducer 

(in the versions with fixed feet, it is usually installed on the use line). Air 

Preserve this handbook for future reference 

B


Summary of Contents for PRO A39B 90 CT4

Page 1: ...7 800 777 83 75 www v p k ru PRO A39B 90 C 4 ABAC PRO A39B 90 C 4 https www v p k ru product a39b 90 ct4 www v p k ru 7 800 777 83 75...

Page 2: ...Manual de instrucciones Manual de instru es Gebruiksaanwijzing Brugsanvisning Instruktionsmanual K ytt ohjeet E Instrukcje obs ugi Upute za upotrebu Navodila za uporabo Kezel si tmutat P ru ka k obsl...

Page 3: ...024363 29 90 3 90 320 10 2 2 220 67 4116024518 29B 90 3 90 320 10 2 2 380 68 4116024519 39 90 3 90 393 10 2 2 220 72 4116024280 A39B 150 CM3 150 393 10 2 2 220 88 4116024281 39B 150 3 150 393 10 2 2 3...

Page 4: ...7 800 777 83 75 www v p k ru PRO A39B 90 C 4 1a 1b 2 3b 3c 4...

Page 5: ...7 800 777 83 75 www v p k ru PRO A39B 90 C 4 6a ON OFF OFF 6b ON OFF ON 6c ON OFF 6d 7a 7b 8 9...

Page 6: ...7 800 777 83 75 www v p k ru PRO A39B 90 C 4 10 11a 11b 12 13 14 15a 15b...

Page 7: ...7 800 777 83 75 www v p k ru PRO A39B 90 C 4 18 16 17a 17b 17c...

Page 8: ...SLO Pred zagonom skrbno preberite navodila za uporabo H Haszn lat el tt figyelmesen olvassa el a k zik nyvet CZ P ed zah jen m pr ce si pozorn p e t te p ru ku pro pou it SK Pred pou van m v robku si...

Page 9: ...ligatoriske beskyttelsesbriller S Obligatoriska skyddglas gonFIN Pakollinen silmien suojaus GR PL Obowi zkowe zabezpieczenie wzroku HR Obavezna za tita za o iju SLO Obvezna za ita o i H K telez szemv...

Page 10: ...erpadla SK Vstrekovacia s stava RUS NO Pumpe Gruppe TR Pompalama grubu RO Grup de pompare BG SRB Pumpna grupa LT Pompavamo jrenginys EST Kompressori pump LV S k u grupa I Attenzione corrente elettrica...

Page 11: ...PRO A39B 90 C 4 I Capacit serbatoio GB Tank capacity F Contenance r servoir D Beh ltergr e E Capacidad dep sito P Capacidade do reservat rio NL Tankcapaciteit DK Br ndstoftank kapacitet S Br nsletank...

Page 12: ...tr mforbrug S Str mf rbrukning FIN Ottovirta GR PL Pr d Pobrany HR Absorbirana energija SLO Absorbirani elektri ni tok H Elnyelt ram CZ Spot eba el energie SK Pr dov spotreba RUS NO Str m Absorbert TR...

Page 13: ...packungsgr en E Dimensiones del embalaje P Tamanho da embalagem NL Afmetingen verpakking DK Emballage m l S F rpackningens dimensioner FIN Pakkauksen mitat GR PL Wymiary opakowania HR Dimenzije omota...

Page 14: ...a SLO Sklop Napajalni kabel H T pvezet k cs metszet CZ Pr m r nap jec ho kabelu SK Prierez nap jacieho k bla RUS NO Avdeling matekabel TR Besleme kablosu kesiti RO Sec iune cablu de alimentare BG SRB...

Page 15: ...ioni paracinghia e non toccare le parti in movimento COSE DA SAPERE Questo compressore costruito per funzionare con un rapporto di intermittenza specificato sulla targhetta dati tecnici ad esempio S3...

Page 16: ...nza di pressione nella testa Utilizzando aria il compressore riparte automaticamente quando viene raggiunto il valore di taratura inferiore 2 bar circa tra superiore ed inferiore E possibile controlla...

Page 17: ...manutenzione PRIMA DI QUALSIASI INTERVENTO COMMUTARE SU POSIZIONE OFF IL PRESSOSTATO DISINSERIRE LA SPINA E SVUOTARE COMPLETAMENTE IL SERBATOIO Controllare il serraggio di tutte le viti in particolare...

Page 18: ...ti motivi Intervento della protezione termica del motore Verificare livello olio Versioni monofase monostadio intervenire sul pulsante del pressostato riportandolo nella posizione spento fig 1a Riarma...

Page 19: ...sons to use the compressor Keep children and animals away from the work area Never position flammable or nylon or fabric articles close to and or on the compressor Never clean the compressor with flam...

Page 20: ...he unit are tightly drawn up fig 10 The check must be carried out prior to the first compressor starting TABLE 1 TIGHTENING OF HEAD TENSION RODS Nm Min torque Nm Max torque Screw M6 9 11 Screw M8 22 2...

Page 21: ...no apparent reason Tripping of the thermal cutout of the motor Check level oil Single stage mono phase versions operate on the button of the pressure switch returning this to the OFF position fig 1a...

Page 22: ...et ou sur le compresseur Ne pas nettoyer l appareil avec des liquides inflammables ou des solvants Utiliser uniquement un chiffon humide apr s avoir d branch la prise de la fiche lectrique L utilisati...

Page 23: ...aut d usure ventuel caus par les vibrations du r servoir au cours de l utilisation Utiliser le r servoir dans les limites de pression et de temp rature sp cifi es sur la plaque signal tique et dans le...

Page 24: ...e compresseur s arr te pendant la marche sans raison apparente Intervention de la protection thermique du moteur V rifier le niveau de l huile Versions monophas es mono stade Intervenir sur le bouton...

Page 25: ...pielsweise die Kennzeichnung S3 50 auf 5 Minuten Arbeitszeit und 5 Minuten Stillstandszeit hin vorgesehen um eine berm ige Erhitzung des Elektromotors zu vermeiden Solltediese dennoch auftreten w rde...

Page 26: ...eh lter ist sorgf ltig zu lesen und zu beachten Ansonsten gelten f r Deutschland die Vorschriften der Druckbeh lterverordnung 3 LUFTBEH LTER BEI BEH LTERMONTIERTEN EINHEITEN Korrosion muss verhindert...

Page 27: ...bei geladenem Kompressorkopf Den Vorderteil des Kompressors durch Bet tigen des Druckknopfs entleeren Geringe Temperatur Die Raumbedingungen verbessern Mangelnde Spannung Kontrollieren ob die Netzspa...

Page 28: ...n de apagado y luego nuevamente a la de encendido fig 1a 1b En las versiones monof sicas hay que actuar manualmente apretando el bot n de restablecimiento situado en la caja de bornes del motor fig 2...

Page 29: ...aci n del dep sito durante el uso Use el dep sito dentro de los l mites de presi n y temperatura indicados en la placa de datos y en el informe de prueba No se debe modificar este dep sito con procedi...

Page 30: ...no eficiente Llamar el Centro de Asistencia Durante el funcionamiento el compresor se detiene aparentemente sin ning n motivo Intervenci n de la protecci n t rmica del motor Comprobar el nivel de acei...

Page 31: ...igado figs 1a 1b Nas vers es monof sicas necess rio intervir manualmente carregando no bot o de recupera o situado na caixa de bornes do motor fig 2 Nas vers es trif sicas suficiente intervir manualme...

Page 32: ...odo 4 MANUTEN O A dura o da m quina est condicionada pela qualidade da manuten o ANTES DE QUALQUER INTERVEN O COMUTAR O MAN STATO PARA A POSI O OFF TIRAR A FICHA E ESVAZIAR COMPLETAMENTE O DEP SITO Co...

Page 33: ...7 800 777 83 75 www v p k ru PRO A39B 90 C 4 Deslizamento da correia Controlar a tens o das correias fig 14...

Page 34: ...ncia Interven o da protec o t rmica do motor Verificar o n vel do leo Vers es monof sicas de um est gio carregar no bot o do man stato repondo o na posi o desligado fig 1a Rearmar a protec o t rmica f...

Page 35: ...van de machine te vereenvoudigen moeten niet alleen de beschreven handelingen worden uitgevoerd maar ook de drukknop op de pressostaat worden bediend deze moet eerst in de uitgeschakelde stand en verv...

Page 36: ...gsdempers om mogelijke vermoeidheidsbreuken als gevolg van trilling van het vat tijdens het gebruik te voorkomen Gebruik het drukvat binnen de grenswaarden voor de druk en temperatuur die op het naamp...

Page 37: ...ep Neem contact op met het Servicecentrum De compressor stopt tijdens bedrijf zonder duidelijke reden Ingreep van de thermische beveiliging van de motor Controleer het oliepeil Eenfase eentrapsversies...

Page 38: ...ndigt at gribe manuelt ind ved at trykke p nulstillingsknappen p motorens klembr t fig 2 P trefasemodellerne er det tilstr kkeligt enten at dreje trykrel ets knap manuelt i positionen ON eller anvende...

Page 39: ...roll r alle skruernes opsp nding og i s rdeleshed dem p gruppens hoved fig 10 Kontrollen skal udf res inden den f rste start af kompressoren TABEL 1 FASTSP NDING TOPSTYKKEBOLTE Nm Coppia Min Nm Coppia...

Page 40: ...re olie p eller udskift om n dvendigt Uduelig magnetventil Kontakt assistancecenteret Kompressoren standser uden synlige rsager under drift Motorens termosikring har sat ind Kontroller olieniveauet Mo...

Page 41: ...som sitter p motorns kopplingsdosa fig 2 P modeller av trefastyp r cker det med att trycka p tryckvaktens knapp s att den r i tillslaget l ge eller trycka p knappen p verhettningsskyddet inuti dosan...

Page 42: ...S I L GE OFF STICKKONTAKTEN DRAS UR OCH LUFTBEH LLAREN T MMAS FULLST NDIGT Kontrollera att alla skruvar r tdragna i synnerhet skruvarna p enhetens lock fig 10 innan kompressorn startas f r f rsta g ng...

Page 43: ...n Kompressorn stannar under drift utan anledning Motorns verhettningsskydd har l st ut Kontrollera oljeniv n Modeller i enstegs och enfasutf rande Tryck p tryckvaktens knapp s att den f rst r i avst n...

Page 44: ...Vaihtoehtoisesti voi painaa s hk taulun rasiassa olevan l mp suojan painiketta kuvat 3a 3b 3c Yksivaihemalleissa on painekytkin jossa on moottorin k ynnistymist helpottava viivesulkeutuva ilmanpoistov...

Page 45: ...s tulee suorittaa ennen kompressorin ensimm ist k ynnistyst TAULUKKO 1 P DYN ANKKURITANKOJEN KIRIST MINEN Nm Minimimomentti Nm Maksimimomentti Pultti M6 9 11 Pultti M8 22 27 Pultti M10 45 55 Pultti M1...

Page 46: ...K ynniss ollessaan kompressori pys htyy ilman n kyv syyt Moottorin l mp suojan laukeaminen Tarkasta ljyn m r Yksivaiheiset yksivy hykemallit vie painekytkimen painike takaisin asentoon off kuva 1a no...

Page 47: ...7 800 777 83 75 www v p k ru PRO A39B 90 C 4 1 4 20 dB 5 C 40 C 4 5 50 cm S3 50 5 5 1a 1b 2 3a 3b 3c 4 5 2 10 O 6a 6b 6c 6d tandem 7a 7b 6a 6b 6c 6d 11bar 15 bar G R...

Page 48: ...PRO A39B 90 C 4 2 bar 4 6a 6b 6c 6d 10 I ON tandem 8 9 13 1 Nm Nm M6 9 11 M8 22 27 M10 45 55 M12 76 93 M14 121 148 100 11a 11b 100 300 API CC SC SAE 40 API CC SC SAE 20 12 7a f 1 cm 14 G R 4 OFF 10 3...

Page 49: ...7 800 777 83 75 www v p k ru PRO A39B 90 C 4 5 G R 15a 15b rilsan rilsan 16 11a 11b 14 17a 17b 17c 1a 2 1b 3c 6d 1a 1b 18...

Page 50: ...lnych lub wykonanych ze sztucznego tworzywa lub z tkaniny blisko i lub na spr arce Nie czy ci maszyny za pomoc palnych p yn w lub rozpuszczalnik w Zastosowa tylko wilgotn cierk po uprzednim upewnieniu...

Page 51: ...Nie wolno kotwi zbiornika ani przymocowanych do niego podzespo w bezpo rednio do pod o a ani do sta ych konstrukcji Zbiornik ci nieniowy nale y zamocowa na t umikach drga aby nie dopu ci do zm czenia...

Page 52: ...7 800 777 83 75 www v p k ru PRO A39B 90 C 4 Przew d rurowy rilsan nie zamontowany w a ciwie na presostacie Zamontowa w a ciwie wewn trz presostatu przew d rurowy rilsan rys 16...

Page 53: ...zaw r niesprawny Zg osi si do Serwisu Technicznego Spr arka podczas pracy zatrzymuje si bez widocznego powodu Interwencja protekcji termicznej silnika Zweryfikowa poziom oleju Wersje jednofazowe jedno...

Page 54: ...urnosnog titnika titnik remena kako bi sprije ili dodir pokretnih dijelova STVARI KOJE OBAVEZNO TREBATE ZNATI Kako bi izbjegli prekomjerno pregrijavanje elektri nog motora kompresor je konstruiran za...

Page 55: ...polo aj prekida a tla ne sklopke ili bira a na elektri noj razvodnoj plo i slike 6a 6b 6c 6d Da bi ponovno upotrijebili kompresor pri ekajte najmanje 10 sekundi nakon to se isklju io prije ponovnog p...

Page 56: ...ltar u skladu s vrstom okoline ali u svakom slu aju najmanje svakih 100 sati Ako je potrebno zamijenite filtar za epljen filtar uzrokuje smanjenje snage a smanjena snaga poja ano habanje kompresora sl...

Page 57: ...ovjerite razinu ulja Jednostupanjski monofazni modeli Pritisnite gumb na tla noj sklopki kako bi ga vratili u polo aj ISKLJU ENO slika 1a Resetirajte za titu od toplinskog preoptere enja slika 2 a ond...

Page 58: ...jo biti blizu delovnega obmo ja V bli ino in ali na kompresor ne odlagajte gorljivih objektov ali predmetov iz najlona in tkanin Kompresorja ne istite z gorljivimi teko inami ali topili Uporabljajte s...

Page 59: ...sorske glave slika 10 Vijake morate preveriti preden prvi za enete kompresor TABELA 1 ZATEGOVANJE VIJAKOV KOMPRESORSKE GLAVE minimalni moment Nm maksimalni moment Nm Sornik vijak M6 9 11 Sornik vijak...

Page 60: ...o Aktivirajte tla no stikalo in ga nastavite v polo aj Izklop ter nato ponovno v polo aj Vklop prikaz 1a Ponovno sprostite toplotno za ito prikaz 2 in izvr ite ponovni zagon prikaz 1b e je motnja e ve...

Page 61: ...adott m veleteken k v l vissza ll tsa a nyom skapcsol kapcsol j t a kikapcsolt helyzetbe s ut na jb l a bekapcsolt helyzetbe 1a 1b bra N h ny egy f zis t pus eset n k zzel kell beavatkozni gy hogy meg...

Page 62: ...az adatt bl n s a tesztjelent sben megjel lt nyom s s h m rs kleti hat r rt kek k z tt haszn lja A tart lyon tilos hegeszt ssel f r ssal vagy m s mechanikai elj r sokkal v ltoztat sokat v gezni 4 KARB...

Page 63: ...t ltse ut na s esetleg cser lje ki Rossz a m gnesszelep H vja a Vev szolg latot A kompresszor menet k zben gyakran le ll l tsz lag ok n lk l H v delem zembe l p se a motor t lhev l se miatt Ellen rizz...

Page 64: ...er se nach z na sk ni svorkovnice motoru obr 2 U t f zov ch verz sta ru n zapnout sp na presostatu anebo stisknout tla tko ochrann ho sp na e kter se nach z uvnit sk ky elektrick ho rozv d e obr 3a 3b...

Page 65: ...u obr 10 Kontrolu je nutn prov st p ed prvn m uveden m kompresoru do provozu C Z TABULKA 1 UTAHOV N SVOREK HLAVICE Nm min utahovac moment Nm max utahovac moment roub M6 9 11 roub M8 22 27 roub M10 45...

Page 66: ...nguje Kontaktujte Technick servis Kompresor se b hem chodu n hle zastav Z sah ochrann ho sp na e motoru Zkontrolujte hladinu oleje Jednof zov verze Vypn te sp na presostatu a znovu ho zapn te obr 1a Z...

Page 67: ...pulova s tla tkom presostatu uvies ho do polohy vypnut a potom znova do polohy zapnut obr 1a 1b Pri jednof zov ch verzi ch je treba zasiahn ru ne stla en m re tartovacieho obnovovacieho tla tka umiest...

Page 68: ...pou van n dr e re pektujte limity teploty a tlaku ktor s uveden na dajovom t tku a v sk obnej spr ve Nevykon vajte iadne modifik cie na tejto n dr i prostredn ctvom zv rania v tania alebo in ch met d...

Page 69: ...entil Zavolajte do Servisn ho strediska Kompresor sa zastav po as prev dzky bez zjavn ch mot vov Zasiahla tepeln ochrana motora Skontrolujte hladinu oleja Jednof zov jednostup ov verzie Zasiahnite na...

Page 70: ...7 800 777 83 75 www v p k ru PRO A39B 90 C 4 1 4 m 20 dB 5 C 40 C 4 5 50 2 10 O 6a 6b 6c 6d Tandem S3 50 5 5 1a 1b 2 3a 3b 3c 4 5 7a 7b 6a 6b 6c 6d 11 15 R U S...

Page 71: ...w v p k ru PRO A39B 90 C 4 2 4 6a 6b 6c 6d I ON Tandem 8 9 13 10 1 M6 9 11 M8 22 27 M10 45 55 M12 76 93 M14 121 148 100 11a 11b 100 300 API CC SC SAE 40 API CC SC SAE 20 12 7a 2 100 100 300 24 h 24 h...

Page 72: ...7 800 777 83 75 www v p k ru PRO A39B 90 C 4 5 R U S 15a 15b 16 11a 11b 14 17a 17b 17c 1a 2 1b 3c 6b 1a 1b 18...

Page 73: ...n r og eller p kompressoren Maskinen m ikke rengj res med brennbare v sker eller l semidler Du m bare bruke en fuktig klut og passe p at du har koplet st pselet fra stikkontakten Bruken av kompressor...

Page 74: ...fig 10 TABELL 1 STRAMMING AV HOLDER FOR MUNNSTYKKET Nm Min moment Nm Maks moment Bolt M6 9 11 Bolt M8 22 27 Bolt M10 45 55 Bolt M12 76 93 Bolt M14 121 148 Rengj re innsugingsfilteret i forhold til hvo...

Page 75: ...er Den termiske beskyttelsen har grepet inn pga overoppheting av motoren Sjekk oljeniv et Enfase modeller monostadium Trykk p trykkm lerens knapp for sette den i AV stilling og deretter p P fig 1a Nul...

Page 76: ...ak m dahale etmek gerekir ek 2 fazl versiyonlar nda bas n l er d mesi zerinde manuel olarak i lem yaparak yan k konumuna getirmek veya elektrik panosu kutusu i erisinde bulunan termik d mesi zerinde m...

Page 77: ...TANKI TAMAMEN BO ALTIN T m vidalar n zellikle gurup kafas n n s k oldu unu kontrol edin ek 10 Kontrol n kompres r n ilk al mas ndan nce yap lmas gerekmektedir TABLO 1 EK C KAFA KAYI I Nm Min Tork Nm M...

Page 78: ...r n Kompres r mar esnas nda belirsiz nedenlerden dolay duruyor Motor termik koruyucu m dahalesi Ya n seviyesini kontrol edin Tek durumlu tek fazl versiyonlar Bas n l er d mesi zerinde m dahale ederek...

Page 79: ...t ca prin ap sarea butonului de pe presostat s opri i compresorul definitiv i s l porni i l din nou vezi fig 1a 1b Pe modelele monofazate este necesar s interveni i manual ap s nd pe butonul de restab...

Page 80: ...erea tuturor uruburilor mai ales a celor din capul ansamblului fig 10 Controlul trebuie s fie efectuat nainte de prima punere n func iune a compresorului TABEL 1 NCHIDEREA CAPURILOR TR G TOARE Nm Mome...

Page 81: ...nici un rezultat apela i la Centrul de Service pentru asisten Modelul cu dispozitiv de pornire stea triunghi ap sa i pe butonul dispozitivului termic de pe panoul de comand vezi fig 3c dup care porni...

Page 82: ...7 800 777 83 75 www v p k ru PRO A39B 90 C 4 1 4 20 dB 5 C 40 C 4 5 50 S3 50 5 5 1a 1b 2 figg 3a 3b 3c 4 5 2 10 OFF 6a 6b 6c 6d 7a 7b 6a 6b 6c 6d 11 15 B G...

Page 83: ...ru PRO A39B 90 C 4 10 2 4 6a 6b 6c 6d 10 I ON 8 9 13 4 OFF 100 11a 11b 100 300 API CC SC SAE 40 API CC SC SAE 20 12 7 f 1 14 2 100 100 300 24 h 24 h 24 h B 5 15a 15b 3 G 1 Nm Nm M6 9 11 M8 22 27 M10 4...

Page 84: ...7 800 777 83 75 www v p k ru PRO A39B 90 C 4 16...

Page 85: ...7 800 777 83 75 www v p k ru PRO A39B 90 C 4 B G C C 11a 11b 14 17a 17b 17c 1a 2 1b 3c 6d 1a 1b 18...

Page 86: ...la pritisnite dugme za resetiranje na priklju noj kutiji motora slika 2 Kod trofaznih modela dovoljno je pritisnuti prekida na tla noj sklopki i vratiti ga na taj na in u polo aj UKLJU ENO A onda prit...

Page 87: ...ERVOAR Kontrolisati pritegnutost svakog zavrtnja a naro ito onih na glavi sklopa slika 10 Kontrola mora da se obavi pre prvog pokretanja kompresora TABLICA 1 PRITEZANJE KOMPRESORSKE GLAVE Minimalni mo...

Page 88: ...rajte za titu od toplotnog preoptere enja slika 2 a onda ponovno pokrenite kompresor slika 1b Ako ne uklonite problem nazovite servisni centar Modeli sa starterom zvezda trougao Pritisnite prekida top...

Page 89: ...gtij pozicij OFF o po to v l j ON ir i naujo jjungti komprersori 1a 1b pav Vienfaziams kompresoriams reikia ranka paspausti mygtuk RESET esantj ant variklio gnybt panelio 2 pav Trifaziams kompresoriam...

Page 90: ...krinkite vis var t priver imo stiprum ypatingai galvut s dangtelio var tus 10 pav Atlikite visus patikrinimus prie paleid iant kompresori pirm kart 1 LENTEL GALVUT S TRAUKLI SUVER IMAS Nm Min Sukimo m...

Page 91: ...at rin apsaug 2 pav ir v l paleisti 1b pav Jei gedimas kartojasi skam binti j aptarnaujan ios jmon s tarnyb Modelis su vaig d s trikampio starteriu paspausti temperat rin s rel s esan ios ele ktros sk...

Page 92: ...ak t ielikult v lja vahetada rge lubage kompressori l hedale lapsi ega loomi Ebakompetentsetel isikutel on kompressori kasutamine keelatud rge asetage s ttivaid nailonist v i riidest esemeid kompresso...

Page 93: ...i esmakordselt peale esimest 100 t tundi Regulaarne livahetusv lp on 300 t tundi Kontrollige pidevalt litaset vajadusel lisage li lit iteava kaudu Soovituslik lit p API CC SC SAE 40 viskoossusega mine...

Page 94: ...n 1b Rikke kordumisel helistage Teeninduskeskusesse D Y k ivituse puhul vajutage elektrikilbi sisse hendatud termoseadeldise nupule Joon 3c ning k ivitage kompressor Joon 6d Rikke kordumisel helistage...

Page 95: ...Neat aut nekompetent m person m str d t ar kompresoru Neat aut b rniem un dz vniekiem atrasties darba vietas tuvum Nelikt uzliesmojo us objektus neilona vai audekla priek metus blakus vai uz kompresor...

Page 96: ...o lielas str vas ies k anas s kuma inerc sinhroniz ta palai ana Tikai panor mas kompresoros ir pievienots spiediena reduktors versij s ar fiks t m k j m parasti tiek instal ts uz lietojam ce a Pagrie...

Page 97: ...12 p rliecinoties ka lieto anas laik neiztec s Katru ned u p rbaud t e as l meni lai vienm r b tu nodro in ta pareiza e o ana z m 7a Periodiski p rbaud t siksnu nostiepumu kur lokan bai f j b t apm 1...

Page 98: ...juma k rbas vid z m 3c un palaist v lreiz z m 6d Ja boj jums atk rtojas zvan t uz Pakalpojumu Centru Citi mode i piespiest spiediena releja pogu uzst dot izsl gts un v lreiz iesl gts z m 1a 1b Ja boj...

Page 99: ...Kr n ir net rumi smiltis Par p ties par kr na izt r anu Jeb k da cita veida labo anu dr kst veikt tikai pilnvarot Pakalpojumu Centr pieprasot ori in l s rezerves da as Nepie aujama ier ces atv r ana v...

Page 100: ...7 800 777 83 75 www v p k ru PRO A39B 90 C 4 Single phase Three phase Three phase...

Reviews: