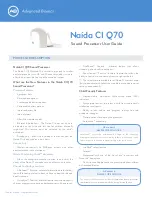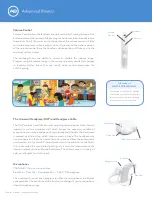
The Universal Headpiece (UHP) and Headpiece Cable
The UHP contains a coil that transmits sound signals and power to the internal
implant, as well as a magnet well, which houses the necessary number of
magnets to ensure the headpiece stays on throughout the day. The headpiece
is covered by a Color Cap, which snaps securely in place. The headpiece has
a microphone in it, that when activated, picks up sound from the environment
and transfers it to the Naída CI sound processor via the cable. Once the Naída
CI has converted the sound into digital signals, it sends the information to the
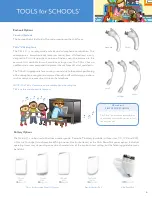
internal implant via the cable and headpiece. The cables come in a variety of
colors and lengths to suit all needs.
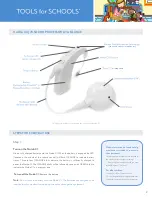
Color Cap
Cable Connection Port
Microphone
Headpiece Mic
T-Mic™ 2
Rear Mic
Front Mic
Microphones
The Naída CI has four microphones:
Front Mic
•
Rear Mic
•
Headpiece Mic
•
T-Mic™ 2 Microphone
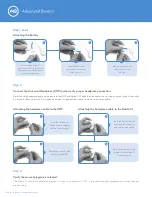
The audiologist can set each program to utilize the microphones in different
configurations. Check with the child’s family or audiologist if you have questions
about microphone usage.
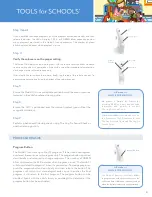
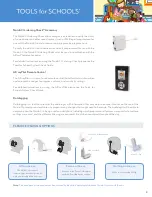
Decrease
Increase
Volume
Control
AB makes it
SIMPLE FOR SCHOOLS:
The volume control can be disabled
or restricted so accidental taps to the
volume control do not result in sound
becoming too soft or overly loud.
Volume Control
Volume Control allows the loudness level to be adjusted. Pressing the top of the
button increases the volume, while pressing the bottom of the button decreases
the volume. Ten (10) presses on the top portion of the volume control will take
you to the maximum volume output, while 10 presses on the bottom portion
of the volume control from the baseline volume position will take you to the
minimum volume output.
The audiologist has the ability to restrict or disable the volume range.
Programming the volume range in this manner prevents accidental changes
in loudness (either too soft or too loud), which could compromise the
child’s hearing.
Tools for Schools™ Program Resources


