background image

3

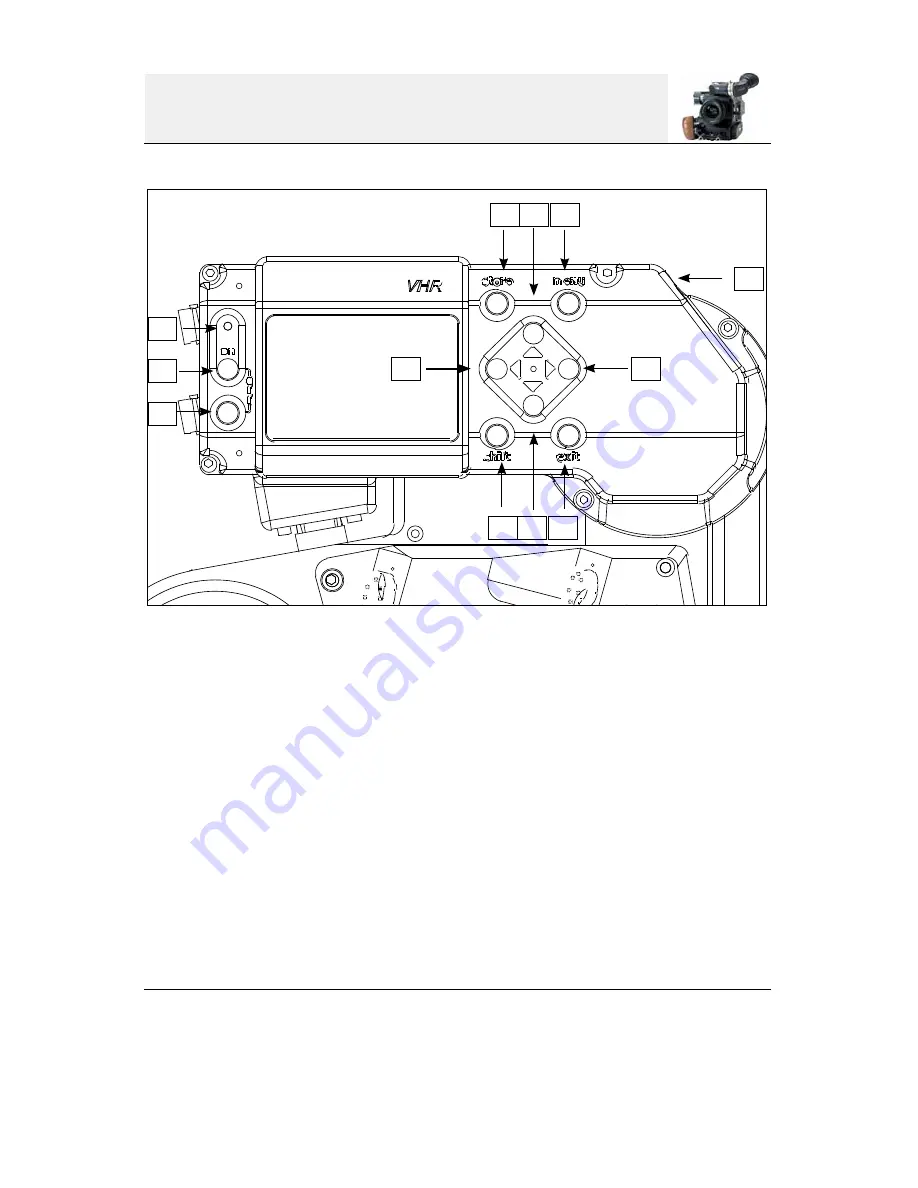
1 • LED indicator 

: Power “ON” indicator

2 • Run key 

: press to turn the power on.

3 • Off key

 : press both 2 and 3 to turn the power off.

4 • Shift key

 : access to Color Temperature and White Balance functions.

5 • Down key 

: scroll through the setup menu and direct access to Gain Control.

6 • Exit key

 : exit setup menu and access White Balance function (while pressing the shift key).

7 • Right key

 : position video inserted characters and setup inserted frame lines.

8 • “Fisher2”

 : 12 V power and ground for heating cable.

9 • Menu and select Key

 : access the video setup menu, select functions and to store still frames.

10 • Up key

 : scroll through the setup menu and direct access to Gain Control.

11 • Store key 

: access the frame store and image compare function.

12 • Left key

 : position video inserted characters and setup inserted frame lines.

1
2
3

4 5 6

11 10 9

8

7

Camera controls

12

Summary of Contents for VHR 35

Page 1: ...1 VHR 35 video assist User s Manual 2007 VHR 35...

Page 2: ...5 Color temperature page 6 Auto White Balance page 7 Main menu page 8 Video menu pages 9 10 Frame pages 11 12 Logo page 13 Technical page 14 Timecode page 15 Font page 16 Auto Power Off page 17 VITC p...

Page 3: ...e function while pressing the shift key 7 Right key position video inserted characters and setup inserted frame lines 8 Fisher2 12 V power and ground for heating cable 9 Menu and select Key access the...

Page 4: ...video assist analog video outputs 14 Fisher 4 power and composite video signal for MiniMonitors 15 Manual Iris Lever controls the video assist iris operation From the rear From the front Camera contr...

Page 5: ...l panel Gain Press the Up and Down key to set the video gain to the desired value Adjustment range from 9db to 9db in 1db increments Up Down VHR o on n o o f f f f s sh hi if ft t e ex xi it t m me en...

Page 6: ...e the Up and Down keys to scroll through and set the video color temperature to the desired value Three choices User 56k and 32k Direct access control panel Shift VHR o on n o o f f f f s sh hi if ft...

Page 7: ...activate the Auto white balance function The camera switches automatically to the User Color Temperature mode The stored RGB values can be modified in the video setup menu Direct access control panel...

Page 8: ...en see p 26 Use the Up and Down keys to select the sub menus and Left and or Right to access them Note the camera status information is as follows RUN in red color when camera is running STOP in green...

Page 9: ...r temperature Color satu ration Color Bar outputing and User color temperature note that this mode is only accessible if user mode has been chosen in the Color temperature mode Use the Up or Down keys...

Page 10: ...se color while a less saturated image will appear more muted and grey With no saturation at all the hue be comes a shade of grey Adjustment ranges from 0 to 200 Color Bars generates color bars which c...

Page 11: ...be elec tronically set in size and position to perfectly match the camera viewing screen markings The color and transparency of each frame can be individually set The area outside the frame can also b...

Page 12: ...g position using the Up Down Left and Right keys Press the Exit key to return to the Frame Menu Proceed in the same fashion to modify the position of the bottom and right lines of the frame markings W...

Page 13: ...al port cable From the main menu use the Down key to select the Logo sub menu and press the Menu key to enter Once the Logo has been generated you can modify the transparency Opacity and its position...

Page 14: ...ws you to modify the following parameters Timecode displayed on screen or not Font Auto Power Off allows you to choose between an automatic On or manual Off power off of the VHR delay to Power Off VIT...

Page 15: ...15 Time Code Time Code Off On allows you to choose to insert On or not Off AatonCode informa tion which consists of Time Date and Camera equipment number ID...

Page 16: ...16 Font Font allows you to choose the font of the displayed information Two fonts available 0 and 1 Use Left and Right keys to proceed...

Page 17: ...between an automatic On or manual Off power off of the camera Power off modifiable only if the Auto Power Off mode has been chosen allows you to choose an automatic power off of the video assist from...

Page 18: ...e position of the Vitc lines Choice from 10 to 23 in PAL Aaton recommends line 19 from 13 and 19 in NTSC Parity allows you to select the parity of the Vitc lines Odd and Even Make sure that your Post...

Page 19: ...ra speed and magazine footage as well as Timecode information in the video image These sub menus allow you to position the information anywhere on the monitor screen Use the Up Down Left and Right key...

Page 20: ...he Store key Select View Store and press Right key The mes sage Shift store to store is displayed proposing to store an image Pro ceed Note the message position on screen can be modified by using the...

Page 21: ...d image is superimposed and can be seen with two different types of view Blend or Checker Press Menu key to scroll both views Press Exit key to leave the Store mode Note the image remains stored only...

Reviews: