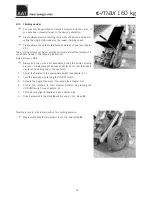
background image

8.2.2

Charging cable

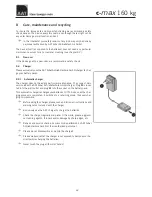
A char ging ca ble for your  ve hi cle  is  avai la ble  as  an  ac ces so ry.    Ap pro xi ma te -

ly a re char ge of 80% is  pos si ble  by  ac ces sing  your  vehicle’s  bat te ry  using a

char ging  ca ble.  Con nec tor 

Œ

  fits to the ci ga ret te lighter; plug in con nec tor



 at the bat te ry pack.

F

Be fo re using the char ging cable, plea se read and follow all in struc -

tions and war ning no tes in clu ded with the char ging ca ble.

F

Ex clu si ve ly  use  the  AAT  Al ber  An triebs tech nik  GmbH  char ging  ca -

ble!

F

Check the char ging ca ble re gu lar ly and pro tect it from oil, grea se,

ag gres si ve clea ning agents, thin ners and/or da ma ge by sharp ed ges,

etc.

F

Re pairs and ser vi ce check-ups may only be per for med by AAT Al ber

An triebs tech nik  GmbH  or  their  aut ho ri zed  per son nel.
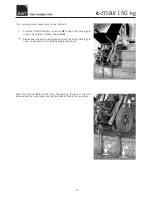
8.3

Battery pack

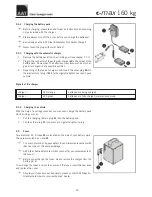
The quick re lea se  bat te ry pack, con si sting of sea led  lead  acid  bat te ries,

should  be  re char ged af ter each use. (Tech ni cal  de tails  for the sea led  lead

acid  bat te ries  you find in chap ter 8.3.1).
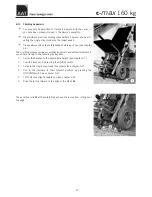
The bat te ry pack is sub ject to a so-cal led self-disch ar ge. The re fo re, you

should con nect the bat te ry pack to the char ger whe ne ver pos si ble. Due to

the  fact  that  the  bat te ry  pack  au to ma ti cal ly  goes  into  char ge  re ten ti on  as

soon as it is ful ly char ged, an over char ge is im pos si ble.
If your bat te ry pack does not pos sess its full ca pa ci ty yet, the rea son may be

that a new bat te ry pack rea ches its full ca pa ci ty only af ter se ve ral char -

ging/disch ar ging  cy cles.
If ful ly char ged bat te ries disch ar ge more quic kly as be fo re, they are pro ba bly 

used up. In such case, plea se have your aut ho ri zed  dea ler check and re pla -

ce them, if ne ces sa ry.
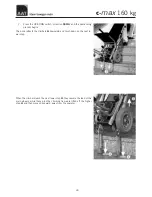
Tip:

F

If the 

C

-max

 is at a stand still for some time, plea se  con nect it to the

char ger to re tain the char ge.  This  does not da ma ge the sea led  lead

acid  bat te ries, on the con tra ry, it in crea ses  their  du ra bi li ty.

33

c

-

max


160 kg

Summary of Contents for C-max

Page 1: ...C max 160 kg Translation of the original user s manual Stair Climbing System...

Page 2: ...tered without the consent of AAT Alber Antriebstechnik GmbH Signature of the manufacturer Markus Alber Managing shareholder AAT Alber Antriebstechnik GmbH The stair climbing system C max has been succ...

Page 3: ...plus seat to the climbing frame 11 3 4 Affix the C part 11 3 5 Helix cable 12 3 6 Attach the battery pack 12 3 7 Detach the battery pack 12 3 8 Arm rests 13 3 9 Handles 13 3 10 Functional check 13 4 S...

Page 4: ...6 10 Climbing upstairs 24 6 11 Climbing downstairs 27 6 12 Laying the C max on the stairs 29 6 13 Transport 30 6 14 Trouble shooting 30 7 Accessories 31 7 1 Battery pack 31 7 2 Charging cable for your...

Page 5: ...to use this user s manual The user s manual is part of the delivery package and instruct you step by step about the safe and adequate use of the c max Operating the c max ta kes a certain skill Please...

Page 6: ...r safety you may not use the stair climbing devi ce C max on escalators or moving belts F Transporting other kinds of loads is explicitly prohibited F Only authorized operators may use the c max There...

Page 7: ...els out 5 C part plus seat 6 climbing frame 7 foot rest folds in 8 main wheel 9 lever with chain drive 10 climber and climbing foot 11 safety brake 12 climbing unit 13 battery pack 14 tightening knobs...

Page 8: ...ute continually adjustable range with one charge of the batteries on average load of 75 kg ca 25 levels equates 375 steps range with one charge of the batteries on maximum load ca 7 levels equates 105...

Page 9: ...2 4 Dimensioned sketch 9 c max 160 kg...

Page 10: ...unit plus the user s manual 2 6 Optional accessories 1 head rest 2 charging cable for the car 3 widened arm rests 4 seat belt system including hip belt 5 hip belt 6 children s foot rest 7 extended sho...

Page 11: ...climbing frame with the two tightening knobs F Always make sure that the back rest is securely fastened to the clim bing frame 3 3 Attach the C part plus seat to the climbing frame Put the C part plus...

Page 12: ...a short circuit between pins and result in severe malfunction of the system 3 6 Attach the battery pack Push the battery pack into its fixture by means of the guiding pins on top of the climbing unit...

Page 13: ...are securely fastened 3 10 Functional check F Please check the safety brakes each time before using the device see chapter 6 4 and 8 5 F Please also check the safety brakes braking effect as described...

Page 14: ...max is tur ned ON F Be aware of nearby transmitter such as radio or TV stations and try to avoid coming close to them F If unintended movement or brake release occurs turn the powered c max OFF as soo...

Page 15: ...ious cleaning the device with spirit F Never use suds or greasy cleaners After cleaning the safety brakes must be checked as described in chapter 6 4 4 4 Lining of the climbing foot Please check regul...

Page 16: ...arging the batteries The potential steps downward therfore are not limited 4 9 Climbing mechanism Please make sure that during the climbing process your hands and feet are in no way close to the rotat...

Page 17: ...cable is plugged into the hou sing of the climbing unit and locked each time before you use the C max 5 4 Battery pack Please make sure that the sealed lead acid batteries are fully charged be fore yo...

Page 18: ...t is too high or too low you will feel a vi bration in the handle The vibration increases the more you diverge from the ideal angle If the handle does not vibrate you are within the ideal inclination...

Page 19: ...stairs If you activate the ON OFF switch in that mode the device will climb only one step at a time The climbing system stops in the correct position even if you press the ON OFF switch continuously...

Page 20: ...e safe operation of the C max is granted see picture F Important If the required brake effect is not guaranteed you may under no circumstances use the C max any more Please contact your authorized AAT...

Page 21: ...maximum lifting capacity see chapter 5 1 F In the interest of your safety please always operate the c max from behind never sideways When a person takes a seat on the c max please follow these instru...

Page 22: ...come a threshold by pulling the C max backwards over it 6 7 Adjust the handles For climbing stairs or driving on slopes comfortably and safely adjust the height of the handles approximately to the lev...

Page 23: ...bers must be pulled in enti rely If you tilt the C max further or too much the safety brakes engage and the C max can t be moved forward any more 6 9 Operation on slopes To drive on a slope make sure...

Page 24: ...t F Always pull the c max a bit backwards during the entire climbing process i e always keep the device under tension so that the wheels can touch down properly on the next step 1 Adjust the handles t...

Page 25: ...cess by moving the climbers downward F Always keep the device under tension during the entire climbing pro cess i e always pull it slightly backward toward you After the climbers reach the floor they...

Page 26: ...t position Because the C max is always pulled slightly backward it rolls automatically to the next step and reaches the initial position again both main wheels touch the next step If you activated the...

Page 27: ...accomplished quickly and without problems if you adhere closely to the following instructions 1 Adjust the handles to the appropriate height see chapter 6 7 2 Turn the C max on by pressing the ON OFF...

Page 28: ...retracts the climbers downward and touch down on the next lo wer step When the climbers reach the next lower step they resume the load of the main wheels while those plus the climbing frame are lifte...

Page 29: ...single step mode the climbers are pulled in entirely and then the descending process ends at this point 8 Again push the C max all the way to the edge of the step i e until the sensitive rolls of the...

Page 30: ...g to the IATA special guidelines A67 and GGVS Rn Nr 2801 A section 2 and admitted to air travel by DOT and IATA 6 14 Trouble shooting If there are problems using the c max please check the following t...

Page 31: ...h 2 Press the release button on top of the battery pack until it disengages Now you pull out the battery pack at its handle from its fixture on the top of the climbing unit s housing 3 Push the other...

Page 32: ...ope of deli very includes the AAT Alber Antriebstechnik GmbH charger Plug is inser ted into the wall outlet and plug into the socket on the battery pack This automatic charger recharges your batteries...

Page 33: ...led lead acid batteries should be recharged after each use Technical details for the sealed lead acid batteries you find in chapter 8 3 1 The battery pack is subject to a so called self discharge Ther...

Page 34: ...d a total discharge entirely A total discharge does not only lead to a loss of the batteries capacity but also shortens their durability Thus do avoid a total discharge by recharging the batteries whe...

Page 35: ...rger 8 3 4 Charging in a vehicle With the help of a voltage converter you may even charge the battery pack while driving your car 1 Put the charging cable s plug into the battery pack 2 Put the other...

Page 36: ...in the wheel rims must be cleaned weekly or after contamination with spirit to en sure the optimum braking effect F Never smoke during the cleaning of the device as well as keep it away from ignition...

Page 37: ...urability However if your c max is old and has reached the end of its lifespan you may return its components to AAT Alber Antriebstechnik GmbH or your authorized dealer to be recycled A new law concer...

Page 38: ...as climbers brake linings gliding strip improper and insufficient maintenance unauthorized constructional changes or inappropriate use of the de vice or its accessories using the c max exceeding its m...

Page 39: ...39 c max 160 kg...

Page 40: ...c max 160 kg AAT Alber Antriebstechnik GmbH Postfach 10 05 60 D 72426 Albstadt Tel 49 74 31 12 95 0 Fax 49 74 31 12 95 35 Email info aat online de www aat online de...

Reviews: