background image

Venture IP Web Administration System Options Guide  

 PAGE 

10 

8/4/2006 

© 2006 Avaya Inc. 
All Rights Reserved.


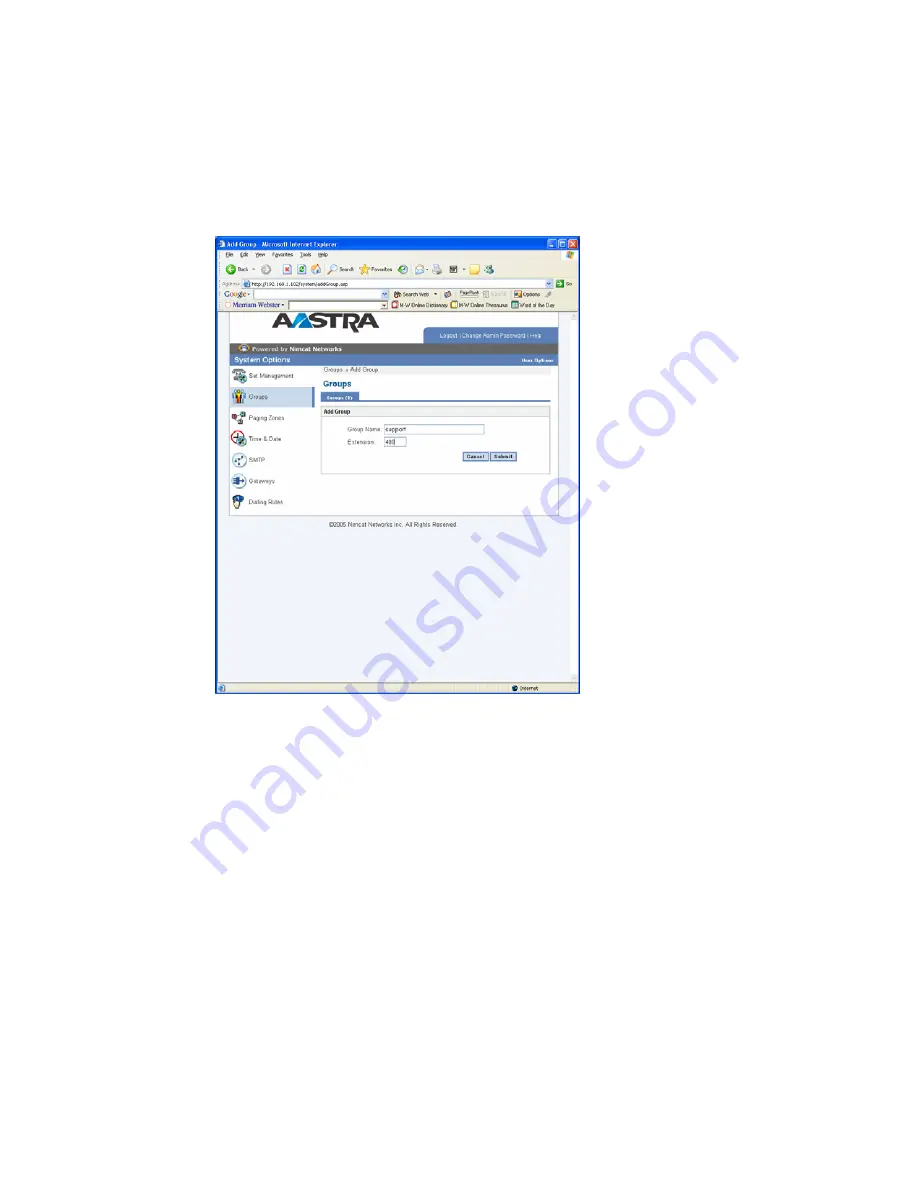
Adding Groups 

To add a group 

1. Click 

Add Group

The Add Group tab appears. 


2.  Enter the information as follows: 


Group Name 

 the assigned group name. 


Extension 

 the assigned extension that can be called to reach the group. 

3. Click 

Submit

The group is added to the Groups tab. 

Deleting Groups 

To delete a group 

1.  From the Group Details page, click 

Delete Group

You are asked to confirm the deletion. 

2. Click 

Submit


Summary of Contents for VentureIP 480i

Page 1: ...Venture IP WebAdministration System Options Guide VentureIP Load Version 2 15 0 ...

Page 2: ... Members 13 Forwarding 15 Dialing Rules 17 PAGING ZONES 20 Editing Zone Members 21 TIME AND DATE 22 Changing the System Time 23 Changing the System Date 24 SMTP 25 Edit SMTP Settings 25 GATEWAYS 26 Edit Gateway Extension 27 Gateway Lines 29 Edit Gateway Lines 30 Music on Hold 31 Edit Gateway Music on Hold 32 Networking Setting 33 Auto Attendant Setting 35 Edit Auto Attended Setting 36 Features 37 ...

Page 3: ...on consists of a standard IP Router or Switch not included Cat5 cabling to each phone and a Venture IP Gateway for access to standard analog phone lines provided by a Public Network Service Provider No Central Server is required All the features are in the Phone System hookup is easy with the Venture IP System Simply plug each phone and the Venture IP Gateway into an unused port of a Fast Ethernet...

Page 4: ...on lets you administer system options using a web browser Logging in To log in 1 Enter the IP Address of your phone in a web browser You can find your phone s IP Address by pressing the key 2 Click on System Options The login screen appears 3 Enter the Password the default Administration password is 5 4 3 2 1 and click Login System Options opens at Set Management ...

Page 5: ...rd Change Password lets you change the password for your system The system password must use numbers between zero and nine 0 9 To change the password 1 Click Change Password The Change Password page appears 2 Enter the current system password 3 Enter the new system password 4 Confirm the new system password 5 Click Submit ...

Page 6: ... and gateways in your system Set Name the assigned user name Click to view or change details for the device Extension the assigned Corporate Directory Number Version the software version of the device Status the current availability of the device Active indicates that the device is currently connected to the network Inactive indicates the phone is either broken or disconnected from the network Set...

Page 7: ...ows you to remove all information about a set or gateway from the network For example this operation would be done to remove all references to a broken device prior to replacing it To remove an extension 1 Click Remove Extension The Remove Extension tab appears 2 From the drop down list select the extension you want to remove 3 Click Validate ...

Page 8: ...ppears 2 Choose the extension from the drop down list 3 Click Submit Software Upgrade The Software Upgrade tab supports upgrades to any device or an entire network You can upgrade the set software load the gateway software load voicemail system prompts and AutoAttendant system prompts When you upgrade the software load and system voicemail prompts you upgrade the Software load for a set Software l...

Page 9: ... tab appears 2 Enter the information as follows TFTP Server the IP address e g 123 123 123 123 of the local or remote server that will host the upgrade Upgrade Software Load check if the software load is being upgraded Software Load select the load from the drop down list Upgrade All Sets check to upgrade all sets in the system Set to Upgrade if Upgrade All Sets is not checked select a single set ...

Page 10: ...oded using a high quality format and consume approximately 64 kilobits per second of bandwidth on the network The LOW setting uses a compressed format for voice calls occupying approximately 8 kilobits per second of bandwidth on the network The quality of the audio is slightly poorer than at the High setting 1 Click Change Details to change the current Network Audio Bandwidth setting 2 From the dr...

Page 11: ...ring on an incoming call Calls can be answered from any of the phones in a group In the event that the call is not answered the specific group settings take effect forwarding the call to a specific phone where it can be answered or handled by that phone s specific settings Group Name the assigned group name Click to view or change details for the group Extension the assigned group extension for gr...

Page 12: ...he Add Group tab appears 2 Enter the information as follows Group Name the assigned group name Extension the assigned extension that can be called to reach the group 3 Click Submit The group is added to the Groups tab Deleting Groups To delete a group 1 From the Group Details page click Delete Group You are asked to confirm the deletion 2 Click Submit ...

Page 13: ... 2006 Avaya Inc All Rights Reserved Group Details From Group Details you can edit the details of a particular group including Group Details Members Forwarding Dialing Rules Group Name To change the Group Name 1 Click the name of the group The Group Details page appears ...

Page 14: ...Venture IP Web Administration System Options Guide PAGE 12 8 4 2006 2006 Avaya Inc All Rights Reserved 2 Click Change Details The Edit Group Details page appears 3 Change the details and click Submit ...

Page 15: ...Venture IP Web Administration System Options Guide PAGE 13 8 4 2006 2006 Avaya Inc All Rights Reserved Members To edit group members 1 Click the Members tab The View Group Members page appears ...

Page 16: ...tion System Options Guide PAGE 14 8 4 2006 2006 Avaya Inc All Rights Reserved 2 Click Change Details The Edit Group Members page appears 3 Use the checkboxes under Members to add or remove members from the group 4 Click Submit ...

Page 17: ...nture IP Web Administration System Options Guide PAGE 15 8 4 2006 2006 Avaya Inc All Rights Reserved Forwarding To change forwarding rules 1 Click the Forwarding tab The View Group Forwarding page appears ...

Page 18: ...ails The Edit Group Forwarding page appears 3 Check Enable Forwarding 4 From the pull down list select the number of rings to forward the call after 5 Click one of the following Extension select from the drop down list Dialed enter the number Operator Assist forwards calls to the set designated as Operator 6 Click Submit ...

Page 19: ...served Dialing Rules Dialing rules can prevent users from making certain calls Adding Dialing Rules To add a dialing rule 1 From the Dialing Rules tab click Add Rule The Edit Group Add Dialing Rules page appears 2 From the pull down list select the rule you want to add 3 Click Allow 4 Click Submit ...

Page 20: ... 4 2006 2006 Avaya Inc All Rights Reserved Removing Dialing Rules To remove a dialing rule 1 From the Dialing Rules tab click Remove Rule The Edit Group Remove Dialing Rule page appears 2 From the drop down list select the rule you want to remove 3 Click Submit ...

Page 21: ... 4 2006 2006 Avaya Inc All Rights Reserved Changing Dialing Rule Details To change dialing rule details 1 From the Dialing Rules tab click Change Details The Edit Group Dialing Rules page appears 2 Click the appropriate checkbox Allow or Disallow 3 Click Submit ...

Page 22: ...IP Web Administration System Options Guide PAGE 20 8 4 2006 2006 Avaya Inc All Rights Reserved Paging Zones Paging Zones shows the zones in the system It lets you manage the zones that individual sets belong to ...

Page 23: ... 4 2006 2006 Avaya Inc All Rights Reserved Editing Zone Members To edit zone members 1 Select the tab of the zone whose members you want to edit for example Zone 2 2 Click Edit Zone Members The Edit Zone Members tab appears 3 Check Add to add a member to a zone ...

Page 24: ...ide PAGE 22 8 4 2006 2006 Avaya Inc All Rights Reserved Time and Date Time and Date shows the current system time that is assigned to the system in hh mm ss am pm format and the current system date that is assigned to the system in dd mm yyyy format ...

Page 25: ...Rights Reserved Changing the System Time To change the System Time 1 In the View System Time area select Change Details The Edit System Time tab appears 2 Enter the desired system time format using the fields provided hh mm and use the drop down list to select AM PM setting 3 Click Submit ...

Page 26: ... 24 8 4 2006 2006 Avaya Inc All Rights Reserved Changing the System Date To change the system date 1 In the View System Date area select Change Details The Edit System Date tab appears 2 Enter the system day in the fields provided dd mm yyyy 3 Click Submit ...

Page 27: ...SMTP Status indicates whether message forwarding to the SMTP Server is enabled or disabled must be enabled to allow users to operate any email based service SMTP Server the IP address of your SMTP server SMTP Port the TCP port used by your SMTP server Port 25 by default Edit SMTP Settings To edit SMTP settings 1 Click Change Details The SMTP Server page appears 2 Enter the information as follows E...

Page 28: ...teways to your network Extension the assigned Extension Number Version the software version running on the gateway IP Address the network address Status the current availability of the device Active indicates that the device is currently connected to the network Inactive indicates the phone is either broken or disconnected from the network ...

Page 29: ...ension The gateway extension is the extension that the gateway uses It is automatically configured during system start up You may want to change the gateway extension if someone wants to use that extension for their telephone set extension To edit the Gateway Extension 1 Click Extension The Gateway Details page appears ...

Page 30: ...Venture IP Web Administration System Options Guide PAGE 28 8 4 2006 2006 Avaya Inc All Rights Reserved 2 Click Change Details The Edit Gateway Details page appears 3 Change the extension 4 Click Submit ...

Page 31: ...ved Gateway Lines You can assign a physical PSTN line to a telephone or a group of telephones Incoming calls on this line bypass Auto Attendant and are forwarded to the specified phone s immediately If a line is assigned to a group of telephones all telephones ring until one of them answers the call ...

Page 32: ...ptions Guide PAGE 30 8 4 2006 2006 Avaya Inc All Rights Reserved Edit Gateway Lines To change Gateway Lines 1 Click Change Details The Change Gateway Lines page appears 2 Use the drop down lists to change the line information 3 Click Submit ...

Page 33: ...ture IP Web Administration System Options Guide PAGE 31 8 4 2006 2006 Avaya Inc All Rights Reserved Music on Hold Music on Hold lets you determine whether it is Enabled or Disabled for a particular Gateway ...

Page 34: ...Options Guide PAGE 32 8 4 2006 2006 Avaya Inc All Rights Reserved Edit Gateway Music on Hold To toggle the MOH setting 1 Click Change Details The Edit Gateway MOH page appears 2 Check or uncheck the Enable Music on Hold box 3 Click Submit ...

Page 35: ...be set to a static address or can be set to dynamically obtain an address DHCP or Zero Conf by setting the IP Address field to 0 0 0 0 Netmask is shown as a series of four as integers 0 255 each representing a 4 bit field It must consist of a leading series of binary 1 s used to mask the network id followed by 0 s which allow the device s host address to be visible The standard netmask for a Class...

Page 36: ...06 Avaya Inc All Rights Reserved 1 Click Change Details The Edit Network Setting page appears 2 Enter the information as follows IP Address The IP Address can be set to a static address Netmask the Netmask address Gateway the IP Address of a machine router 3 Click Submit ...

Page 37: ... Attendant Setting The Auto Attendant feature acts as a system receptionist The Auto Attendant supports up to three greetings System Default Day greeting and Night greeting The Day and Night greetings of the Auto Attendant must be recorded before they can be used Only one greeting can be enabled at any time ...

Page 38: ...6 2006 Avaya Inc All Rights Reserved Edit Auto Attended Setting To change the Auto Attended settings 1 Click Change Details The Edit Auto Attendant Settings page appears 2 Use the drop down lists to change for Day Night and to French Default is English 3 Click Submit ...

Page 39: ...Options Guide PAGE 37 8 4 2006 2006 Avaya Inc All Rights Reserved Features The Gateway Features displays information regarding the Email Fwd Options and WebAdm Sys Options which are available on the current gateway No changes are required ...

Page 40: ...lect it from the System Options menu See VentureIP System Guide for more details Rule Description name or label to identify the numeric Dialing Rule Pattern the numeric string that creates the Dialing Rule Note There are 3 fixed enabled Dialing Rules required for the system Extension Local 9 and Operator 0 and they cannot be Deleted or Edited ...

Page 41: ...ons Guide PAGE 39 8 4 2006 2006 Avaya Inc All Rights Reserved Creating Rules To create dialing rules 1 From the Dialing Rules page click Create Rule The Create Rule page appears 2 Enter a rule description 3 Enter a rule pattern 4 Click Submit ...

Page 42: ...uide PAGE 40 8 4 2006 2006 Avaya Inc All Rights Reserved Deleting Rules To delete dialing rules 1 From the Dialing Rules page click Delete Rule The Delete Rule page appears 2 From the drop down list select the rule you want to delete 3 Click Submit ...

Page 43: ...a dialing rule 1 Click the rule you want to edit The Edit Rule page appears 2 Edit the rule 3 Click Submit Acknowledgements This product includes software developed by the OpenSSL Project for use in the OpenSSL Toolkit http www openssl org This product includes cryptographic software written by Eric Young eay cryptosoft com ...

Reviews: