background image

12

Registering Aastra 480i

(c) 2003-2010 Bicom Systems

an example with IP address

2. Hit "Enter" on your keyboard.

STEP FOUR:

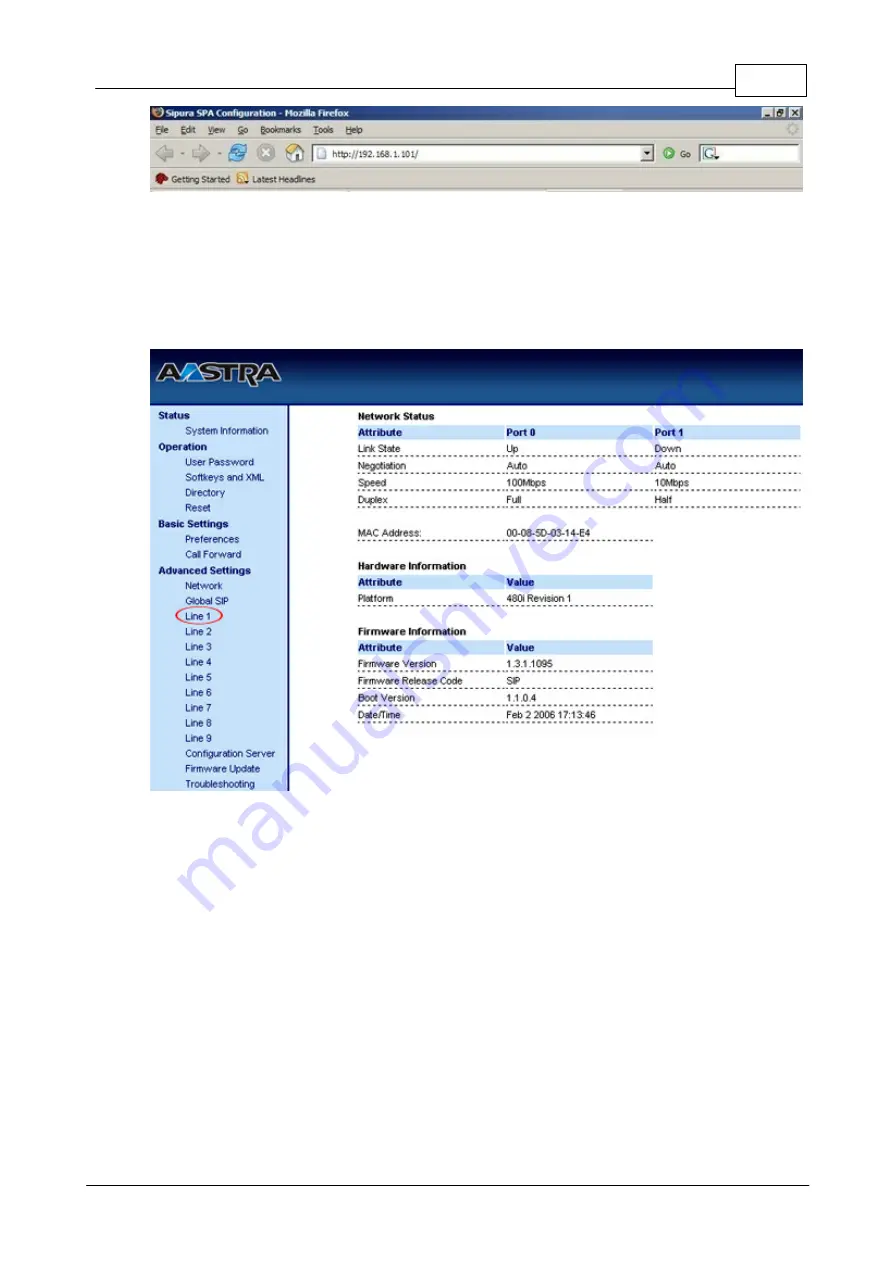
 Configuring Aastra 480i.

1. Click on "Line 1" link.

 
2. Enter the following details into the respective fields.

REQUIRED FIELDS:

Phone Number

PBXware extension number. 

Example:

 1000 

Authentication Name

Usually the same number as "Phone Number".  

Password


The Secret of the extension as received in the e-mail associated with this extension. 

Example:

 3dX3r5 

Summary of Contents for VentureIP 480i

Page 1: ...c 2003 2010 Bicom Systems Aastra 480i How To...

Page 2: ......

Page 3: ...very precaution has been taken in the preparation of this document the publisher and the author assume no responsibility for errors or omissions or for damages resulting from the use of information co...

Page 4: ...tering Aastra 480i 4 4 1 Requirements 4 2 Manual Configuration 4 UAD Settings 7 Creating Extension 10 Registering Phone 14 3 Auto Provisioning 14 UAD Settings 17 Creating Extension 20 Registering Phon...

Page 5: ...Foreword c 2003 2010 Bicom Systems I...

Page 6: ...Part I...

Page 7: ...ra 480i How to use Aastra 480i with PBXware This How to is written as general guide on how to use Aastra 480i with PBXware using 1 3 1 1095 SIP Aastra 480i firmware It covers the most common tasks tha...

Page 8: ...Part II...

Page 9: ...l Configuration UAD Settings Creating Extension Registering Phone 2 2 1 UAD Settings STEP ONE PBXware IP address 1 Find out the IP address of the PBXware server STEP TWO Login to PBXware 1 Open a new...

Page 10: ...Aastra 480i How To c 2003 2010 Bicom Systems STEP THREE UAD status 1 Make sure the UAD is enabled To check the UAD status navigate to Settings UAD and click on the edit icon corresponding to Aastra 48...

Page 11: ...6 Registering Aastra 480i c 2003 2010 Bicom Systems 2 Make sure Status is set to active Auto provisioning is set to No and DHCP is set to Yes...

Page 12: ...To c 2003 2010 Bicom Systems 3 Click on the Save button to save changes 2 2 2 Creating Extension STEP ONE Add Extension 1 Navigate to Extensions Click on Add Extension 2 The standard options window wi...

Page 13: ...extensions registered from remote networks WAN Internet etc 5 Click on the Next button STEP TWO Extension values 1 Enter values into required field text boxes REQUIRED FIELDS Name Enter a name for the...

Page 14: ...PTIONAL FIELDS Extension An auto generated extension number based on the next available sequential number An extension value can be changed Example 1000 Username Username is auto generated populated a...

Page 15: ...hone STEP ONE Power over Ethernet Connect the ethernet port to a POE Passive Power over Ethernet injector Connect POE Passive Power over Ethernet injector to a hub router or switch as to access LAN Af...

Page 16: ...ate down to Network 3 Press Show button 4 Enter password Default factory password is 22222 5 Press the Enter button 6 Use the Navigation button to navigate down to IP Address 7 Press the Show button S...

Page 17: ...g Aastra 480i 1 Click on Line 1 link 2 Enter the following details into the respective fields REQUIRED FIELDS Phone Number PBXware extension number Example 1000 Authentication Name Usually the same nu...

Page 18: ...s Proxy Server IP address of PBXware server Example 192 168 1 2 Proxy Port 5060 Registrar Server IP address of PBXware server Example 192 168 1 2 Registrar Port 5060 an example with details filled in...

Page 19: ...hanges take effect Conclusion If everything is done as above described you should have successfully registered your Aastra 480i to PBXware Dial 123 to verify registration For further information pleas...

Page 20: ...p 192 168 1 2 admin index php an example with IP address following by admin index php 2 Hit Enter on your keyboard 3 Login into PBXware with your e mail address and password STEP THREE UAD status 1 Ma...

Page 21: ...16 Registering Aastra 480i c 2003 2010 Bicom Systems 2 Make sure Status is set to active Auto provisioning is set to Yes and DHCP is set to Yes...

Page 22: ...To c 2003 2010 Bicom Systems 3 Click on the Save button to save changes 2 3 2 Creating Extension STEP ONE Add Extension 1 Navigate to Extensions Click on Add Extension 2 The standard options window w...

Page 23: ...N Internet etc 5 Click on the Next button STEP TWO Extension values 1 Enter values into the required field text boxes REQUIRED FIELDS Name Enter a name for the extension being created Example John Smi...

Page 24: ...IONAL FIELDS Extension An auto generated extension number based on the next available sequential number An extension value can be changed Example 1000 Username Username is auto generated populated and...

Page 25: ...Ethernet Connect the ethernet port to a POE Passive Power over Ethernet injector Connect POE Passive Power over Ethernet injector to a hub router or switch as to access LAN After successfully connecti...

Page 26: ...to Network Settings 3 Press the Show button 4 Enter password Default factory password is 22222 5 Press the Enter button 6 Use the Navigation button to navigate down to IP Address 7 Press the Show butt...

Page 27: ...address 2 Hit Enter on your keyboard STEP FOUR Configuring TFTP server 1 Login to the Aastra 480i Web Interface you ll be prompted to enter username and password The factory default username is lower...

Page 28: ...tra 480i How To c 2003 2010 Bicom Systems an example with details filled in 3 TFTP Server must be set with TFTP server value Example 192 168 1 2 4 Click on the Save Settings button 5 Click on the Rese...

Page 29: ...operly connected to the same LAN as your PBXware 2 Ensure that all devices are set to factory defaults 3 Ensure that all devices are using port 5060 2 4 2 Auto Configuration 1 Navigate to Extensions F...

Page 30: ...Xware has finished searching for devices a list of all devices found will be shown 5 Change activation status from Not Activated to Auto Configuration for one or more displayed devices of your choice...

Page 31: ...26 Registering Aastra 480i c 2003 2010 Bicom Systems an example with list of found devices 7 After you have edited a device a pop up window will appear...

Page 32: ...igure just one or all of them as shown above Line 1 example Name John Smith E mail john domain com Ext 1000 PIN 1223 Secret Enter an at least 6 digit or letter long secret 9 Click on the Save button e...

Page 33: ...28 Registering Aastra 480i c 2003 2010 Bicom Systems 11 Device s will automatically reboot and be auto configured...

Page 34: ...Part III...

Page 35: ...e Basic Settings tab 3 Make sure that Auto Answer box is checked Microphone Mute box is not checked 4 Navigate to the bottom of the page and click on the Save Settings button 5 Reboot the phone to app...

Page 36: ...Part IV...

Page 37: ...al Identification Number Remote Network devices that are managed or controlled from a network system other than the system to which they are directly connected Router A device that forwards data packe...

Page 38: ...33 Aastra 480i How To c 2003 2010 Bicom Systems...

Page 39: ......

Reviews: