background image


16

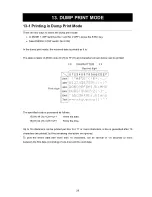
9-2 Example of Each Mode Setting 

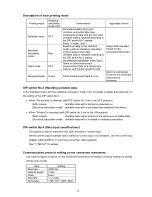
Described below are example settings of the standard, statistical calculation and dump print 

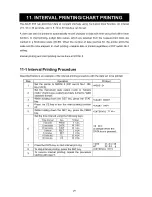
mode. For interval printing and chart printing function using the built-in timer, see "11. INTERVAL 

PRINTING/CHART PRINTING". 


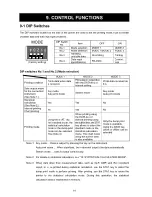
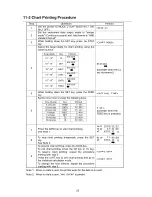
(1) Set the printer DIP switches No.1 and No.2, according to the instrument output mode and the 

printing mode. 


Output mode 

(See Note 1) 

DIP switch 

No.1 

DIP switch

No.2 

Mode 

selection 

Printer 

Printing mode 

(See Note 2) 

Key mode 
or 
Auto print 
mode 

OFF OFF MODE 

Standard mode 
Statistical calculation mode 
or 
Dump print mode (See Note 3)

Stream mode 

ON OFF 

MODE 

Standard mode 
or 
Statistical calculation mode 

Note 1:  key mode … Data is output by pressing the key on the instrument. 


Auto print mode … When stabilized, the instrument outputs the data automatically. 


Stream mode … Data is output continuously. 

 
Note 2: In the standard mode or the statistical calculation mode, select A&D standard 

format for the instrument output format. 

 
Note 3:  In the dump print mode using MODE 3 (DIP switch No.2 ON), the DATA key is 

available for switching between online and offline. In the dump print mode using 

MODE1, switching between online and offline is not available. 


When only input data is to be printed, setting the printer to MODE 3 is recommended. 

 
(2) Use the STAT. key to change the printing mode as necessary. The printing mode can be 

identified by the status of the statistical calculation mode LED. 


Printing mode 

Status of the statistical calculation mode LED 

Standard mode 

OFF 

Statistical calculation mode 

Red 

Dump print mode   
(Only MODE 1 is available.) 

Green 

 
(3) When the printer is set to MODE 2, press the DATA key on the printer to print. Otherwise, use 

the key on the instrument to print. 

 
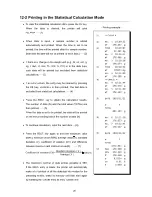
(4) When the printing mode is statistical calculation, press the RSLT. key to print number of 

operations and total weight data. Press the RSLT. key again to print the maximum value, 
minimum value, average value, standard deviation, coefficient of variation ((standard 
deviation/average)*100), and range (difference between maximum and minimum). 

See "12-2 Printing in the Statistical Calculation Mode" for details. 

Summary of Contents for AD-8121B

Page 1: ...AD 8121B Compact Printer INSTRUCTION MANUAL 1WMPD4000758A...

Page 2: ...duced transmitted transcribed or translated into any language in any form by any means without the written permission of A D Company Ltd The contents of this manual and the specifications of the instr...

Page 3: ...hes 14 9 2 Example of Each Mode Setting 16 9 3 Keyboard 17 9 4 Printing Format 19 10 CALENDAR CLOCK FUNCTION 20 10 1 Setting the Date Time 20 10 2 Date Time Setting Procedure 22 11 INTERVAL PRINTING C...

Page 4: ...r enters the date setting mode To select whether or not to print the date press the CL key Each time the CL key is pressed the setting is switched between No printing and Printing When Printing is sel...

Page 5: ...rom A D s electronic balances scales indicators the moisture analyzer viscometer and other instruments produced by A D that specify the AD 8121B as the printer of choice Hereafter these will be referr...

Page 6: ...eceptacle type 2 2 Accessories Sold separately Option Accessories Sold separately PP Note The foot switch is shipped without a connector Connect a plug AX KO980 S100 to the foot switch cable to make a...

Page 7: ...m being struck or having an excessive force applied to it during its operation Do not attempt to disassemble it Be sure to connect disconnect the cables only when the power is OFF Only use the specifi...

Page 8: ...n by pressing the foot switch connect the plug to the foot switch and then insert the plug into the EXT P jack The foot switch will function in the same way as the DATA key on the printer keyboard Plu...

Page 9: ...perated using the AC adapter the batteries need not be installed The batteries provided with the printer are for testing the printer s performance and may have a shorter life Step 1 Open the battery b...

Page 10: ...R 6 1 Installing the Ink Ribbon Cassette Step 1 Slide the printer paper cover in the direction of the arrow 1 then remove it in the upward direction 2 Step 2 Push the printer cover at the spot marked...

Page 11: ...e ink ribbon cassette supplied with your printer To remove the ink ribbon cassette push the cassette at the spot marked PUSH Step 4 Replace the printer cover and printer paper cover in the reverse ord...

Page 12: ...the Printer Paper Step 1 Slide the printer paper cover in the direction of the arrow 1 then remove it in the upward direction 2 Step 2 Push the printer cover at the spot marked by the arrow 1 Remove t...

Page 13: ...folds from the paper if there are any Step 4 Turn on the power Press the FEED key while lightly feeding the printer paper edge into the paper inlet until it comes out of the outlet an appropriate len...

Page 14: ...e the AD8121 01 adapter cable and the connection cable Set the DIP switch No 4 ON current loop See 9 1 DIP Switches for details Set the baud rate of the instrument to 2400 bps 2 Connecting the specifi...

Page 15: ...o the battery polarity See 5 INSTALLING THE BATTERY for details Only use alkaline batteries Manganese batteries offer inadequate power to operate the printer A new battery will last about 3500 data op...

Page 16: ...de the statistical calculation mode or the dump print mode can be selected See Note 3 When printing using the DATA key or interval printing using the built in timer the STAT key allows to select the s...

Page 17: ...calculation mode how to handle unstable data depends on the setting of the DIP switch No 3 When No printing is selected with DIP switch No 3 set to the OFF position Both modes Unstable data will be p...

Page 18: ...utput format Note 3 In the dump print mode using MODE 3 DIP switch No 2 ON the DATA key is available for switching between online and offline In the dump print mode using MODE1 switching between onlin...

Page 19: ...ss the FEED key to feed one line If you hold this key down the printer paper is fed continuously STAT Statistical data selection key 1 MODE 1 Selects the standard mode the statistical calculation mode...

Page 20: ...ls the chart printing and interval printing Used with other keys as follows 1 In MODE 2 hold down the SET key and press the FEED key to activate the interval setting mode 2 In MODE 2 hold down the SET...

Page 21: ...23 45 g Unstable Minus Gram W T 1 1 1 1 1 2 3 4 5 g g g QT 00004567 PC Stable Plus Counting Q T 1 1 1 1 1 1 1 4 5 6 7 g P C US 00005678 PC Unstable Minus Counting Q T 1 1 1 1 1 1 5 6 7 8 g P C ST GS 0...

Page 22: ...ot to print the date and time can be selected The date and time will be printed on separate lines In the statistical calculation mode the date is printed before printing the statistical calculation re...

Page 23: ...ey is pressed the target digit of the setting value is decreased by one See Note 1 CL Clear key Selects whether or not to print the date and time During Printing status the green LED on the panel will...

Page 24: ...change the printing order M D Y 11 22 2003 Press the DATA key To print data for checking M D Y 11 22 2003 Press the RSLT key To shift 1 digit to the right M D Y 11 22 2003 Press the STAT key To increa...

Page 25: ...key To decrease the digit by 1 13 56 32 Press the DATA key To print data for checking 13 56 32 Press the RSLT key To shift 1 digit to the right 13 56 32 Press the STAT key To increase the digit by 1 1...

Page 26: ...interval printing procedure with the date set to be printed Step Operation Printout 1 Set the printer to MODE 2 DIP switch No 1 ON No 2 OFF MODE 2 2 Set the instrument data output mode to stream mode...

Page 27: ...op chart printing temporarily press the SET key See Note 2 STOP11112 40 08 WT1118335 1411g To resume chart printing press the DATA key To exit chart printing press the CE key or CL key To resume chart...

Page 28: ...26 Printing Example The below is a printing example in the chart printing mode...

Page 29: ...ally time can be printed for each data 12 1 Selection of Standard Mode or Statistical Calculation Mode To select the standard mode or statistical calculation mode for weight data or counting data pres...

Page 30: ...L is then printed The last data is excluded from statistical calculations 4 Press the RSLT key to obtain the calculation results The number of data N and the total value TOTAL are then printed 5 When...

Page 31: ...code 20 H to 7F H and characters shown below can be printed The specified code is processed as follows 1B H 44 H CR LF Prints the date 1B H 54 H CR LF Prints the time Up to 16 characters can be printe...

Page 32: ...eceived Whether or not to print data is selected alternately each time the DATA key is pressed in MODE 3 Online denotes printable status when data is received and offline denotes non printable status...

Page 33: ...H mm 7 1 W x 6 3 D x 3 2 H inches Weight Main unit Approx 400g 0 88lb Without paper or batteries 14 2 Input Specifications Communication Method RS 232C or current loop Baud Rate 2400 bps Data Bit Leng...

Page 34: ...32 MEMO...

Reviews: