background image

23

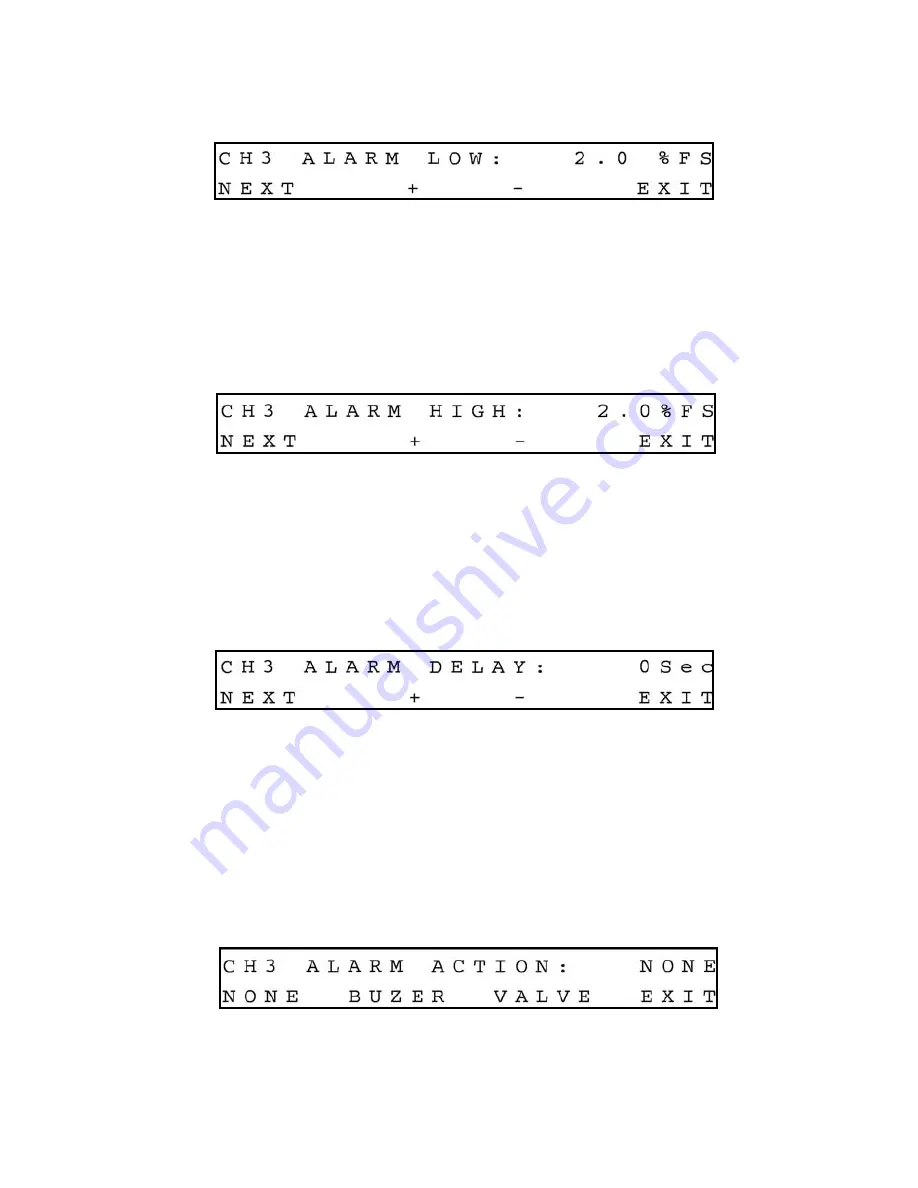
NEXT on the display to go to the Alarm Low settings. The following 

Setup Alarm Low

Display 

will appear.

e.3.8.2  Setup Alarm Low Display

Pressing (+) or (-) will increment or decrement Low Alarm settings per 0.1% F.S.
respectively. If no settings are required for High Alarm press the ENTER button under
EXIT on the display, to go back to the Main Display. Press the ESC button under NEXT
on the display to go to the Alarm High settings. The following 

Setup Alarm Low

Display 

will appear.

e.3.8.3  Setup Alarm High Display

Pressing (+) or (-) will increment or decrement High Alarm settings per 0.1% F.S.
respectively. If no settings are  required for High Alarm press the ENTER button under
EXIT on the display, to go back to the Main Display. Press the ESC button under NEXT
on the display to go to the Alarm Delay settings. The following 

Setup Alarm Delay

Display 

will appear.

3.8.4  Setup Alarm Delay Display

Alarm Delay specifies the time interval in seconds the Alarm conditions have to be True
(without any interruption) before the Alarm will be activated. If zero value is set, the
Alarm will be activated immediately after Alarm conditions are met. Pressing (+) or (-)
will increment or decrement Alarm Delay settings per 1 second respectively. If no set-
tings are required for Alarm Action press the ENTER button under EXIT on the display,
to go back to the Main Display. Press the ESC button under NEXT on the display to go
to the Alarm Action settings. The following 

Setup Alarm Action Display 

will appear.

e.3.8.5  Setup Alarm Action Display

To change Alarm Action in NONE, BUZZER or VALVE, press the button (ESC, UP, DOWN
respectively) directly below the text shown on the display. If Buzzer action is chosen
the audible signal will be activated when Alarm conditions become true.  

Summary of Contents for Command Module

Page 1: ...OPERATING MANUAL SDPROC COMMAND MODULES Technical Data Sheet No TD9704M Rev F Date of Issue August 2010...

Page 2: ...egistered trademark of Aalborg Instruments Controls NOTE Aalborg reserves the right to change designs and dimensions at its sole discretion at any time without notice For certified dimensions please c...

Page 3: ...tus e 2 4 Set Point Display e 2 5 Totalizer Alarm Display e 2 6 Setup Channel Display e 2 6 1 Internal External Program Reference e 2 6 2 Setup Gas Density Display e 2 6 3 Setup Engineering Units Disp...

Page 4: ...isplay e 3 8 4 Setup Alarm Delay Display e 3 8 5 Setup Alarm Action Display e 3 9 Setup Totalizer Display e 3 9 1 Setup Totalizer Mode Display e 3 9 2 Setup Totalizer Start Flow Display e 3 9 3 Setup...

Page 5: ...ss i 3 Configuration i 4 Operation Using the SDPROC Web Page i 5 Operation Using the SDPROC Telnet Console j TROUBLESHOOTING j 1 Common Conditions j 2 Troubleshooting Guide j 3 Technical Assistance AP...

Page 6: ......

Page 7: ...n Authorization Number RAN Equipment returned without an RAN will not be accepted Aalborg7 reserves the right to charge a fee to the customer for equipment returned under warranty claims if the instru...

Page 8: ...in step b 2 4 Important Notes Assure that the Flow Transducer cables are used in accordance with configuration and options purchased In general D Connector numbering patterns are standardized There a...

Page 9: ...the AC power supply receptacle The SDPROC is capable of receiving 85VAC to 240VAC and 50 60Hz power without any need for jumpering or compensation Use only the AC power line cord supplied with the in...

Page 10: ...the back panel of the Command Module RS 232 Software interface commands set allows communications with the unit using either a custom software program or a dumb terminal and provide complete control...

Page 11: ...ctivated by Alarm or Totalizer DIMENSIONS Length 7 75 inch 19 5cm width 6 75 inch 17cm height 4 5 inch 11cm WEIGHT 6 00 lbs 1 8kg TRANSDUCER INTERFACE CABLE Flat cable with 15 pin D connector on the e...

Page 12: ...AFC DFC GFM GFC manuals Turn the POWER switch to the ON position A start up display will be briefly visible and will display the type SDPROC configuration for the given unit Remember to allow for prop...

Page 13: ...e are three modes of operation that the mass flow controller can be set for CLOSE will shut off the power to the mass flow controller valve allowing the valve to mechan ically close OPEN will provide...

Page 14: ...irst line on the Display screen indicates the current valve status and flow rate in selected engineering units Pressing the Esc button from the Valve Status Flow Display will dis play Totalizer Alarm...

Page 15: ...and PROGRAM TIMER When complete with settings press the ESC button under EXIT on the display to go to the Density screen The following Setup Gas Density Display will appear e 2 6 2 Setup Gas Density...

Page 16: ...djusted Pressing or will increment or decrement the particular digit respectively The numbers will change from 0 to 9 and next to decimal point Pressing button one more time will change highlighted po...

Page 17: ...ec tively directly below the mode shown on the display Press the ENTER button under EXIT on the display to go back to the Main Display Press the ESC button under NEXT on the dis play to go to the Alar...

Page 18: ...ons have to be removed or Alarm has to be disabled If Valve action is chosen the power to the mass flow controller valve will be shut off allowing the valve to mechanically close If the Valve was shut...

Page 19: ...g units is required if the Totalizer is set to Enabled The engineering unit for Totalizer Stop Volume has to be related to the current active engineering unit If for example current engineering unit i...

Page 20: ...6 press the Enter button under PROG on the display in order to make Program settings The following display will appear There are two program options BATCH and TIMER flow control e 2 9 1 Batch Program...

Page 21: ...the Esc button under EXIT on the display to go to the BATCH control screen The following display will appear BATCH mode control screen with batch disabled The two digit numbers after SE indicate the...

Page 22: ...the flashing cursor to the minutes position When done with time settings press again ENTER but ton to move the flashing cursor to the date position month date and year respec tively Make sure date and...

Page 23: ...alizer Settings screen Pressing the DOWN button will return to the Main Display Totalizer Settings Display One channel SDPROC Press UP one more time to return to the Main Display E 3 MULTI CHANNEL SDP...

Page 24: ...E will shut off the power to the mass flow controller valve allowing the valve to mechan ically close OPEN will provide maximum power to the valve to allow it to open fully This mode is used when ther...

Page 25: ...s flow controller in CLOSE OPEN or AUTO modes press the button UP DOWN ENTER respectively directly below the mode shown on the display First line on the Display screen indicates the current valve stat...

Page 26: ...the Esc button under GENER on the display in order to make General settings The following Internal External Program Reference display will appear e 3 7 1 Internal External Program Reference The INT EX...

Page 27: ...or DN button to change current engineering units The following engi neering units are supported F S SLPM SLPH SCCM SCCH SCFM SCFH SCMM SCMH LBPM LBPH GRPM GRPH If no more settings are required press t...

Page 28: ...will appear Press the ESC button under NEXT on the display or the ENTER button under EXIT on the display to go back to the Main Display e 3 8 Setup Alarm Display Before enabling the Alarm make sure a...

Page 29: ...to the Alarm Delay settings The following Setup Alarm Delay Display will appear 3 8 4 Setup Alarm Delay Display Alarm Delay specifies the time interval in seconds the Alarm conditions have to be True...

Page 30: ...mes equal or more than the Totalizer Start value Totalizer Stop values have to be entered in volume mass based engineering units Totalizer condition becomes valid when the totalized volume is equal or...

Page 31: ...or button When complete with Totalizer Stop Volume settings press the ESC button under NEXT on the display to go to the Totalizer Action screen The following Setup Totalizer Action Display will appear...

Page 32: ...value is 99999 seconds Pressing the button one more time will rollover time settings to zero The same is true for 0 seconds pressing the button will rollover time settings to 99999 seconds Press the E...

Page 33: ...toggle the batch mode to OFF disabled Press the Esc button under EXIT on the display to go to the Main Display e 3 10 2 Timer Program Settings Display The Timer Flow Control allows execution of a cust...

Page 34: ...and Set point settings for as many steps as required for your application 96 is maximum limit When complete with all settings for the Timer pro gram press the Esc button under EXIT on the display to...

Page 35: ...or will increment or decrement the Ratio Value settings per 0 1 F S respectively The number in the upper right corner of the screen represents the total value of the mixture the sum of the ratio valu...

Page 36: ...the Ratio mode the SDPROC will automatically check the adjusted set point for slave channels in order to keep them within the range between 2 0 and 100 F S When complete with ratio settings press the...

Page 37: ...settings press again the ENTER button to move the flashing cursor to the date position month date and year respectively When done with years settings press again the ENTER button to disable Real time...

Page 38: ...nel of the SDPROC Slide the fuse drawer open Replace the defective fuse s with a 2A FF very quick acting fuse Slide the fuse drawer back in Reconnect the AC the power line cord Continue SDPROC operati...

Page 39: ...the SDPROC When the or controls is pressed at least once the following display will appear The display should show the D A value between 3900 and 4095 Save the D A slope parameter by pressing CAL ENTE...

Page 40: ...so will result in incorrect SCALE calibration for channels which are not connected to 5 000 Vdc Press any key when done with 5 000 Vdc connections The following display will appear NOTE The screen abo...

Page 41: ...face 1 Connect the SDPROC to a PC or other DTE type terminal via a standard serial cable no null modem is required 2 Set the communications port parameters on the terminal to 9600 baud 8 data bits 2 s...

Page 42: ...nvalid command is sent the unit will respond with string ERROR where string refers to the characters that were received by the SDPROC NOTE the length of the string has to be at least two characters lo...

Page 43: ...EXTERNAL 2 BATCH 3 TIMER 4 RATIO RF CHANNEL 1 char 1 4 INDEX 1 char 0 4 RF Ch In OK CR LF Ex RF 1 CR LF 4 Set VALVE MODE MODE 0 CLOSE 1 AUTO 2 OPEN VM CHANNEL 1 char 1 4 MODE 1 char 0 2 VM Ch Md OK CR...

Page 44: ...OSE TM CH MODE ACTION OK CR LF Ex TM 1 1 2 OK CR LF 14 Reset TOTALIZER to ZERO TZ CHANNEL 1 char 1 4 TZ CH OK CR LF Ex TZ 2 OK CR LF 15 Read TOTALIZER VOLUME Returns volume in current E U TR CHANNEL 1...

Page 45: ...Ex SRS 0 0 13 CR LF for two channels SDPROC 2 5 Set BATCH properties mode 0 1 loop OFF ON 0 1 number of the step to execute 1 16 BM CHANNEL 1 char 1 4 MODE 0 1 0 DISABLE 1 ENABLE LOOP 0 1 0 DISABLE 1...

Page 46: ...R LF 34 Set Instrument Subnet Mask Subnet mask string must have decimal notation example 255 255 255 0 maximum 15 characters are allowed SMC Subnet Mask String XXX XXX XX X XXX SMC XXX XXX XXX OK CR L...

Page 47: ...5 characters Host Name max 25 characters DHC Domain Host OK CR LF 43 Read current settings for Domain Name and Host Name DHS Domain Name aalborg com CR LF Host Name sdproc CR LF 44 Set the DHCP flag w...

Page 48: ...s ARP HTTP WEB Server DHCP DNS and Telnet protocols i 2 1 DHCP DHCP Dynamic Host Configuration Protocol enables an individual device to extract their IP configuration from the DHCP server If DHCP is e...

Page 49: ...dress that is in the same range as the SDPROC s IP address 192 168 1 X where X may be any number from 1 to 254 NOTE Make sure your PC s Subnet Mask is 255 255 255 0 If the factory default address is a...

Page 50: ...ll be displayed 44 Figure i 3 Network Password Page d Enter User Name and Password and click OK NOTE The SDPROC is shipped with default User Name user and Password password For network security purpos...

Page 51: ...Console Telnet stands for Telecommunication Network it is a protocol that provides a way for users to connect to computers or servers on a network The Windows Operating System includes the Telnet prog...

Page 52: ...hipment Should you feel that the instrument is not functioning properly please check for the following common condi tions first Are all cables connected correctly Is the power supply correctly selecte...

Page 53: ...ol pins 8 and 12 NOTE Connect and disconnect any interface cable only when the SDPROC is powered off Mass flow controller does not respond to set point adjustment 15 pin interface cable is incorrect t...

Page 54: ...48 APPENDIX 1 COMPONENTS DIAGRAM SDPROC MAIN PC BOARD...

Page 55: ...APPENDIX 2 DIMENSIONAL DRAWING 49 SDPROC COMMAND MODULE...

Page 56: ...r and to equipment and it is deemed the responsibility of the customer that only operators with basic knowledge of the equipment and its limitations are permitted to control and operate the equipment...

Reviews: