background image

A A E O N   O p e r a t o r   P a n e l    

A O P - 8 0 6 0


AOP-8060 Series User Manual 

               18   

Panel Mount Installation 

The display panel can be mounted into the wall. You will need the screws along 

with the mounting brackets, which be packed in the accessory box. Follow the 

steps below: 

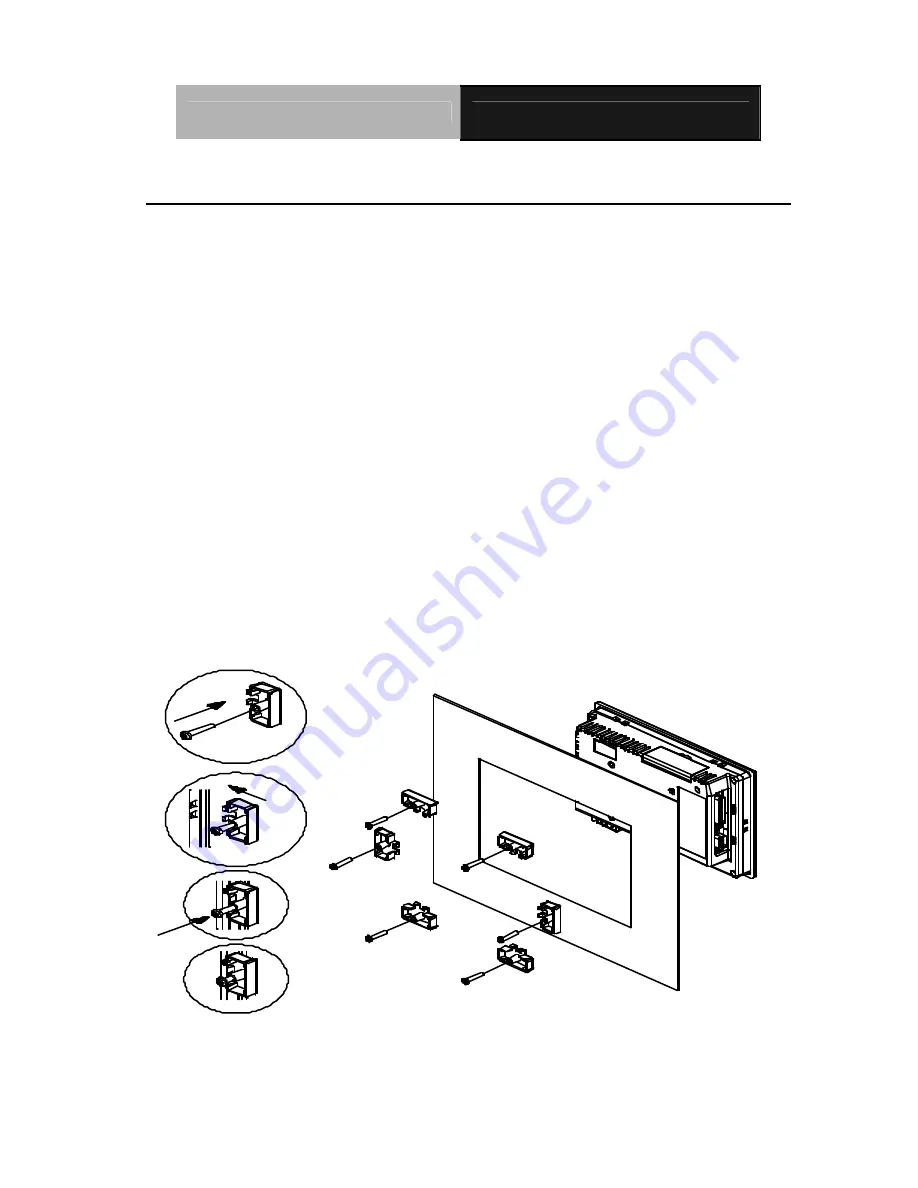
Before you start to follow the instructions, please place the display panel into the 

wall. See the following illustration on the left. 


Step 1: Place the mounting brackets and plug the screw. 

Step 2: Aim the mounting set at the hole on the monitor. 

Step 3: Fix the monitor with the mounting set by screwing it. 

Step 4: You’ve completed the preliminary when the mounting set is tightened. 

Next, repeat the steps and tighten all mounting set around the monitor 

until the monitor is firmly mounting on the wall. 


Summary of Contents for AOP-8060

Page 1: ...AAEON Operator Panel A O P 8 0 6 0 AOP 8060 Series User Manual 1 AOP 8060 SiS 550 SoC 200MHz Processor Based Fanless Operator Panel PC with 5 7 STN LCD AOP 8060 Manual 1 st Ed Sep 2004...

Page 2: ...n provided in this manual is intended to be accurate and reliable However the original manufacturer assumes no responsibility for its use nor for any infringements upon the rights of third parties whi...

Page 3: ...rporation Intel and Pentium are trademarks of Intel Corporation Microsoft Windows is a registered trademark of Microsoft Corporation RTL is a trademark of Realtek Semi Conductor Co Ltd ESS is a tradem...

Page 4: ...please make sure that the following materials have been shipped 1 AOP 8060 series Fanless Panel PC 1 CompactFlash storage card 1 PS 2 Y type keyboard mouse cable 1 CD ROM for manual in PDF format and...

Page 5: ...lithium battery 2 Packing please carry the unit with both hands handle with care 3 Maintenance to properly maintain and clean the surfaces use only approved products or clean with a dry applicator 4...

Page 6: ...g it fall may cause damage 7 The openings on the enclosure are for air convection Protect the equipment from overheating DO NOT COVER THE OPENINGS 8 Make sure the voltage of the power source is correc...

Page 7: ...been dropped and damaged f The equipment has obvious signs of breakage 15 DO NOT LEAVE THIS EQUIPMENT IN AN UNCONTROLLED ENVIRONMENT WHERE THE STORAGE TEMPERATURE IS BELOW 20 C 4 F OR ABOVE 60 C 140 F...

Page 8: ...nowledgments 3 Packing List 4 Safety Warranty 6 General Information 9 Introduction 10 Specification 11 Dimension 16 Hardware Installation 17 Panel Mount Installation 18 Digital I O Connector CN14 20 C...

Page 9: ...AAEON Operator Panel A O P 8 0 6 0 AOP 8060 Series User Manual 9 General Information Chapter 1...

Page 10: ...In addition its fit anywhere design makes it very flexible and able to be used in many different kinds of installations It can be wall mounted panel mounted or DIN Rail mounted For system integrators...

Page 11: ...00 10 100Base Tx RJ 45 connector x 1 I O Port 2 serial ports 1 x RS 232 D SUB 9 connector 1 x RS 232 422 485 D SUB 25 connector 1 parallel port supports ECP EPP 1 PS 2 mouse and keyboard port 2 USB 1...

Page 12: ...Operating Temperature 32 104 0 40 Storage Temperature 4 140 20 60 Operating Humidity 10 to 90 35 non condensing Vibration 1G 0 05 Swept Sine 10 15Hz Operation 80 min for each X Y Z axis Shock 15G pea...

Page 13: ...CD products are manufactured with High precision technology However in all LCD panels there maybe a small number of defective pixels that do not change color This is a normal occurrence for all LCD di...

Page 14: ...Panel A O P 8 0 6 0 AOP 8060 Series User Manual 14 IP65 certified front panel with touch screen DC inlet Base T Ethernet connector Parallel Port PS 2 keyboard Mouse Dual USB ports Line out 12VDC 24VD...

Page 15: ...AAEON Operator Panel A O P 8 0 6 0 AOP 8060 Series User Manual 15 VESA 75mm screw holes RS 232 port RS 232 422 485 25 pin port Digital I O CompactFlash Type II socket...

Page 16: ...AAEON Operator Panel A O P 8 0 6 0 AOP 8060 Series User Manual 16 Dimension...

Page 17: ...AAEON Operator Panel A O P 8 0 6 0 AOP 8060 Series User Manual 17 Hardware Installation Chapter 2...

Page 18: ...follow the instructions please place the display panel into the wall See the following illustration on the left Step 1 Place the mounting brackets and plug the screw Step 2 Aim the mounting set at the...

Page 19: ...AAEON Operator Panel A O P 8 0 6 0 AOP 8060 Series User Manual 19 Complete Illustration...

Page 20: ...6 0 AOP 8060 Series User Manual 20 Digital I O Connector CN14 Pin Signal 1 Input 1 Output 1 2 Input 2 Output 2 3 Input 3 Output 3 4 Input 4 Output 4 5 Input 5 Output 5 6 Input 6 Output 6 7 Input 7 Ou...

Page 21: ...D1 2 RXD1 3 TXD1 4 DTR1 5 GND 6 DSR1 7 RTS1 8 CTS1 9 RI1 COM 2 Connector CN10 Pin Signal Pin Signal 1 N C 2 N C 3 N C 4 N C 5 N C 6 N C 7 DTR2 8 N C 9 RI2 10 485TX 11 485TX 12 N C 13 N C 14 TXD2 15 RX...
Page 22: ...AAEON Operator Panel A O P 8 0 6 0 AOP 8060 Series User Manual 22 Win CE Installation Chapter 3...

Page 23: ...ooting files in the package Insert CD and blank CF card to your PC 2 Boot up your PC with the CD 3 After the successful boot up make sure where the CF card is Disk C D E F etc and then key in SYS X X...

Reviews: