Aaeon AHP-1122 User Manual Download Page 10

Touch Panel PC 

A H P - 1 1 2 2


Chapter 1 General Information 

1- 2 

1.1 Introduction 

The AHP-1122 operator panel is an Intel

®

 Atom™ D510 1.66 GHz 

processor computer that is designed to serve as a human machine 
interface (HMI). It is a PC-based  system with 12.1" color TFT LCD 
display, onboard Ethernet controller, multi-COM port interfaces and 
an  audio co ntroller.  With a built-in  CompactFlash  socket, the  
AHP-1122  is as com pact  and user friendly as a 

multi-function 

computer.  In addition, its "fit 

anywhere"  design  makes  it very 

flexible and able to be used in many different kinds of installations. 
It can be VESA 75 wall mounted. 
 
For system integrators, this simple, complete, compact and highly 
integrated system let you easily bui ld an operator panel into your 
applications.  Common  industrial  applications  include  factory 
automation systems, precision machinery, and production process 
control.  It is also  suitable  for many  non-industrial  applications, 
including vending machine, and car park automation. Our operator 
panel  is  a reliable, cost -effective  solution  to you r  application's 
processing requirements. 

Summary of Contents for AHP-1122

Page 1: ...Touch Panel PC A H P 1 1 2 2 AHP 1122 Onboard Intel Atom D510 1 6 GHz Processor Touch Panel PC With 12 1 TFT LCD AHP 1122 Manual 1st Ed November 2010...

Page 2: ...intended to be accurate and reli able However the original manufacturer assumes no responsibility for its use or for any infringements upon the rights of third parties that may result from its use The...

Page 3: ...s AMI is a trademark of American Megatrends Inc Intel and Atom are trademarks of Intel Corporation Microsoft Windows is a registered trademark of Microsoft Corp IBM PC AT PS 2 and VGA are trademarks o...

Page 4: ...sure that the following materials are enclosed z AHP 1122 Touch Panel PC z Phoenix Terminal Block z Mounting brackets and screws z CD ROM for manual in PDF format and drivers If any of these items sho...

Page 5: ...NOT COVER THE OPENINGS 8 Make sure the voltage of the power source is correct before connecting the equipment to the power outlet 9 Position the power cord so that people cannot step on it Do not pla...

Page 6: ...PMENT FCC This device complies with Part 15 FCC Rules Operation is subject to the following two conditions 1 this device may not cause harmful interference and 2 this device must accept any interferen...

Page 7: ...Touch Panel PC A H P 1 1 2 2 vi Below Table for China RoHS Requirements Panel PC Workstation Pb Hg Cd Cr VI PBB PBDE O SJ T 11363 2006 X SJ T 11363 2006...

Page 8: ...1 6 Chapter 2 Hardware Installation 2 1 Panelmount Installation 2 2 2 2 COM 1 2 RS 232 422 485 Serial Port Connector 2 4 2 3 CompactFlash Installation 2 5 2 4 Hard Disk Drive Installation 2 6 Chapter...

Page 9: ...Touch Panel PC A H P 1 1 2 2 Chapter 1 General Information 1 1 General Chapter 1 Information...

Page 10: ...i function computer In addition its fit anywhere design makes it very flexible and able to be used in many different kinds of installations It can be VESA 75 wall mounted For system integrators this s...

Page 11: ...ed memory up to 224 MB z I O Port USB2 0 x 4 RS 232 x 1 RS 232 422 485 x 1 LAN x 2 VGA x 1 z Storage Disk Drive CompactFlash slot x 1 Internal 2 5 SATA Hard Disk Drive x 1 z Expansion PCI Express Mini...

Page 12: ...ture 32o F 122o F 0o C 50o C z Storage Temperature 4o F 140o F 20o C 60o C z Operating Humidity 5 to 90 40o C non condensing z Vibration 3 g rms 5 500Hz Operation With Hard Disk Drive z Shock 20 G pea...

Page 13: ...1 1 2 2 Chapter 1 General Information 1 5 z Backlight LED z Backlight MTBF Hours 50 000 60 000 Touch Screen z Type 5 wire analog resistive z Resolution 2048x2048 z Light Transmission 80 z Lifetime 35...

Page 14: ...Touch Panel PC A H P 1 1 2 2 Chapter 1 General Information 1 6 1 3 Dimension Cutout Size 303mm x 229mm...

Page 15: ...Touch Panel PC A H P 1 1 2 2 Chapter 2 Quick Installation Guide 2 1 Hardware Installation Chapter 2...

Page 16: ...the instructions please place the display panel into the wall See the following illustration on the left Step 1 Place the mounting brackets and plug the screw Step 2 Aim the mounting set at the hole o...

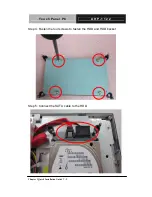
Page 17: ...Touch Panel PC A H P 1 1 2 2 Chapter 2 Quick Installation Guide 2 3 Complete Illustration...

Page 18: ...rt Connector COM1 D sub 9 male 5 4 2 1 9 8 6 7 Pin Signal Pin Signal 1 DCD 2 RXD 3 TXD 4 DTR 5 GND 6 DSR 7 RTS 8 CTS 9 RI COM2 RS 232 422 485 D sub 9 male 5 4 2 1 9 8 6 7 Pin Signal Pin Signal 1 DCD 4...

Page 19: ...H P 1 1 2 2 Chapter 2 Quick Installation Guide 2 5 2 3 CompactFlash Installation Step 1 Loose the screws on the rear cover to open the AHP 1122 Step 2 Unfasten the three screws to take out the heat si...

Page 20: ...PC A H P 1 1 2 2 Chapter 2 Quick Installation Guide 2 6 Step 3 Insert the CompactFlash card to the CompactFlash slot 2 4 Hard Disk Drive Installation Step 1 Loose the screws on the rear cover to open...

Page 21: ...Touch Panel PC A H P 1 1 2 2 Chapter 2 Quick Installation Guide 2 7 Step 2 Unfasten the screws on the HDD bracket Step 3 Insert the SATA HDD...

Page 22: ...Touch Panel PC A H P 1 1 2 2 Chapter 2 Quick Installation Guide 2 8 Step 4 Fasten the four screws to fasten the HDD and HDD backet Step 5 Connect the SATA cable to the HDD...

Page 23: ...Touch Panel PC A H P 1 1 2 2 Chapter 3 AMI BIOS Setup 3 1 AMI Chapter 3 BIOS Setup...

Page 24: ...against the values stored in the CMOS memory If they do not match the program outputs an error message You will then need to run the BIOS setup program to set the configuration information in memory...

Page 25: ...n when the power is turned off Entering Setup Power on the computer and press Del or F2 immediately This will allow you to enter Setup Main Set the date use tab to switch between date elements Advance...

Page 26: ...Touch Panel PC A H P 1 1 2 2 Chapter 4 Driver Installation 4 1 Driver Chapter 4 Installation...

Page 27: ...drivers and utilities that meet your needs Follow the sequence below to install the drivers Step 1 Install Chipset Driver Step 2 Install VGA Driver Step 3 Install LAN Driver Step 4 Install Touch Panel...

Page 28: ...4 The system will help you install the driver automatically Step 2 Install VGA Driver 1 Click on the STEP2 VGA folder and select the OS folder your system is 2 Double click on the Setup exe located i...

Page 29: ...ed in each OS folder 3 Follow the instructions that the window shows 4 The system will help you install the driver automatically Step 5 Install WiFi and Bluetooth Driver 1 Click on the STEP5 WIFI BLUE...

Reviews: