background image

—  4 —

Checking the Batteries power

To check the battery power, right-click the mouse icon 

 in the Taskbar.

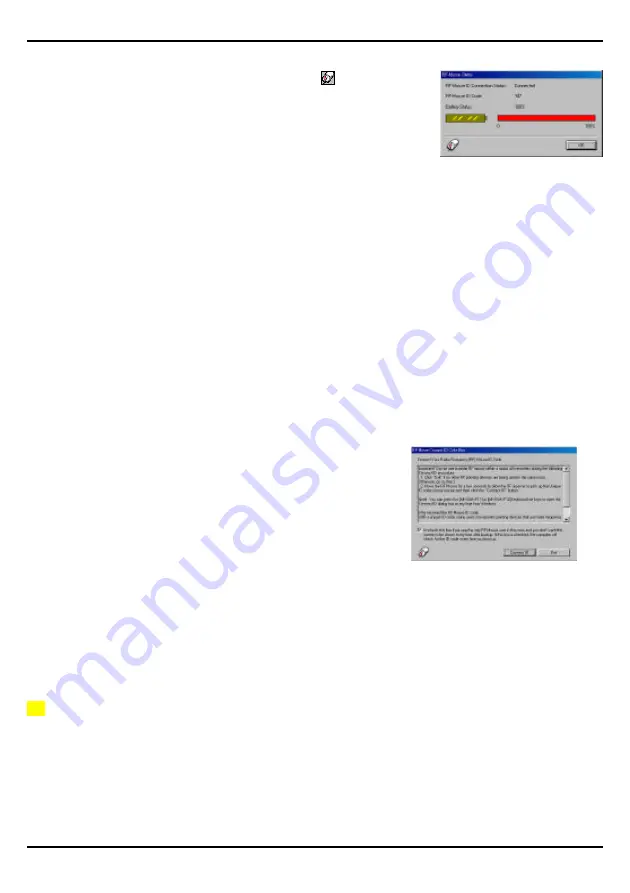
Choose the “Check RF-Mouse Status” option to display the RF-Mouse
Status window. The current battery percentage charge is shown.

Installing the Mouse Software

Before you can take advantage of the many features your mouse offers, you must install the driver.  The driver is
on the installation diskette that came packaged with your mouse.

Windows 95/98/2000/NT4.0/ME/XP installation

1.


Connect the mouse to your computer.

2.


Insert the installation diskette into your floppy disk drive.

3.


Click the 

Start

 button and then click 

Run

.

4.


In the 

Run

 dialog window, type 

A:\setup

, where “A” is the letter of your floppy disk drive.

5.


Click 

OK

 and follow the instructions on your screen to complete the installation.

The RF-Mouse ID code

Each RF-Mouse is assigned a unique ID code at manufacture, so the receiver only picks up the signal from your
mouse and prevents other RF-Mouse radio signals from operating on your computer. This feature can also be
disabled, allowing other RF-pointing devices to operate your computer.

Connecting the RF-Mouse ID Code

When the driver installation is finished your computer reboots and the RF-
Mouse window (shown on the right) appears.

CONNECT ID:

 Move the RF-Mouse for a few seconds to establish a

connection, then click 

Connect ID

. The unique ID code of your mouse is

recognized and another RF pointing device will not function on your
computer.

Exit: 

Click 

Exit

 if no other RF pointing devices are within 3 meters range

or if you want other RF pointing devices to be able to access your computer.

Changing the RF-Mouse ID Code

You can use a new RF-Mouse on your computer without changing the Radio receiver; you just need to change the ID
code. Refer to the following:

1.


Press [Shift + Alt + F11] or [Shift + Alt + F12] to call up the RF-Mouse ID Code window.

2.


Move the RF-Mouse for a few seconds to establish a connection, then click 

Connect ID

.

3.


The new ID code is Connected and the RF-Mouse window closes.

4.


Click Exit to close the RF-Mouse ID code window.

Identifying Components

The mouse is designed to fit snugly into your hand. The scroll wheel is positioned on the top allowing for easy
operation with the index finger. Standard mouse buttons are positioned to either side of the scroll wheels and
can be reached comfortably with the index and ring fingers. A third button is placed under the vertical wheel
and can be easily clicked by pushing down on the wheel.

The following pages will tell you how to configure the scroll wheels and buttons to suit your specific needs.

Summary of Contents for RFMSW-15

Page 1: ...Radio Mini Wireless Wheel Mouse User s Guide MODEL RFMSW 15 Trademark Recognition Windows Office 97 and MS IntelliMouse are registered trademarks of Microsoft Corp RFMSW 15 ...

Page 2: ...d used in accordance with the instruction may cause harmful interference to radio communication However there is no guarantee that interference will not occur in a particular installation If this equipment does cause harmful interference to radio or television reception which can be determined by turning the equipment off and on the user is encouraged to try to correct the interference by one or m...

Page 3: ...quick start to programs you run frequently And your RF Mouse has a unique ID code so other RF Radio Frequency pointing devices won t affect your system Connecting the RF Mouse Receiver n To connect your mouse receiver to a USB mouse port 1 Locate an available USB mouse port on the back of your computer 2 Insert the USB mouse port connector into the USB mouse port n To connect your mouse receiver t...

Page 4: ...llowing section for more information Selecting the Frequency Channel The RF Mouse operates on two frequency channels To prevent interference when using two RF Mice in close proximity a different frequency channel should be used for each mouse Refer to the following to change the frequency channel for your mouse 1 Set the frequency channel on the receiver to 1 or 2 2 Remove the battery cover from t...

Page 5: ...r reboots and the RF Mouse window shown on the right appears CONNECT ID Move the RF Mouse for a few seconds to establish a connection then click Connect ID The unique ID code of your mouse is recognized and another RF pointing device will not function on your computer Exit Click Exit if no other RF pointing devices are within 3 meters range or if you want other RF pointing devices to be able to ac...

Page 6: ...unterclockwise until it unlocks and remove it 2 Remove the tracking ball 3 Wash the tracking ball with warm water and soap then allow it to dry 4 Use a cotton swab and alcohol to clean the tracking rollers in the housing 5 Replace the tracking ball and the housing cover 6 Rotate the housing cover clockwise until it locks in place ...

Page 7: ...button on the mouse if it is not already assigned Place the cursor in an application Press the mouse button assigned to AutoScroll The AutoScroll icon appears Move the mouse once in the direction you want to scroll The farther you move the pointer from the starting point the faster the scrolling To stop AutoScroll press any mouse button M MO OU US SE E P PR RO OP PE ER RT TI IE ES S S SE ET TT TI ...

Page 8: ...ck the Reverse scrolling direction box to change the scrolling direction when you turn the scroll wheel Select the Scroll or Scroll one page per scroll unit radio button to set the scrolling speed to suit your work habits Executing Net Jump Commands NetJump combines commonly used tasks for Web browsing into one convenient grid and puts them right under the cursor To use NetJump open the Mouse Prop...

Reviews: