background image


Page 5


1.5


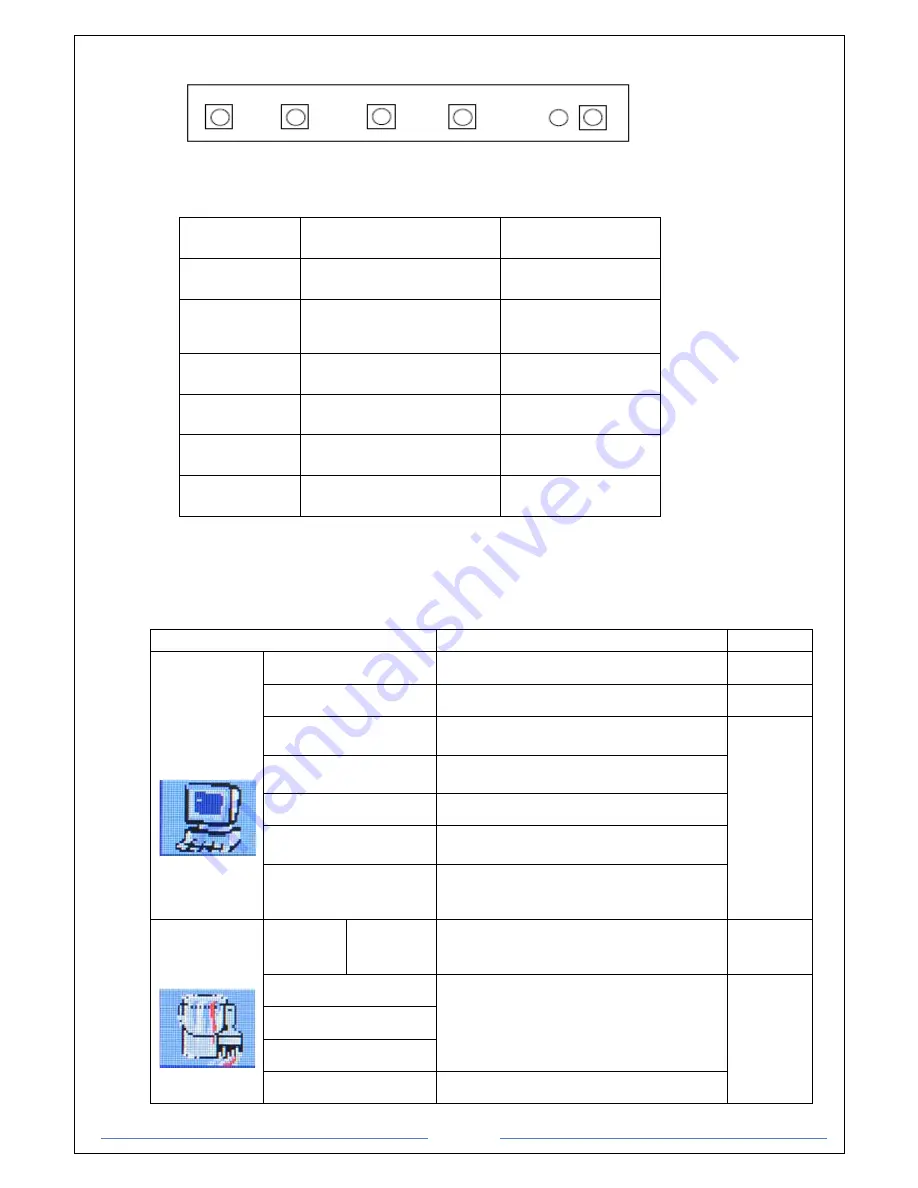
OSD (On-Screen-Menu) 


                           menu         select            down              up                        power 


Button 

Function 

Status 

POWER 

Power ON or OFF 

ON/OFF 

LED 

Indicate working status 

Green:    On 
Red:        Stand-by 
Orange:   No signal 

UP 

Launch OSD Menu or 
add value 

Move to OSD Menu 

DOWN 

Launch OSD Menu or 
add value 

Move to OSD Menu 

SELECT 

Select OSD Menu 


MENU 

On /Off OSD Menu 


1.6


OSD Menu 


OSD Menu 

Description 

Remarks 


Picture 


Brightness 

Adjust the brightness of the screen 


Contrast 

Adjust the contrast of the screen 


H.Position 

Adjust the horizontal position of the 
screen’s image 

Only 
usable on      
analog 
mode 

V.Position 

Adjust the vertical position of the screen’s 
image 

Phase 

Adjust the focus of the screen’s image 

Clock 

Adjust the horizontal size of the screen’s 
image 

Auto adjust 

Automatically adjust the horizontal position, 
vertical position, horizontal size, and phase 
window’s 

 
Color 


Color 
temp 

User 
Reddish 
Bluish 

Control the temperature of the color 


Red 

Control the intensity of the color of screen’s 
image 
(usable when color temperature is USER 
mode.) 

Only 
usable on 
analog 
mode 

Green 

Blue 

Auto color 

Adjust the color balance of the screen 

Summary of Contents for AOD 260

Page 1: ...L AOD ATS 260 metal case touch computer Back with and without cover A1Touch Solution BV 31 0 45 574 81 90 31 0 45 574 81 91 Hogeweg 21 NL 6367 BA Voerendaal info A1TouchSolution nl The Netherlands www...

Page 2: ...User s Manual 1 0 Connection to the computer 1 1 Installation 1 2 Features 1 3 Plug and play function 1 4 Safety Precaution 1 5 OSD On Screen Menu 1 6 OSD Menu 1 7 Specifications 1 8 Contents of the r...

Page 3: ...ge 3 1 Touch Computer User s Manual 1 0 Connection To the Computer 1 1 Installation Mount the unit in position as desired You can adjust the connection for your PC environment via I O panel of compute...

Page 4: ...TRUCTIONS in this manual Please read and comprehend all using directives before use this machine Power Use the type of power indicated on the marking label Adapter Only use an adapter designed of the...

Page 5: ...st of the screen H Position Adjust the horizontal position of the screen s image Only usable on analog mode V Position Adjust the vertical position of the screen s image Phase Adjust the focus of the...

Page 6: ...ical position OSD Timer OSD MENU disappear from over the screen after setting time Transparency Adjust the transparency of the OSD menu Misc Language English French German Spanish Korean Select one of...

Page 7: ...le Harddisk Sata SSD and SATA Harddisk possible VGA Intel 7th generation Gen 7 graphics LAN RJ 45 PCIE x1 Gigabit LAN 10 100 1000 Mb s Realtek RTL8111GR Supports Wake On WAN Supports Wake On LAN Audio...

Page 8: ...stylus Single touch activation force less than 40 gramm SAW Standard glare Touchable with finger and glove Single touch activation force less than 85 gramm Projected Capacitive Standard glare Touchab...

Page 9: ...rn off the power and check the system s power cord AC adapter for proper connection Appear the No Input the Signal Check the connecting of the vga cable on I O panel computer and power on computer App...

Reviews: