a-TroniX 9885123 User Manual Download Page 26

Page 26 09/2021

User Manual Wallbox home, home plus, 
home plus with charging socket and business

a)  Switch on the WLAN router to ensure that the router can establish a normal connection 

to the Internet.

b)  Turn on the smartphone‘s WLAN, connect the smartphone to the router via WLAN and 

make sure that the phone can access the Internet via the router.

c) Install the „esptouch“ APP on your smartphone.

NOTE:

esptouch for iOS download link:

https://apps.apple.com/cn/app/espressif-
esptouch/id1071176700;

esptouch for Android download link: 

https://github.com/EspressifApp/EsptouchForAndroid/
releases/download/v1.1.1/esptouch.apk


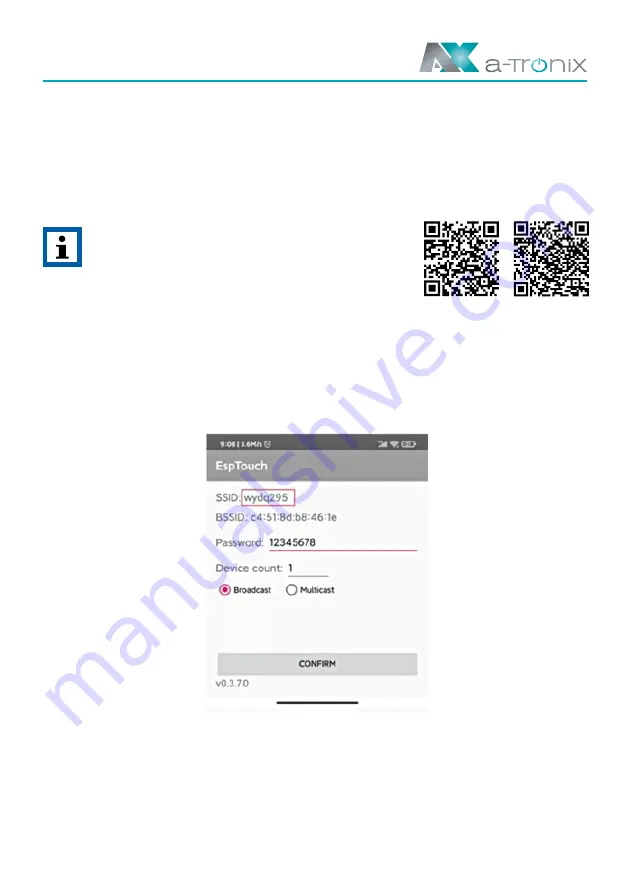
d)  Open the esptouch APP, enter the password for the WiFi network name (shown as Fig. 

6-4), and keep the phone in the esptouch APP, do not exit.

Fig. 6-4 APP interface

e)  Press and rotate to reset the emergency stop button 3 times in a row until the four 

indicator lights turn on in a cycle according to the running lamp mode. At the same 
time, the LCD screen will switch to the WiFi configuration page (shown as Fig. 6-5).

  Click the „CONFIRM“ button of the APP on the smart phone.

(for iOS)

(for Android)

Summary of Contents for 9885123

Page 1: ...ome home plus und business Article Article number a TroniX Wallbox Home 9885132 a TroniX Wallbox Home Plus 9885176 a TroniX Wallbox Home Plus with charging socket 9885739 a TroniX Wallbox Business 988...

Page 2: ...e 2 plug which allows you to charge your vehicle comfortably and safely at any time Read carefully before use Read this manual carefully before installation It contains important regulations and instr...

Page 3: ...connection 11 3 3 2 Case C connection 11 3 4 EU declaration of Conformity 11 4 PRODUCT INFORMATION 12 4 1 General 12 4 2 Block diagram 13 4 3 Product series 13 4 4 Technical specifications 13 4 4 1 El...

Page 4: ...N 21 6 1 Power On 21 6 2 Interface 21 6 2 1 Information 21 6 2 2 LED indicators 22 6 2 3 LCD Display 22 6 2 4 RFID reader 23 6 2 5 Emergency stop button 24 6 2 6 Charging Port Type2 Plug Holder 24 6 3...

Page 5: ...of frequency 8 LCD Liquid Crystal Display 9 LED Light emitting Diode 10 RFID Radio Frequency Identification 11 CMS Central Management System Manages EVSE and has the information for authorizing users...

Page 6: ...ontact area of the charging plug should be checked for dirt and moisture the charging cable should be checked for cuts or abrasions to the insulation and the cable outlet of the charger should be chec...

Page 7: ...is not operated as requested Attention Warning of a danger spot or dangerous situation This sign is intended to alert the user that minor personal injury or material damage can result if the device is...

Page 8: ...the EV Charging station otherwise the equipment may be damaged 2 3 Installation Safety protection must be done when installing the EV Charging station Installation and wiring has to be done by personn...

Page 9: ...Please use our QR code It is strictly prohibited to use the charging station when the charging adapter or charging cables are defective cracked worn broken or the charging cables is exposed If you fin...

Page 10: ...is permanently connected to an AC supply network The charging station the charging cable and the vehicle can mutually announce the maximum possible charging power and the readiness for charging by me...

Page 11: ...ection for the a TroniX Wallbox Home Plus with charging socket 3 3 2 Case C connection Case C connection for the a TroniX Wallbox Home Home Plus and Business articles 3 4 EU Declaration of Conformity...

Page 12: ...he a TroniX series AC EV charging station see Fig 4 1 Fig 4 1 The Shape Dimensions of M3W The AC EV charging station of the a TroniX series provides a friendly user interface with the corresponding co...

Page 13: ...kW 22kW 400V 3 phase 400V 3 phase 400V 3 phase RCCB recommended Type B 25A NDB1C 63C40 Type B 4 Pole 3 Pole 40A 4 Pole The tripping time 10ms 1500A short circuit current Rated maximum Current 16A 16A...

Page 14: ...ety protection Emergency stop button Surge protection over temperature over under voltage over current ground protection 8 RCD inside Yes Type B 4 4 3 Mechanical parameters 1 Mounting Wall mounted 2 C...

Page 15: ...moving please pay attention to the following points to ensure product safety a This product is electrical equipment It should be handled with care to avoid violent vibration and impact b The front pan...

Page 16: ...order requirements If damage or missing parts are found please inform your supplier NOTE If damage or missing parts are found please inform your supplier The packaging is recyclable After unpacking p...

Page 17: ...es 6 Crimping pliers Pressed cable terminal 7 Cross screwdriver Fastening screw 5 3 3 Ambient For further safety instructions see section 2 For further environmental conditions see section 4 4 4 a It...

Page 18: ...box home home plus home plus with charging socket and business Fig 5 1 Mounted the a TroniX series product on the wall Home Home Plus Business Fig 5 1 1 Mounted the a TroniX series product on the wall...

Page 19: ...ox 1 g Pass the input cable through the Input Cable Interface 2 connect the power cable to the Input terminal 5 h Reset the cover of input terminal box 1 Fig 5 3 Wiring 1 Input Terminal Box 4 Accessor...

Page 20: ...me plus with charging socket and business 5 4 3 Step 3 hang on Follow the arrow and hold the Wallbox Accessories 4 on the attachment Fig 5 4 Hang the wallbox on the attachment 5 4 4 Step 4 fixation Ti...

Page 21: ...power supply The POWER indicator light lights up and the charging station switches to standby mode 6 2 Interface 6 2 1 Information As shown in Fig 6 1 the a TroniX series product is equipped with seve...

Page 22: ...Standby State Charging adapter 2 OFF ON OFF OFF is properly connected to the vehicle 3 OFF Twinkle OFF OFF Starting 4 OFF OFF Twinkle OFF Charging Alternately Error Get the error code 5 OFF OFF OFF Tw...

Page 23: ...stop state Fig 6 2 LCD display 6 2 4 RFID reader In general the a TroniX Wallbox is equipped with an RFID card reader as standard and the charging process can be started and stopped using the RFID ca...

Page 24: ...Fig 6 7 c Plug the charging adapter into the mains socket of the electric vehicle and the Connect LED of the charging station lights up d When the charging indicator starts flashing the unit switches...

Page 25: ...y and the adapter can be pulled out NOTE Start and stop charging for a card controlled charging station by holding your card to the RFID reader For an APP controlled charging station start and stop th...

Page 26: ...m cn app espressif esptouch id1071176700 esptouch for Android download link https github com EspressifApp EsptouchForAndroid releases download v1 1 1 esptouch apk d Open the esptouch APP enter the pas...

Page 27: ...l indicator lights start to flash at the frequency of 1 Hz it indicates that the WiFi configuration of charging station is completed At the same time the LCD screen will display Successful and the WiF...

Page 28: ...temperature protection Check whether the branch breaker is tripped and close the breaker after troubleshooting Check whether the connection is correct if the cable comes off should be properly connec...

Page 29: ...sticking Leakage detection circuit error Earth error Error code 16 Power off and restart the device Error code 17 Check whether the charging adapter and its cable are damaged or wet Recover after pull...

Page 30: ...s around the charging pile such as whether there are high temperature corrosion or inflammable and explosive articles close to the charging station d Check whether the join point of the input terminal...

Reviews: